How to Find Your System’s VRAM in Windows 11
This guide shows you how to check your computer’s Video RAM (VRAM) in Windows 11.
Open Settings and navigate to System > Display > Advanced display. Then, click Display adapter properties for Display 1 and check the Adapter Information tab for “Dedicated Video Memory.” Alternatively, run dxdiag and view the Display tab for “Display Memory (VRAM).
Why check your VRAM?
Checking your VRAM, or Video Random Access Memory, is important because it’s the dedicated memory your graphics card uses to store game textures and video effects.
What happens when you are done?
What’s next? After these steps, you’ll know exactly how much dedicated video memory your graphics card has. You will also understand the difference between dedicated and shared memory. This helps you troubleshoot performance issues and ensures your hardware meets the requirements for your favorite apps.
How to find your VRAM in 🪟 Windows 11
You can check your VRAM in Windows 11 using the Settings app. This dedicated memory helps your graphics card run games and other visual tasks smoothly. Knowing your VRAM amount is useful if you’re experiencing performance issues or want to upgrade your system.
1. Open Settings by pressing the Windows key + I on your keyboard, or click Start then Settings.
2. In the System menu, click on the Display tile on the right side of your screen.

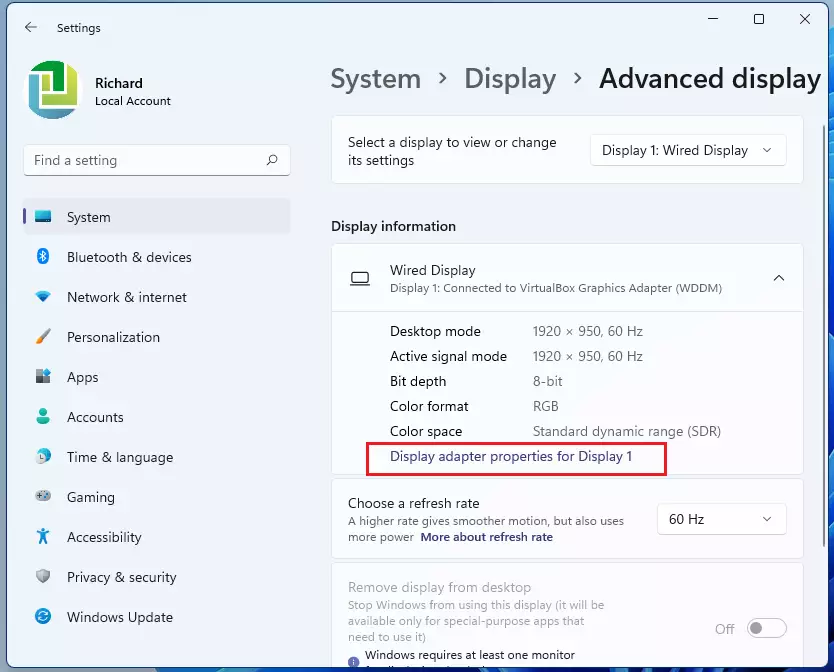
3. Scroll down to the Related settings section and click on Advanced display.

4. Under the Display information section, click on Display adapter properties for Display 1.
5. A new window will pop up. Look at the Adapter Information tab. You will see your Dedicated Video Memory listed here.
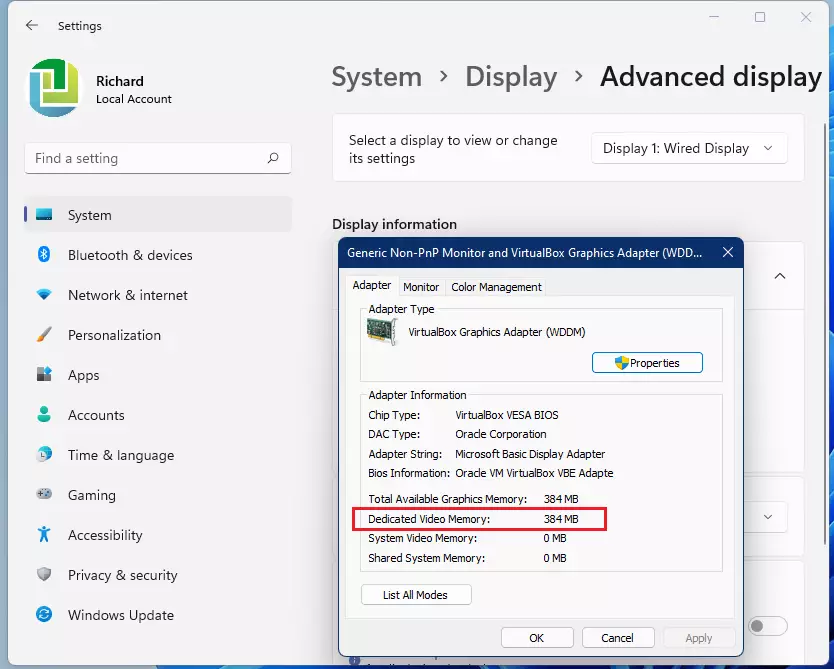
Note: You will see your graphics card brand, such as Nvidia or AMD, listed under Adapter Type. If you see another name, you are likely using integrated graphics.
Using the DirectX Diagnostic Tool (dxdiag)
The DirectX Diagnostic Tool, often called dxdiag, is a simple and accurate way to check your graphics card’s VRAM.
Understanding Dedicated vs. Shared Memory
When checking your graphics memory, you’ll see two types: Dedicated Video Memory, which is built into your graphics card, and Shared System Memory, which your computer can borrow.
Checking VRAM with Task Manager
Task Manager offers a quick way to check your VRAM usage in real-time, showing both dedicated and shared memory.
Can you increase VRAM?
You generally can’t increase the physical VRAM on a dedicated graphics card, but integrated graphics might allow you to allocate more system RAM through your computer’s BIOS.
Summary
VRAM is special memory just for your graphics card, helping it handle games and video editing. Checking your VRAM in Windows 11 is simple and can help you figure out why things might be running slow. You can easily find this information in the Settings app.- VRAM is dedicated memory for your graphics card.
- Checking VRAM helps you diagnose slow performance in games or video editing.
- You can view your VRAM through Settings > System > Display > Advanced display.
- The dxdiag tool and Task Manager are excellent ways to verify your graphics memory.
- If your VRAM is too low, you may need to upgrade your graphics hardware.
Why does my VRAM show as lower than my total RAM?
VRAM and system RAM are different components. VRAM is physically located on your graphics card, while system RAM is on your motherboard. They serve different purposes. Even if you have 32GB of system RAM, your graphics card only has the specific amount of memory it was manufactured with.
Does increasing VRAM in BIOS actually improve gaming performance?
For most users, no. Increasing VRAM allocation in BIOS only helps integrated graphics cards borrow more system RAM. It does not make the graphics chip faster. If you have a dedicated graphics card, you cannot increase its physical VRAM through software or BIOS settings.
How do I check VRAM if I have both an Intel and NVIDIA GPU?
If you have both Intel and NVIDIA GPUs, Task Manager’s Performance tab will show two GPU entries, allowing you to check the specific memory details for each.
Was this guide helpful?

About the Author
Richard
Tech Writer, IT Professional
Richard, a writer for Geek Rewind, is a tech enthusiast who loves breaking down complex IT topics into simple, easy-to-understand ideas. With years of hands-on experience in system administration and enterprise IT operations, he’s developed a knack for offering practical tips and solutions. Richard aims to make technology more accessible and actionable. He's deeply committed to the Geek Rewind community, always ready to answer questions and engage in discussions.
No comments yet — be the first to share your thoughts!