How to Add your Accounts to Microsoft Authenticator
Microsoft Authenticator lets you add your accounts to simplify and secure your logins.
This free mobile app acts as a digital authenticator, generating one-time passcodes (OTPs) and enabling passwordless sign-ins for supported services.
You can add various account types, including your personal Microsoft account (like Outlook.com or Xbox), work or school accounts managed by Microsoft Entra ID, and even non-Microsoft accounts that support TOTP (Time-based One-Time Password) generation, such as Google or Facebook.
Adding accounts to Microsoft Authenticator in 2024 streamlines your digital life by replacing multiple passwords with secure, app-generated codes.
Getting Started with Microsoft Authenticator
First, you need the Microsoft Authenticator app. You can get it for Android and iOS phones. If you don’t have it, download it from your phone’s app store.
Download and Install the App
- Go to the Google Play Store or the Apple App Store.
- Search for “Microsoft Authenticator” and download the app. It’s free.
Tip: Make sure you download the app from Microsoft Corporation. This ensures it’s the real app and is secure.
Adding Your Personal Microsoft Account
This is for your everyday Microsoft account. Use it for Outlook.com, OneDrive, Xbox, and more. Adding it to Authenticator makes signing in faster and more secure.
Option 1: Verify Sign-Ins with the App
This lets you approve sign-ins from your phone, even if you forget your password. It’s a great way to start using the app.
- Sign in to your Microsoft account online: Open a web browser on your computer and go to
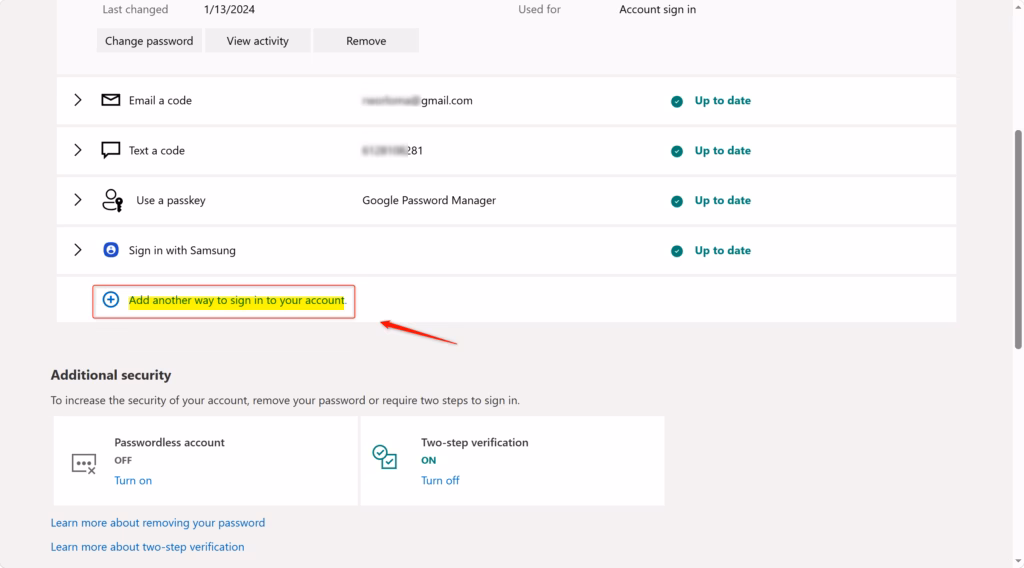
account.microsoft.com/security. Sign in with your Microsoft account details. - Manage your sign-in methods: Once logged in, look for an option like “Manage how I sign in” or “Security basics.” Click it. This shows you all the ways you can prove it’s you when you log in.
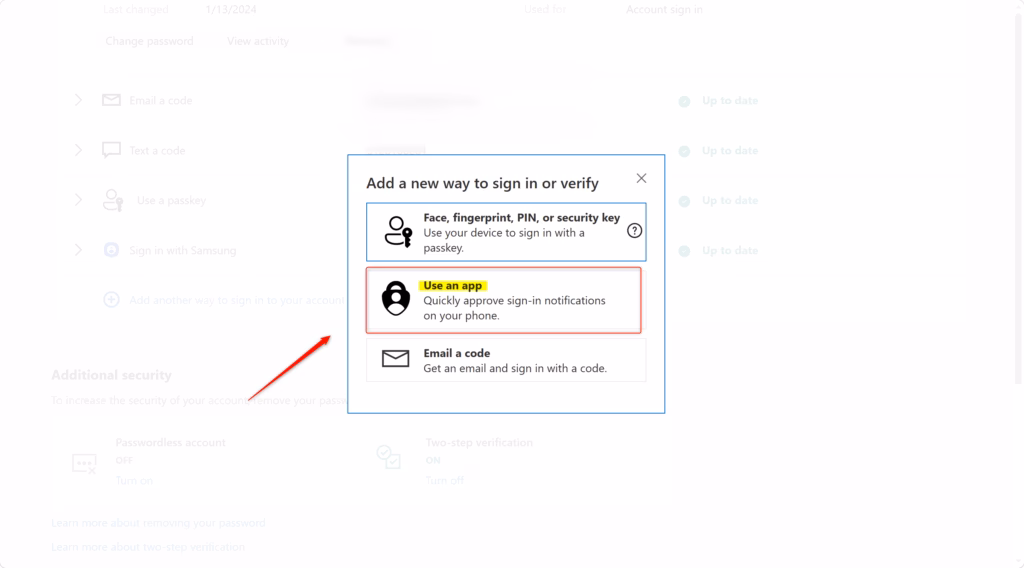
- Add a new verification method: Find and select “Add a new way to sign in or verify.” Choose “Use an app.”
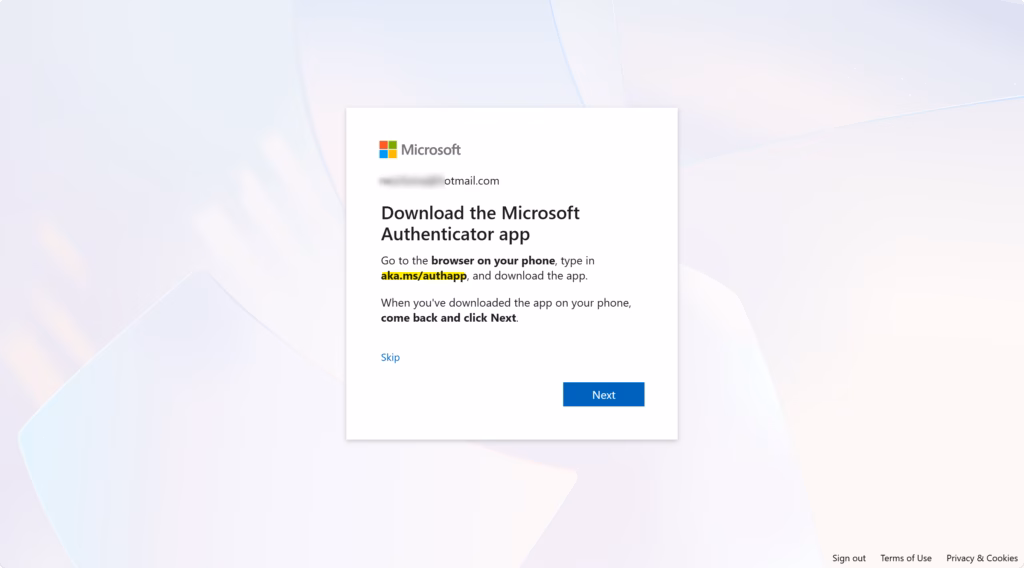
Tip: If you haven’t installed Authenticator on your phone yet, you might see a prompt to “Get it now.” Follow those steps first. If you have the app, you might need to select “Set up a different Authenticator app” or something similar.
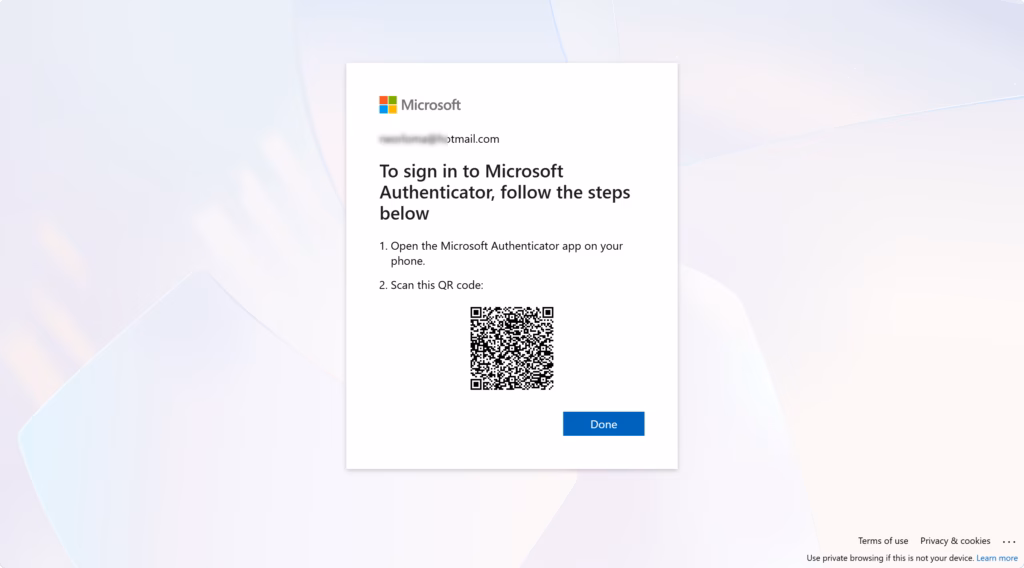
- Set up on your phone: Your computer screen will show a QR code. Open the Microsoft Authenticator app on your phone. Tap the plus icon (+). Select “Personal account,” then choose “Scan a QR Code.”
- Confirm on your computer: Once your phone scans the QR code, the app will add your account. Your computer should then show that setup is complete. You have now linked your personal Microsoft account to Authenticator!
Option 2: Use Authenticator for Two-Step Verification
This makes the app your main way to verify your identity. It adds an extra layer of security. Each time you sign in from a new device or browser, you’ll get a prompt on your phone to approve.
- Go to your security settings: Go to
account.microsoft.com/securityand sign in. - Manage sign-in options: Find and click “Manage how I sign in.”
- Turn on Two-Step Verification: Scroll down to the “Two-step verification” section. Click “Turn on” or “Set up.”
Tip: If you already set up Authenticator using Option 1, this step might be faster. The system will know you have the app.
- Follow the instructions: Microsoft will guide you. This will likely involve scanning a QR code on your computer with your Authenticator app. Select “Personal account” then tap “Scan a QR Code.”
Warning: This QR code is important for security. It makes sure you are the one setting up Authenticator on your phone. Treat it like a password and don’t share it.
- Approve the prompt: After scanning, you will get a notification on your phone through the Authenticator app. Tap “Approve” to confirm.
Option 3: Go Passwordless (The Future is Here!)
Imagine signing in without typing a password. Just a quick tap on your phone. This is what passwordless sign-in with Microsoft Authenticator offers. It’s often the most secure and easiest option.
- Access your security settings: Go to
account.microsoft.com/securityand sign in. - Manage sign-in methods: Select “Manage how I sign in.”
- Enable Passwordless sign-in: Scroll down to the “Passwordless account” section and choose “Turn on” or “Set up.”
- Follow the prompts: You will be guided through a process. This usually involves verifying your identity one last time. Often, you’ll approve a notification sent to your Authenticator app.

Tip: Make sure your Authenticator app is updated for this feature to work well. You might also need to register your device in the app if asked.
Summary
This guide shows you how to set up the Microsoft Authenticator app on your phone. You learned how to add both personal Microsoft accounts and work or school accounts. We covered methods like using QR codes and direct sign-ins. The guide also explained how to enable two-step verification and passwordless sign-in for personal accounts. Finally, common troubleshooting tips for errors and admin restrictions were provided. Using Microsoft Authenticator helps make your online accounts more secure and simplifies the login process.
How do I manually add an account to Microsoft Authenticator?
To manually add an account, open the Microsoft Authenticator app, tap the '+' icon, select 'Other account', and then choose 'Enter code manually'. You'll need to input the account details and the secret key provided by the service you are adding.
Why can't i add an account to Microsoft Authenticator?
Account addition issues can stem from incorrect secret keys, expired QR codes, network connectivity problems, or the service not supporting TOTP. Ensure you have the correct details and a stable internet connection. Some older services might not be compatible.
How to add account in Microsoft Authenticator without QR code?
To add an account without a QR code, open the Authenticator app, tap the '+' icon, select 'Other account', and choose 'Enter code manually'. You will then need to input the account name and the secret key provided by the service.
How do I set up Microsoft Authenticator if I got a new phone?
On your new phone, download and install Microsoft Authenticator. Open the app and select 'Get started'. Choose 'Restore from backup' if you previously backed up your accounts to the cloud. Otherwise, you'll need to re-add accounts manually or via QR codes.
Was this guide helpful?

About the Author
Richard
Tech Writer, IT Professional
Richard, a writer for Geek Rewind, is a tech enthusiast who loves breaking down complex IT topics into simple, easy-to-understand ideas. With years of hands-on experience in system administration and enterprise IT operations, he’s developed a knack for offering practical tips and solutions. Richard aims to make technology more accessible and actionable. He's deeply committed to the Geek Rewind community, always ready to answer questions and engage in discussions.

No comments yet — be the first to share your thoughts!