How to Reinstall Microsoft Print to PDF in Windows 11

You can easily reinstall Microsoft Print to PDF in Windows 11 if it disappears from your printer list or stops functioning.
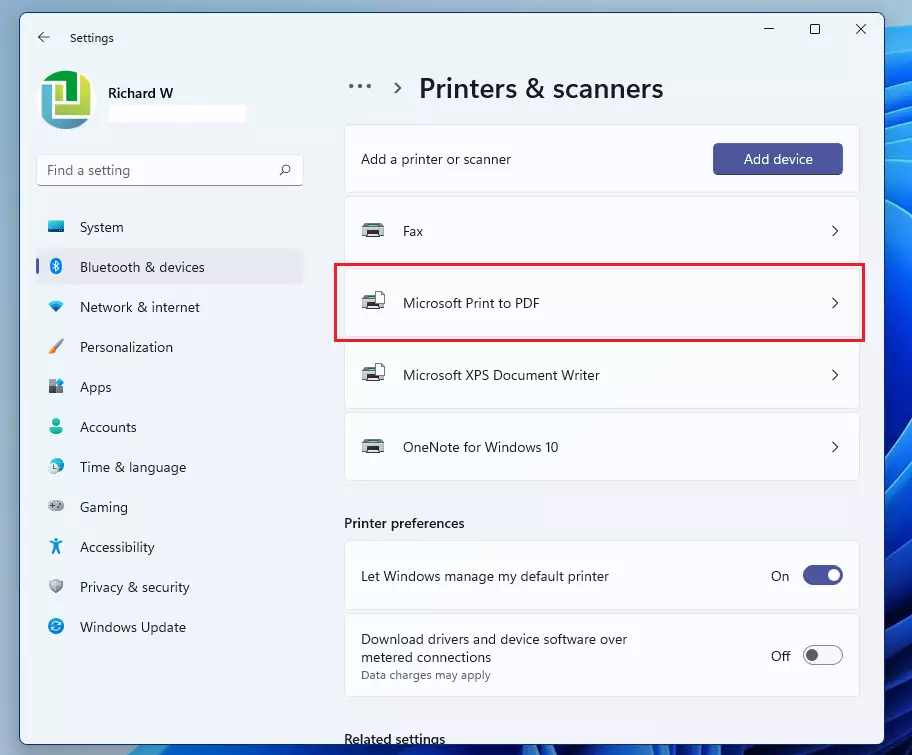
Microsoft Print to PDF is a built-in Windows feature that acts as a virtual printer, allowing you to save any printable document, webpage, or image directly as a PDF file. This is incredibly useful when you need a digital copy but lack a physical printer.
This essential tool is often missing or disabled after major Windows updates, like the ones for Windows 11 version 23H2. Fortunately, you can restore it through the Optional Features settings.
Once reinstalled, you’ll regain the ability to convert files to PDF from any application, ensuring you can always create portable digital documents.
Troubleshooting: Why is the printer missing?
The printer might be missing because of a corrupted printer driver, a stopped Print Spooler service, or a glitch in Windows Features. If the option is greyed out, it often means the system files for the printer are damaged or missing.
Step 1 Restart the Print Spooler Service
The Print Spooler manages all print jobs. If it stops, your printers will disappear. Requires admin privileges.
- Press ⊞ Win+R, type
services.msc, and hit Enter. - Find Print Spooler in the list.
- Right-click it and select Restart.
Step 2Reinstalling via Windows Features
You can try to toggle the feature off and on using the Windows Optional Features menu.
- Open the Start menu and search for Turn Windows features on or off.
- Find Microsoft Print to PDF in the list.
- Uncheck the box , click OK, and restart your computer.
- Go back to the same menu and check the box again to reinstall it.
Step 3Reinstalling via Command Prompt
If the standard menu fails, use the Command Prompt. Requires admin privileges.
Click the Start button and search for Command Prompt. Right-click it and choose Run as administrator.

Type these commands one by one. Press Enter after each line:
net stop spoolerdism /Online /Disable-Feature /FeatureName:"Printing-PrintToPDFServices-Features" /NoRestart
These commands stop your printer service and remove the broken version of the PDF printer from your system.
Next, type these commands to add the feature back and restart the service:
dism /Online /Enable-Feature /FeatureName:"Printing-PrintToPDFServices-Features" /NoRestartnet start spooler
If you still do not see the printer, restart your computer. This usually finishes the setup process.
Advanced Fix: PowerShell Reinstallation
If you prefer PowerShell, you can use the following command to reinstall the feature. Requires admin privileges.
Disable-WindowsOptionalFeature -Online -FeatureName Printing-PrintToPDFServices-Features
Enable-WindowsOptionalFeature -Online -FeatureName Printing-PrintToPDFServices-Features
Summary
- The Microsoft Print to PDF tool is a virtual printer for saving files as PDFs.
- If it goes missing, standard settings menus often cannot fix it.
- We use the Command Prompt with admin privileges to stop the printer service, remove the old feature, and install a fresh copy.
- Always remember to restart your computer if the printer does not appear right away.
- For Windows 11 ARM64 users, ensure your system is fully updated, as driver compatibility is managed automatically by Windows Update.
What if Microsoft Print to PDF is missing from the printer list?
If the printer is missing, it is likely disabled in Windows Features or the driver is corrupted. Try restarting the Print Spooler service first. If that fails, use the Command Prompt method to remove and reinstall the feature, which forces Windows to rebuild the printer driver files correctly.
Why does Microsoft Print to PDF fail to save files?
This usually happens if the Print Spooler service is stuck or if the file path you are saving to has restricted permissions. Ensure you have write access to the folder. If the issue persists, reinstalling the driver via the Print Management console or Command Prompt often resolves the conflict.
Was this guide helpful?

About the Author
Richard
Tech Writer, IT Professional
Richard, a writer for Geek Rewind, is a tech enthusiast who loves breaking down complex IT topics into simple, easy-to-understand ideas. With years of hands-on experience in system administration and enterprise IT operations, he’s developed a knack for offering practical tips and solutions. Richard aims to make technology more accessible and actionable. He's deeply committed to the Geek Rewind community, always ready to answer questions and engage in discussions.


this is working perfectly in windows 11
pls note run as administrator for command window
Please help ! i am not understanding this right! I did work from command prompt as administrator.
typed in the first line exactly and it worked. the message said spooler stopped.
Then i typed in the second line but keep getting error message! Please help me!
Meriha84377@gmail.com
[…] Windows, one can print a document in PDF format from any app with the built-in Microsoft Print to PDF […]