This article explains how to adjust processor scheduling for the best performance in Windows 11.
Processor scheduling is how Windows allocates CPU resources to various processes and threads. It ensures that each program gets the CPU time to execute efficiently, balancing system resources for optimal performance.
In Windows, you can adjust processor scheduling for the best performance of Programs or Background services.
If processor scheduling is adjusted for programs, then Windows allocates more processor resources to foreground programs than background services. If you adjust for background services, Windows allocates more processor resources to background processes.
Adjust processor scheduling in Windows 11
As mentioned, users can optimize the system processor scheduling by adjusting for programs or background services.
Here’s how to do it.
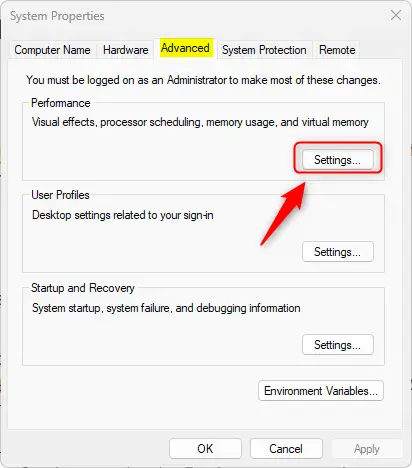
First, open the System Properties (SystemPropertiesAdvanced.exe).
You can open the System Properties by searching for SystemPropertiesAdvanced.exe or clicking Start -> Settings -> System -> About – > Advanced system settings.
On the Advanced tab, click on Settings under the Performance section.
On the “Performance Options” window, under the “Processor scheduling” section, choose one of the options:
Adjust for best performance of:
- Programs
- Background services
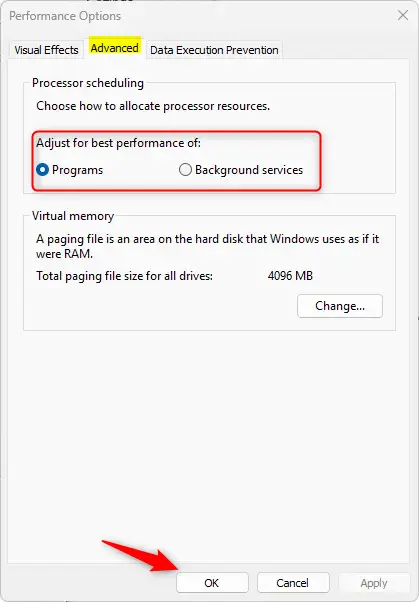
Click the OK button once you’re done with your selection.
Change processor scheduling using the Windows Registry
Another way to change the processor scheduling in Windows is to use the Windows Registry editor.
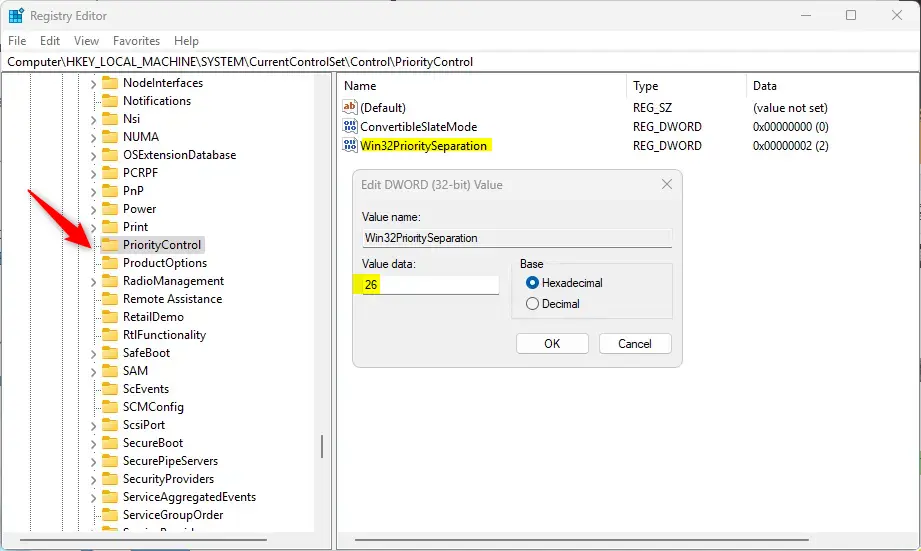
First, open the Windows Registry and navigate to the folder key path below.
Computer\HKEY_LOCAL_MACHINE\SYSTEM\CurrentControlSet\Control\PriorityControl
Right-click PriorityControl > New > DWORD (32-bit) Value and name the new DWORD Win32PrioritySeparation.
Double-click Win32PrioritySeparation and change the value 26 to adjust for programs.
Enter 18 to adjust for background services.
You may have to reboot your computer to apply the changes.
That should do it!
Conclusion:
Adjusting processor scheduling in Windows 11 can significantly enhance your system’s performance based on your needs. Here are the key takeaways:
- Understanding Processor Scheduling: It’s essential to grasp how Windows allocates CPU resources to improve application efficiency.
- Choice of Scheduling: Users can prioritize programs or background services depending on their usage patterns.
- System Properties Adjustment: Modifying settings through System Properties is straightforward and user-friendly.
- Registry Editing: For advanced users, the Windows Registry offers a more granular control of processor scheduling.
- Reboot Required: Remember to reboot your computer to apply changes when modifying settings through the registry.
By strategically adjusting processor scheduling, you can ensure your system operates at its best, tailored to your specific workload.


Leave a Reply