Change Preferred Languages in Microsoft Edge

Preferred languages in Microsoft Edge control which language you see on websites and which languages Edge treats as ones you read. The setting is available in Edge on both Windows 10 and Windows 11. Edge uses your list to decide which version of a site to ask for first, and which pages it should offer to translate.
You can add several languages and sort them by importance at edge://settings/languages. You can also reach the page through Settings Languages. Edge then asks translation services to show web pages in your top choice whenever a site supports it. The change applies to Edge only. It does not touch the Windows display language or the keyboard layouts you have installed.
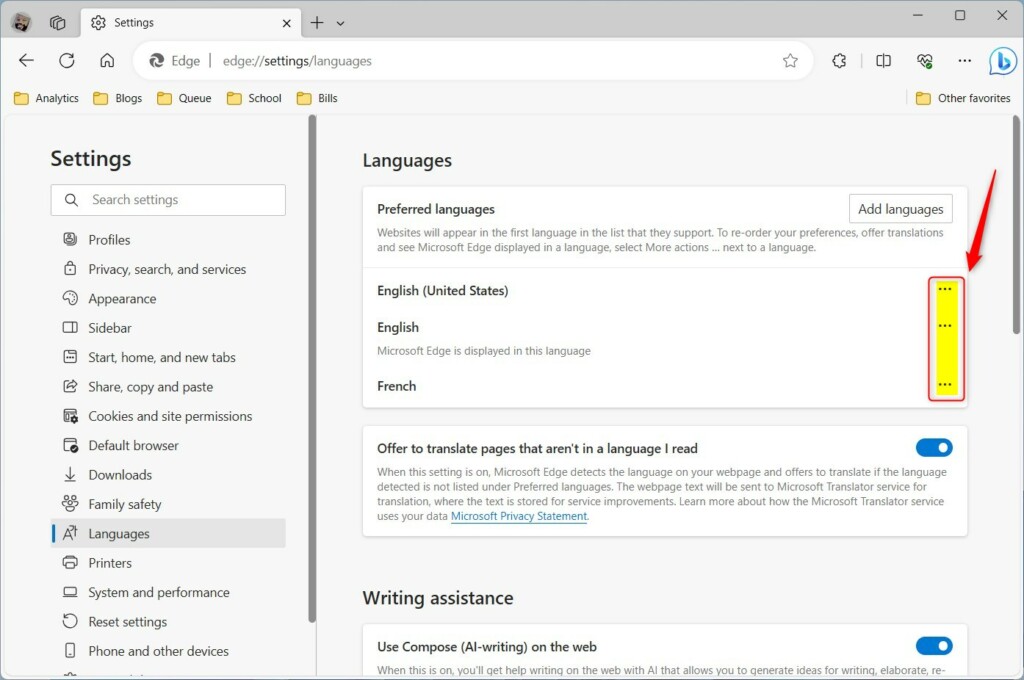
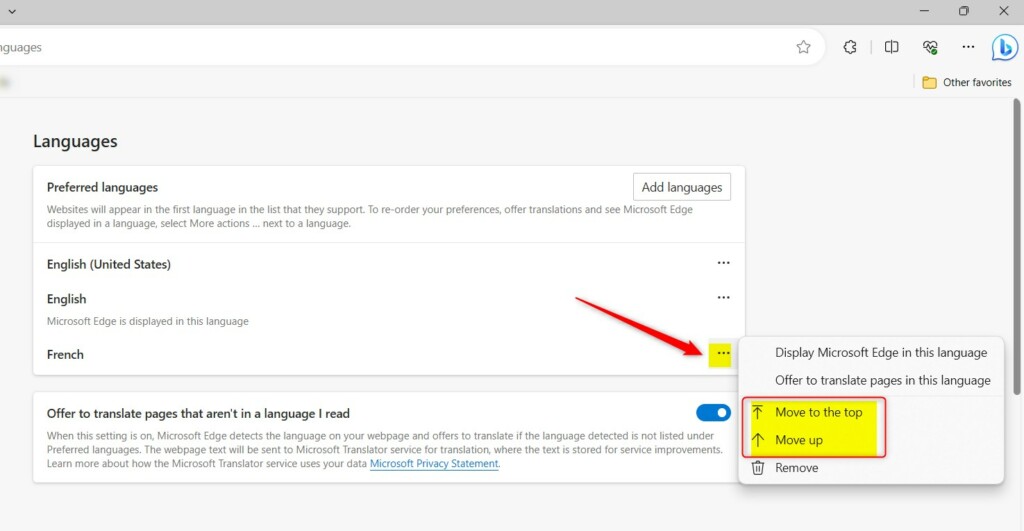
Open Microsoft Edge settings, navigate to Languages, and add your desired language if it’s not present. Click the three dots next to a language and select “Move to top” or “Move up” to set your preference.
Why change language settings?
Browsing in your native language, or in one you are learning, saves you from translating pages by hand. A few practical cases:
- If you read two languages, put the one you read faster at the top and keep the other below it as a fallback.
- If you are learning a language, adding it to the list gives you more pages in that language without making it your main one.
- If a site keeps loading in the wrong language, the list is the first thing to check.
What happens when done?
After you update the list, Edge compares your preferences with the languages each site you visit supports. The top-ranked language on your list wins. If the site does not offer it, Edge moves down the list to the next language the site does have.
The change is not retroactive. Pages that are already open keep their current language until you reload them. If a site still shows the wrong language after a reload, it may be using your location or a language choice saved in its own settings instead of your browser preferences.
Change preferred language order in Microsoft Edge
To change preferred languages in Microsoft Edge, open the browser settings, find the languages menu, and drag your chosen language to the top of the list. This tells websites which language you want to see first when pages load. You can add new languages in the same place if the one you need is missing. The short version:
- Open Edge and go to Settings and more (...) > Settings Languages
- Under the preferred languages list, click Add languages if your language is not there yet.
- Move the language you want to the top of the list.
- Reload any open tabs to see the change.
The next sections go through each part in more detail.

Go to the Languages section to see your current list. Add a new language like this:
- Click the Settings and more button (the three dots at the top right of Edge), then click Settings. A Settings tab opens.
- Click Languages in the left-hand list. If you do not see the sidebar, widen the window or click the menu icon at the top left of the Settings page. You should now see your current languages listed.
- Click Add languages. A dialog opens with a search box and a list of languages.
- Type the language name in the search box, or scroll the list, and tick the checkbox next to each language you want.
- Click Add. The dialog closes and the new languages appear at the bottom of your list.
If the page says some settings are managed by your organization, a work or school policy controls them. Your IT administrator has to change it, because you cannot override it from the Edge settings page.

Clicking the three dots next to a language opens its options. Moving the selection to the top, or up one position, changes the priority order Edge uses. To reorder:
- On the Languages page, find the language you want to prioritize in the list.
- Click the three dots (More actions) at the right end of its row. A small menu opens.
- Click Move to the top to make it your first choice. Use Move up or Move down to shift it one place at a time. The row jumps to its new position straight away, and there is no Save button.
- Reload any open tabs so the sites ask for pages in the new order.
The same menu has a Remove option. To undo a change, move the language back to where it was, or remove a language you added by mistake. Removing it does not uninstall anything from Windows.
Browser UI vs. Website Content
The two settings are easy to mix up. Browser display languages change the text on menus and buttons inside Microsoft Edge. Preferred languages only tell websites which language to use for web pages. Keeping your main language at the top of the preferred list covers the websites you visit. For the Edge interface, check the display language option in the same three-dots menu.
- On the Languages page, click the three dots next to the language you want for menus and buttons.
- Tick Display Microsoft Edge in this language. This option is greyed out for languages that Edge does not offer as an interface language.
- Click Restart when the button appears. Edge closes and reopens with the new interface language. Save any work in open tabs first, though Edge normally restores them.
To go back, choose your original language the same way and restart again.
Keep your target language at the top of the list so pages render in it consistently. Edge does not reorder the list on its own, so the setting stays until you change it. If a site shows the wrong language, check the following:
- Confirm the language is still first in the list.
- Reload the page, or open the site in a new tab.
- Check whether the site has its own language switcher, since a choice saved on the site can override the browser.
- If you use several browser profiles, remember each profile has its own language settings.
Reference:
Conclusion:
Adjusting these language settings tailors Microsoft Edge to your daily browsing. Add the languages you read, put your main one first, and set the display language separately if you want the menus to match. Questions and feedback belong in the comments section below.
Was this guide helpful?

About the Author
Richard
Tech Writer, IT Professional
Richard is a writer at Geek Rewind who turns complex IT tasks into clear, step-by-step guides. He draws on years of hands-on experience in system administration and enterprise IT operations, focusing on Windows, Linux and WordPress: the problems people actually run into, and the fixes that work. His server and WordPress guides come from systems he runs himself. Richard builds and maintains the platform behind Geek Rewind, from its Ubuntu servers and Nginx configuration to its custom WordPress plugins. Many new tutorials start with readers' questions, and he's always glad to answer them in the comments.



No comments yet — be the first to share your thoughts!