How to Add or Remove Microsoft Print to PDF in Windows 11

This guide shows you how to add or remove the Microsoft Print to PDF feature on your Windows 11 PC.
You can add or remove Microsoft Print to PDF via “Turn Windows features on or off” by checking or unchecking the box. Alternatively, use DISM or PowerShell commands in an administrator terminal to enable or disable the feature.
What Is Microsoft Print to PDF?
Microsoft Print to PDF lets you save any document or webpage as a PDF file without needing extra programs. It’s a built-in tool in Windows. By default, PDF files open with Microsoft Edge, but you can use any PDF reader you like.
Why use it? It saves you money because you won’t need to buy extra PDF software. What happens when done? Once you’re done, your files are saved as PDFs ready to share or store.
If the Microsoft Print to PDF option disappears or stops working, you can fix it by turning the feature off and on again.
Note: You’ll need administrator rights for this.
How to Add or Remove Microsoft Print to PDF
Option 1Using Windows Features
- Click the Start button, type
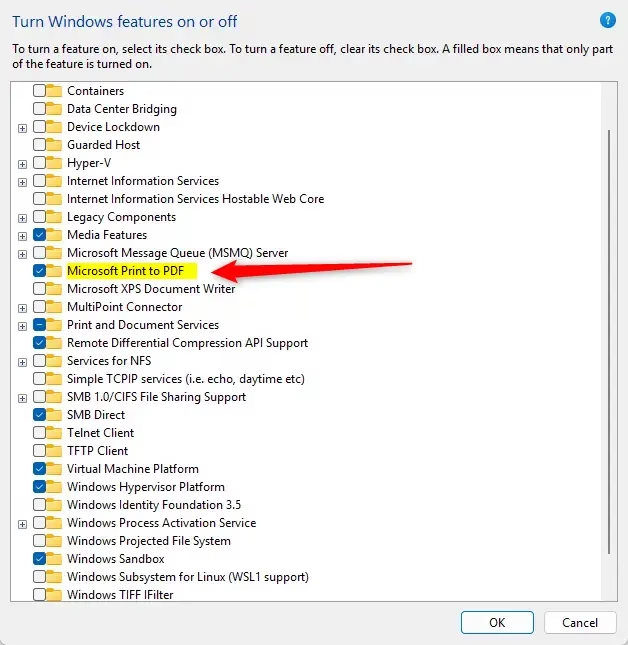
Windows Features, and open Turn Windows features on or off. Requires admin privileges. - In the list, find Microsoft Print to PDF.
- To add it, check the box . To remove it, uncheck the box .
- Click OK to save your changes.
- Restart your computer if prompted.
If the Windows Features window is blank:
- Press ⊞ Win+R, type
services.msc, and press Enter. - Find Windows Modules Installer in the list.
- Double-click it and set the Startup type to Automatic.
- Click Start if the service is stopped, then click OK.
Here is what the Windows Features window looks like:
Option 2Using Command Prompt (DISM)
- Right-click the Start button and choose Windows Terminal (Admin). Requires admin privileges.
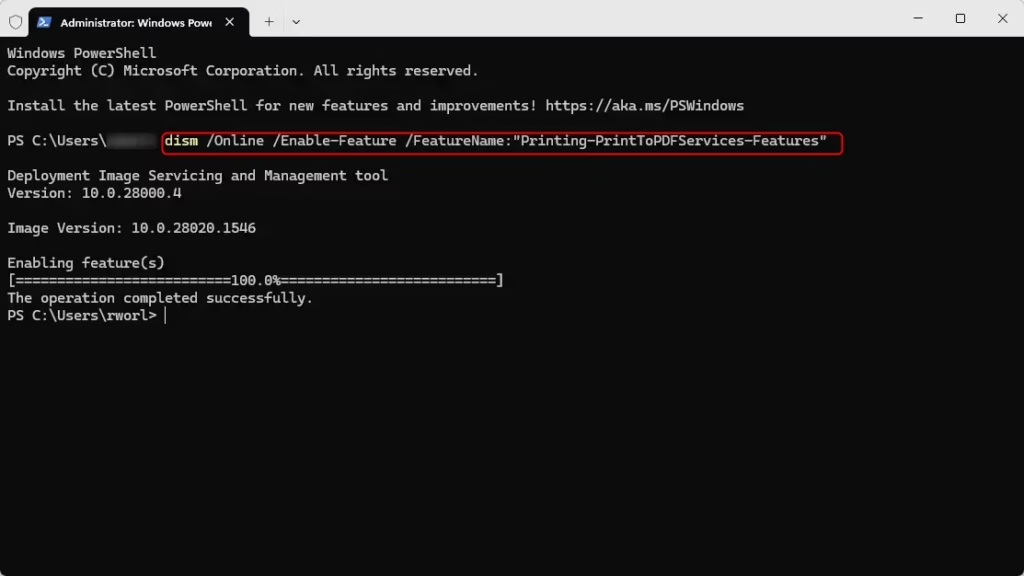
- In the terminal window, type this command to add Microsoft Print to PDF and press Enter:
dism /Online /Enable-Feature /FeatureName:"Printing-PrintToPDFServices-Features" - To remove it, type this command and press Enter:
dism /Online /Disable-Feature /FeatureName:"Printing-PrintToPDFServices-Features" - Close the terminal when done.
Example of the command running in Windows Terminal:
Option 3Using PowerShell
- Open Windows Terminal (Admin). Requires admin privileges.
- Make sure you are in the PowerShell tab (or type
powershelland press Enter). - To add Microsoft Print to PDF, type this command and press Enter:
Enable-WindowsOptionalFeature -Online -FeatureName "Printing-PrintToPDFServices-Features" - To remove it, type this command and press Enter:
Disable-WindowsOptionalFeature -Online -FeatureName "Printing-PrintToPDFServices-Features" - Close PowerShell when finished.
PowerShell example:

Summary
- Microsoft Print to PDF is a handy tool to save files as PDFs without extra software.
- You can add or remove it using Windows Features, Command Prompt, or PowerShell.
- Make sure you run these as an administrator.
- If you have trouble, check that the Windows Modules Installer service is running.
- Once restored, you can print to PDF from any app that supports printing.
How do I enable print to PDF on Windows?
Open the Start menu, go to the search bar, and type: Turn Windows features on or off. Or you can go to Control Panel > Programs and Features > Turn Windows features on or off. Ensure you check the box for “Microsoft Print to PDF” to enable the feature.
Was this guide helpful?

About the Author
Richard
Tech Writer, IT Professional
Richard, a writer for Geek Rewind, is a tech enthusiast who loves breaking down complex IT topics into simple, easy-to-understand ideas. With years of hands-on experience in system administration and enterprise IT operations, he’s developed a knack for offering practical tips and solutions. Richard aims to make technology more accessible and actionable. He's deeply committed to the Geek Rewind community, always ready to answer questions and engage in discussions.


No comments yet — be the first to share your thoughts!