This article explains how to install Mattermost Server on Ubuntu Linux.
Mattermost is an open-source alternative to the Slack messaging platform. It allows teams to communicate and collaborate securely from behind the company’s firewall.
Installing Mattermost Server on Ubuntu Linux allows teams to have a self-hosted, open-source alternative to the Slack messaging platform. It allows for secure communication and collaboration behind the company’s firewall. Mattermost brings teams together to collaborate on projects, which can help work get done more efficiently.
Whether you are a small or large enterprise, Mattermost can provide a platform to communicate and collaborate. Additionally, conversations are available on desktop and mobile devices, making it easier to stay connected.
Mattermost helps you:
- Discuss topics in private groups, one-to-one or team-wide
- Easily share and view image files
- Connect in-house systems with webhooks and Slack-compatible integrations
For more about Mattermost, visit its homepage.
Caution: Mattermost for Linux is in beta. New features are still being added, and potential issues are being ironed out. When you’re ready to install Mattermost for Linux, follow the steps below:
Install MariaDB Database Server
MariaDB database server is a great place to start when looking at open-source database servers with Mattermost. To install MariaDB, run the commands below.
sudo apt update
sudo apt-get install mariadb-server mariadb-client
After installing MariaDB, the commands below can stop, start, and enable the service to start when the server boots.
Run these on Ubuntu 16.04 LTS
sudo systemctl stop mysql.service
sudo systemctl start mysql.service
sudo systemctl enable mysql.service
Run these on Ubuntu 17.10 and 18.04 LTS
sudo systemctl stop mariadb.service
sudo systemctl start mariadb.service
sudo systemctl enable mariadb.service
After that, run the commands below to secure the MariaDB server by creating a root password and disallowing remote root access.
sudo mysql_secure_installation
When prompted, answer the questions below by following the guide.
- Enter current password for root (enter for none): Just press the Enter
- Set root password? [Y/n]: Y
- New password: Enter password
- Re-enter new password: Repeat password
- Remove anonymous users? [Y/n]: Y
- Disallow root login remotely? [Y/n]: Y
- Remove test database and access to it? [Y/n]: Y
- Reload privilege tables now? [Y/n]: Y
Restart MariaDB server
sudo systemctl restart mariadb.service
After installing the MariaDB server, continue below to create the Mattermost database and database user account.
Now that you’ve installed all the required packages, continue below to start configuring the servers. First, run the commands below to create a blank Mattermost database.
Run the commands below to log on to the database server. When prompted for a password, type the root password you created above.
sudo mysql -u root -p
Then, create a database called mattermost
CREATE DATABASE mattermost;
Create a database user called mattermostuser with a new password
CREATE USER 'mattermostuser'@'localhost' IDENTIFIED BY 'new_password_here';
Then, grant the user full access to the database.
GRANT ALL ON mattermost.* TO 'mattermostuser'@'localhost' IDENTIFIED BY 'user_password_here' WITH GRANT OPTION;
Finally, save your changes and exit.
FLUSH PRIVILEGES;
EXIT;
Download and Configure the Mattermost Server
After setting up Mattermost, run the commands below to download the Mattermost server archive.
cd /tmp && wget https://releases.mattermost.com/5.0.1/mattermost-5.0.1-linux-amd64.tar.gz
After downloading the archive, run the commands below to extract it. And move it to the /opt directory.
tar -xvzf mattermost*.gz
sudo mv mattermost /opt
Next, create a storage directory for files.
sudo mkdir /opt/mattermost/data
The storage directory will contain all the files and images your users post to Mattermost. You must ensure the drive is large enough to hold the anticipated number of uploaded files and photos.
Next, set up a system user and group called mattermost to run this service and set the ownership and permissions. Finally, create the Mattermost user and group by running the commands below:
sudo useradd --system --user-group mattermost
Set the user and group matter most as the owner of the Mattermost files:
sudo chown -R mattermost:mattermost /opt/mattermost
Give write permissions to the matter most group:
sudo chmod -R g+w /opt/mattermost
After that, run the commands below to edit the information on the Mattermost database connection.
sudo nano /opt/mattermost/config/config.json
Then, make the highlighted changes below and save the file.
"SqlSettings": {
        "DriverName": "mysql",
        "DataSource": "mattermostuser:new_password_here@tcp(localhost:3306)/mattermost?charset=utf8mb4,utf8&readTimeout=30s&writeTimeout=$
        "DataSourceReplicas": [],
        "DataSourceSearchReplicas": [],
        "MaxIdleConns": 20,
        "MaxOpenConns": 300,
        "Trace": false,
        "AtRestEncryptKey": "",
        "QueryTimeout": 30
Save the file.
After that, run the commands below to create a systemd service unit file.
sudo nano /etc/systemd/system/mattermost.service
Then copy and paste the content below into the file and save it.
[Unit]
Description=Mattermost
After=network.target
After=mariadb.service
Requires=mariadb.service

[Service]
Type=notify
ExecStart=/opt/mattermost/bin/mattermost
TimeoutStartSec=3600
Restart=always
RestartSec=10
WorkingDirectory=/opt/mattermost
User=mattermost
Group=mattermost
LimitNOFILE=49152

[Install]
WantedBy=mariadb.service
For Ubuntu 16.04, release MariaDB.service with MySQL. Service.
Next, run the commands below to start the Mattermost service.
sudo systemctl daemon-reload
sudo systemctl start mattermost.service
sudo systemctl enable mattermost.service
Now open your browser and browse to the server hostname or IP address followed by port # 8065
http://localhost:8065
You should see the Mattermost signup page.
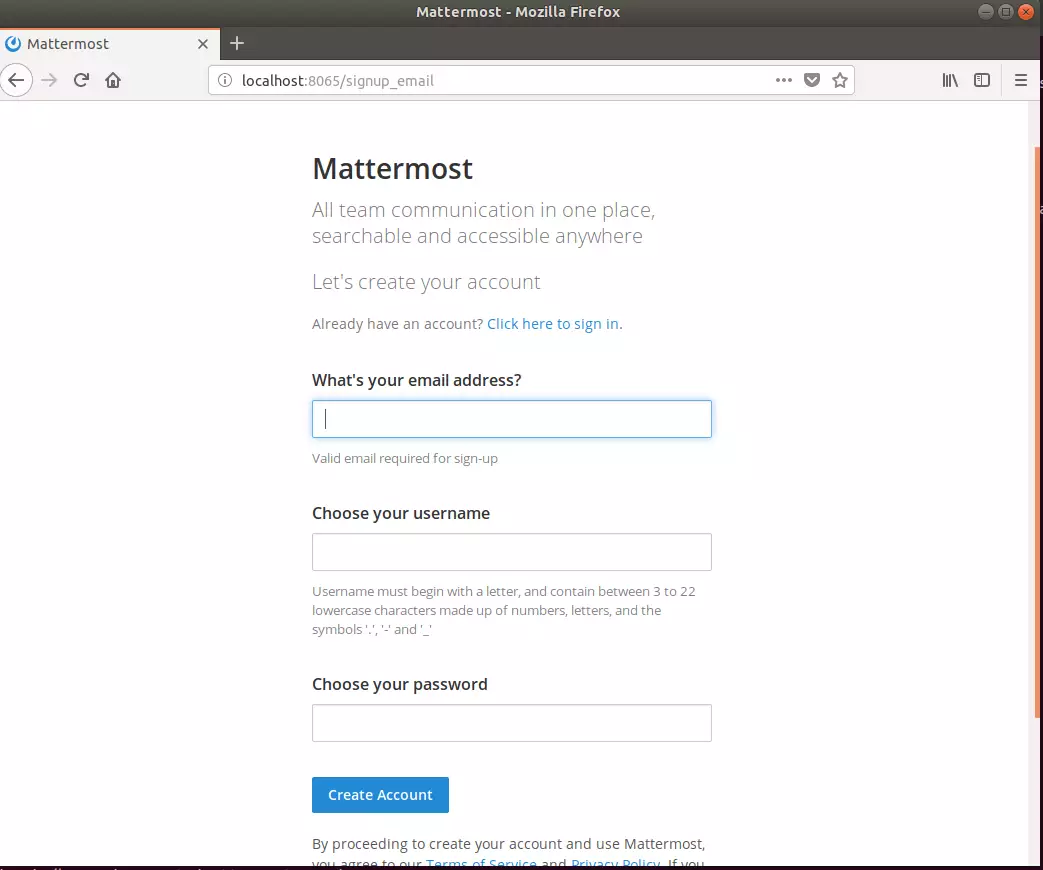
Create an admin account and sign on.
You may also like the post below:

Leave a Reply to Anil Baniya Cancel reply