
Windows 11 has a feature called Recall. It takes pictures of your screen every few seconds. This helps your computer remember what you’ve been doing. But many people want to turn it off to keep their personal information private.
What is Recall?
Recall & Snapshots is a smart tool in Windows 11. It takes a snapshot of your screen every 5 seconds. But it only takes pictures when something on your screen changes.
This means Windows keeps a kind of “photo album” of what you’ve been working on. You can quickly search and find things you saw before. Why would you want this? It helps you remember where you saw important information. What happens when you use it? Your screen activity gets saved and stored on your computer.
How to Turn Recall On or Off in Settings
Recall usually starts turned on. But you can turn it off anytime you want:
- Click the Start button and open Settings.
- Go to Privacy & security.
- Find and click on Recall & snapshots.
- Toggle the switch to turn snapshots on or off.
There are other options too, like pausing snapshots temporarily, excluding certain apps, or deleting all snapshots.
Recall is Now a Windows Feature You Can Add or Remove
With a recent Windows update (KB5041865 Windows 11 build 26100.1591), Recall is now a feature you can easily add or remove from your system. Why would you do this? Removing it completely gives you full control over your privacy.
How to Add or Remove Recall Using Windows Features
Follow these simple steps to turn Recall on or off:
- Press Windows key + R on your keyboard to open the Run box.
- Type
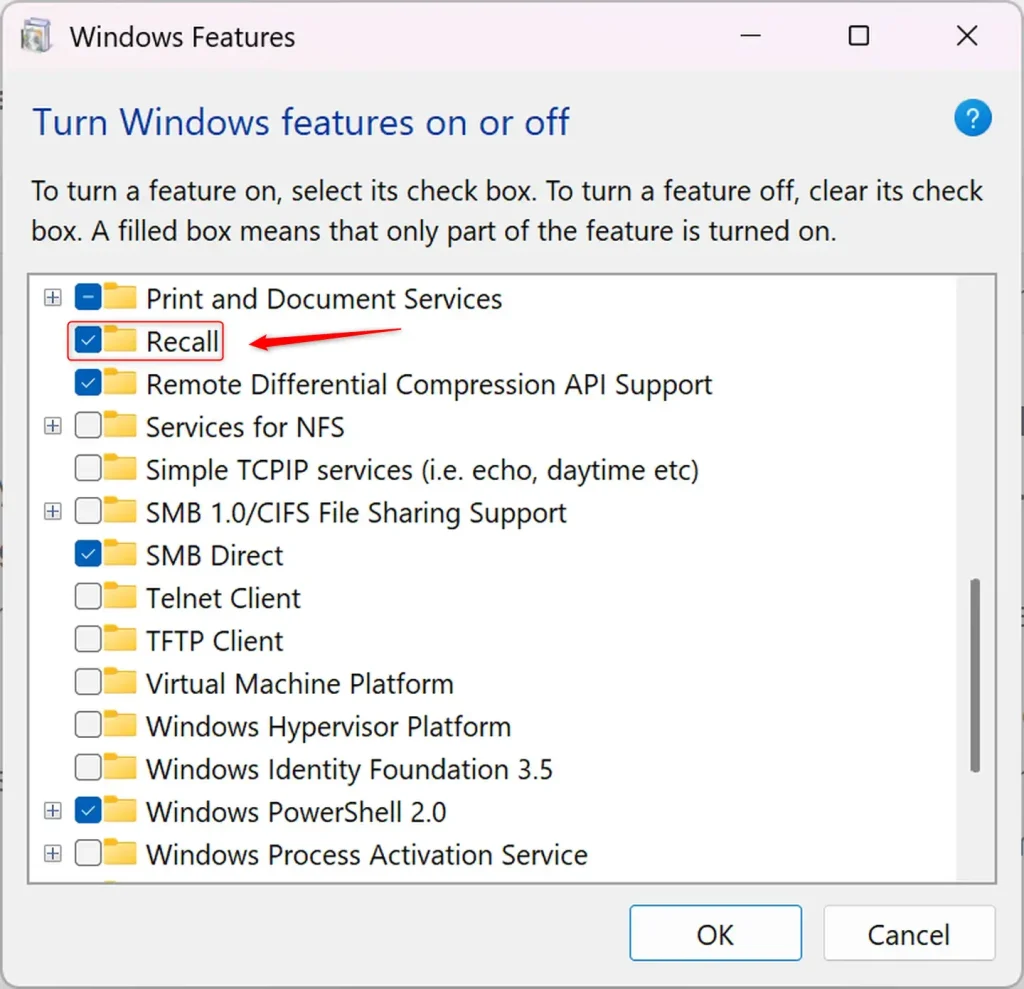
OptionalFeatures.exeand press Enter. This opens the Windows Features window. - Scroll down the list until you find Recall.
- Check the box to add (turn on) Recall. Or uncheck it to remove (turn off) Recall.
- Click OK to save your changes.
Windows will apply the changes. It may ask you to restart your PC. What happens after you restart? The Recall feature will be added or removed based on what you chose.
How to Uninstall or Reinstall Recall Using Commands
Do you like using commands? You can also add or remove Recall through Windows Terminal. This method is faster for some people.
⚠️ Admin privileges required
Steps:
- Open Windows Terminal as an administrator. To do this, right-click the Start button and choose Windows Terminal (Admin).
- In Windows Terminal, open a PowerShell or Command Prompt tab.
- To install (enable) Recall, type this command and press Enter:
DISM /Online /Enable-Feature /FeatureName:"Recall" - To uninstall (disable) Recall, type this command and press Enter:
DISM /Online /Disable-Feature /FeatureName:"Recall"
You can also use PowerShell commands:
To enable Recall:

Enable-WindowsOptionalFeature -Online -FeatureName "Recall"
To disable Recall:

Disable-WindowsOptionalFeature -Online -FeatureName "Recall"
After running these commands, restart your computer. This makes sure the changes take effect.
Summary
- Recall is a Windows 11 feature that takes snapshots of your screen every few seconds.
- You can control Recall to protect your privacy by turning it off or uninstalling it.
- Turn Recall on or off from Settings under Privacy & security.
- You can add or remove Recall from Windows Features or by using commands in Windows Terminal.
- Restart your PC after making changes to ensure everything works properly.
- By managing Recall the way you want, you keep your computer privacy exactly how you like it.


Leave a Reply Cancel reply