How to Enable or Disable Spellcheck in Windows 11
You can toggle spellcheck on or off in Windows 11’s Settings app, specifically within the Text input section. This built-in spellcheck highlights potential spelling mistakes with a red wavy line, helping you spot typos as you type. This feature is particularly useful for documents and communications to ensure accuracy.
However, you might want to disable it if the spellchecker incorrectly flags correctly spelled words, such as proper nouns, technical terms, or words from a different language. Disabling it removes the automatic red underlines.
Navigate to Settings, then Time & language, and select Typing. Toggle the “Highlight misspelled words” option to On or Off to control spellcheck.
Turn Spellcheck On or Off Using Windows Settings
You can turn Windows 11 spellcheck on or off easily using the Settings app, which helps you catch typos by highlighting misspelled words with a red line as you type.
- Open Settings by clicking the Start button (the Windows logo) in the bottom-left corner. Or press
Windows key + Ion your keyboard. - In the Settings window, click Time & language from the left menu.
- On the right side, click Typing.
- Look for the option called Highlight misspelled words.
- Toggle the switch to On to turn spellcheck on, or Off to turn it off.
Here are pictures to help you find the right settings:
Click the Settings icon in Windows 11
Choose Time & Language in Settings
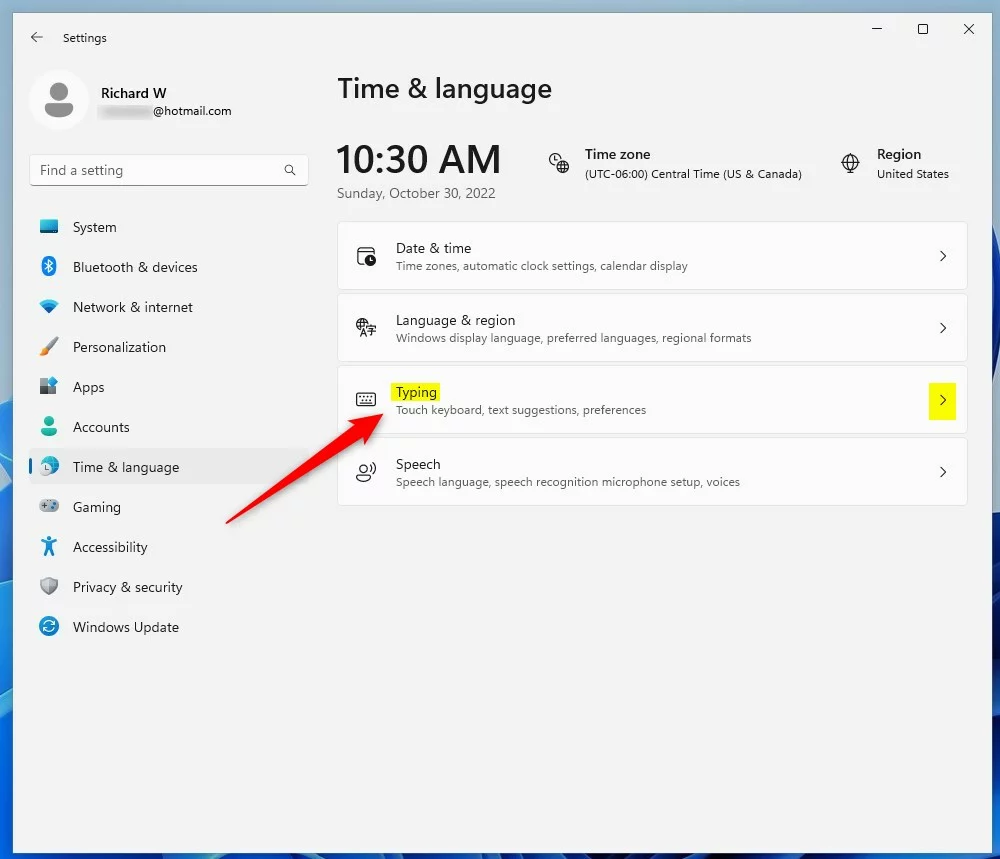
Click Typing to see spellcheck options
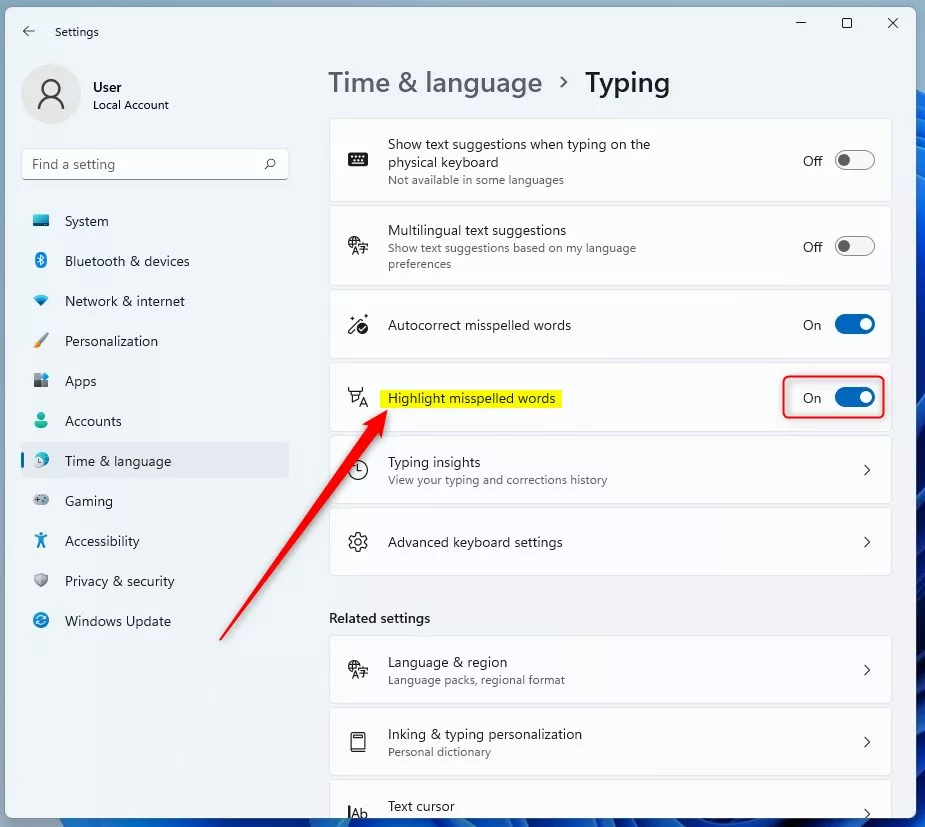
Toggle Highlight misspelled words on or off
Bonus: Change Spellcheck Using the Windows Registry (Advanced)
For advanced control over Windows 11 spellcheck, you can use the Registry Editor, but be careful as it requires administrator access and careful steps to avoid system issues.
- Open the Registry Editor by pressing
Windows key + R, typingregedit, and pressing Enter. - Go to this location. You can copy and paste it into the address bar at the top:
HKEY_CURRENT_USER\SOFTWARE\Microsoft\TabletTip\1.7 - If you don’t see the 1.7 folder, right-click on TabletTip, choose New > Key, and name it 1.7.
- Click the 1.7 folder. In the right pane, right-click and choose New > DWORD (32-bit) Value.
- Name the new value
EnableSpellchecking. - Double-click
EnableSpellcheckingand set its value to:1to turn spellcheck ON0to turn spellcheck OFF
- Close the Registry Editor and restart your computer for the changes to take effect.
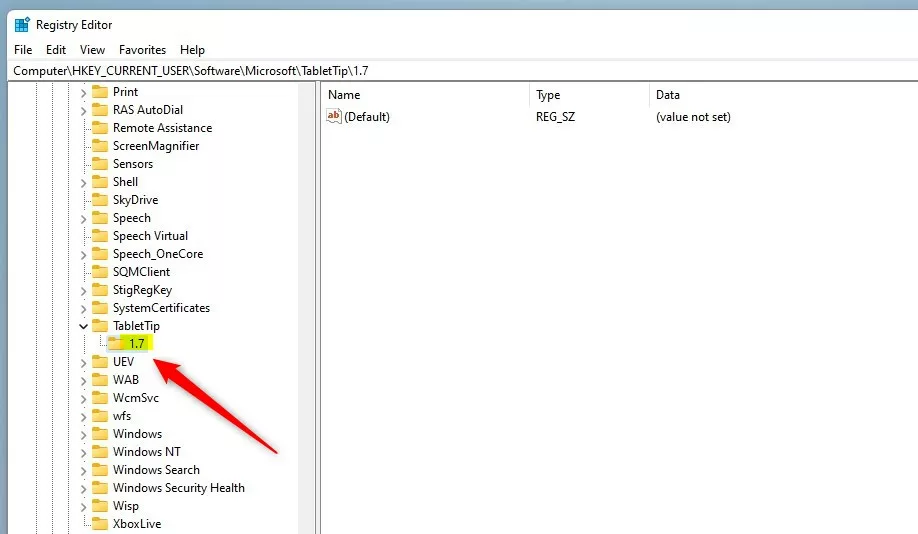
Setting EnableSpellchecking in Windows Registry
Summary
Windows 11 spellcheck helps you fix errors fast by highlighting misspelled words with a red line, and you can easily turn this feature on or off in Settings or use the Registry Editor for advanced changes.- Spellcheck shows red lines under misspelled words so you can fix them quickly.
- You can easily turn it on or off in Settings > Time & language > Typing.
- Advanced users can also change this setting in the Windows Registry.
- Turn spellcheck off if it marks correct words as wrong.
- For more tips on customizing Windows 11, check out how to change your display language or how to reset the Settings app.
How do I turn on spell check in 🪟 Windows 11?
Windows 11’s spellcheck and autocorrect features activate without needing extra software. Once they’re on, they work in most apps, helping your writing look clear and polished. To activate these tools, open Windows Settings, go to Time & Language, and select Typing.
Was this guide helpful?

About the Author
Richard
Tech Writer, IT Professional
Richard, a writer for Geek Rewind, is a tech enthusiast who loves breaking down complex IT topics into simple, easy-to-understand ideas. With years of hands-on experience in system administration and enterprise IT operations, he’s developed a knack for offering practical tips and solutions. Richard aims to make technology more accessible and actionable. He's deeply committed to the Geek Rewind community, always ready to answer questions and engage in discussions.


No comments yet — be the first to share your thoughts!