

This article explains how to turn “Text input spell-checking and auto-correction” on or off in the Messenger Desktop app on Windows 11.
The Messenger Desktop app is a standalone messaging app developed by Facebook that allows users to send and receive messages, make audio and video calls, and share files and media with other users without going through a web browser.
When you use the Messenger app on Windows, you can turn auto-start on or off, change your online status, turn message preview on or off, mute or unmute all notifications, change skintone for emojis and hand gestures, and more.
When you use the Messenger Desktop app on Windows, you can also turn Text input spell-checking and suto-correction on or off to correct spelling mistakes and typos automatically.
Turning spell-checking and auto-correction on or off in the Messenger app can help improve the accuracy and clarity of your messages. When these features are turned on, the app will automatically correct any spelling mistakes or typos you make while typing, making your messages easier to read and understand.
However, some users may prefer to have more control over their messaging and may choose to turn these features off.
Turn Spell-checking and Auto-correction on or off in Messenger
As mentioned above, users can turn on “Text input spell-checking and auto-correction” on or off in the Messenger app on Windows.
Turn it on if you need help with spelling and want to avoid typos. If not, turn it off.
Here’s how to do it.
First, launch the app by clicking the Start menu and selecting it on the All Apps list.

You can also launch the app from the Taskbar or Taskbar overflow.

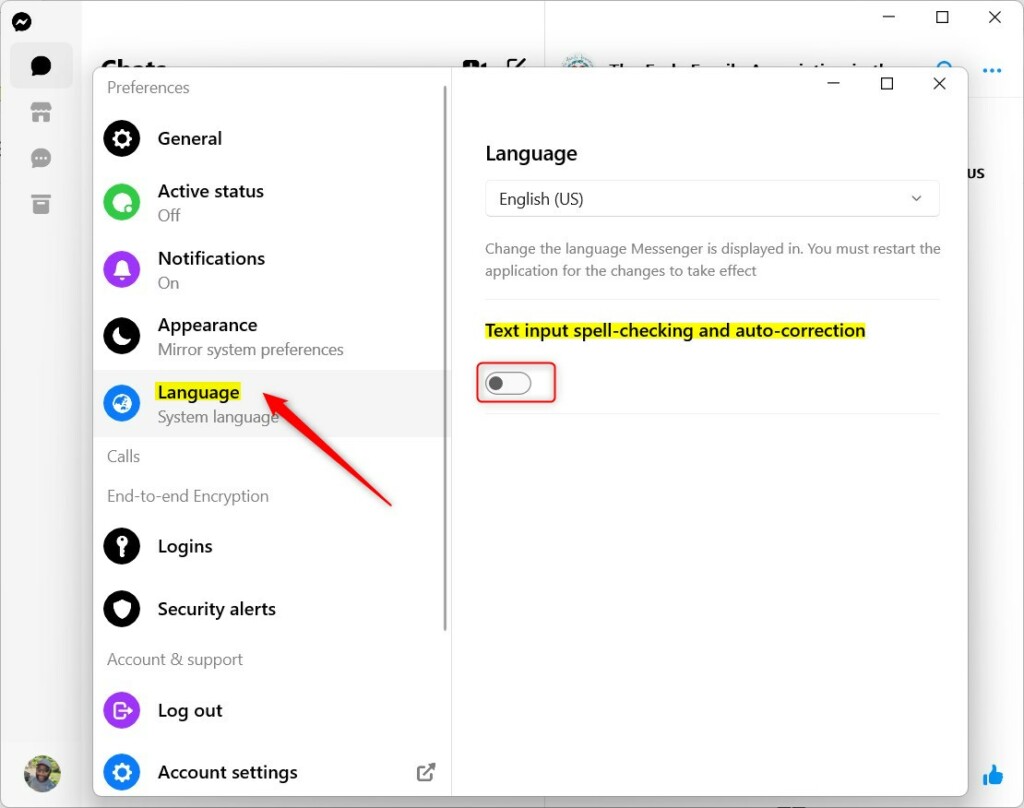
When the app opens, click your profile image and select Preferences at the bottom left of your screen.

Next, select the Language tab on the left. Under “Text input spell-checking and auto-correction,” toggle the switch button to the On position to enable it.
To disable it, toggle the button back to the Off position.
That should do it!
Conclusion:
- Turning on spell-checking and auto-correction in the Messenger Desktop app on Windows 11 can help avoid spelling mistakes and typos, making messages clearer and easier to understand.
- Conversely, some users may prefer to have more control over their messaging and choose to turn these features off.
- To enable or disable “Text input spell-checking and auto-correction,” users can follow the simple steps outlined in this guide.
- We hope this article has helped you customize your Messenger experience on Windows 11. Please use the comments section below for any feedback or additional insights.
Leave a Reply