How to Manage Read Receipts in Outlook on Windows 11
You manage Outlook read receipts on Windows 11 by adjusting your tracking notification settings within the application.
A read receipt is a notification sent back to the sender confirming you have opened their email. Controlling these can significantly enhance your email privacy and help you manage your inbox more effectively on your PC.
In Outlook for Windows 11, you have three primary choices: always send a receipt, never send one, or be prompted for confirmation each time you open a message. These options ensure you’re in control of when senders know their emails have been read.
Configure read receipts in Outlook by going to Settings > Mail > Message handling. Choose to always send, never send, or be prompted each time to control notifications sent to senders when you open their emails.
How to change read receipt settings
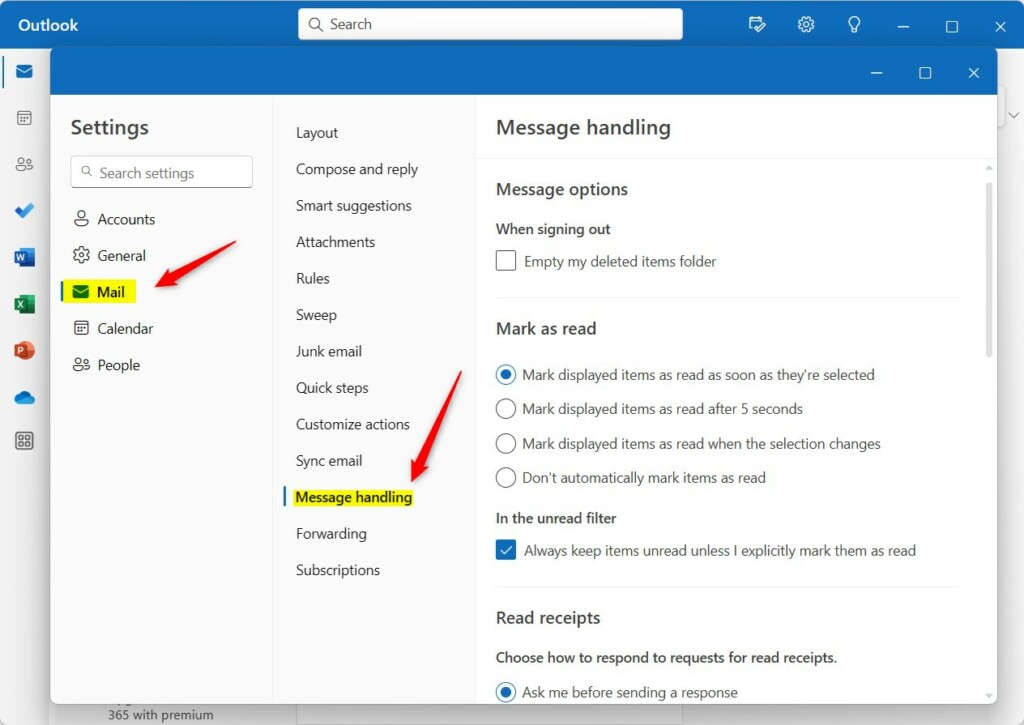
You can change your read receipt settings in Outlook on Windows 11 by opening the app and going to Settings, then Mail, and Message handling.
Once the app is open, click the Settings gear icon in the top right corner.

On the Settings screen, click Mail on the left. Then, on the right, select Message handling. You’ll find the Read receipts section there.
You have three choices:
- Ask me before sending a response: You decide each time an email asks for a receipt.
- Always send a response: You automatically tell the sender you opened the email.
- Never send a response: You ignore all requests for receipts.
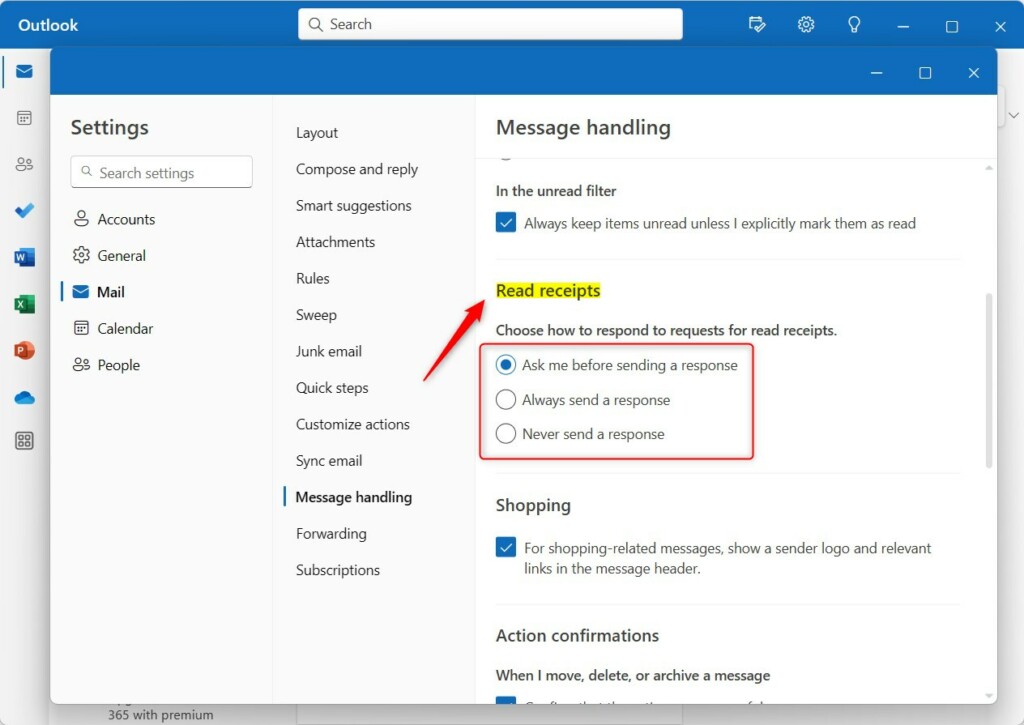
Pick your preferred option and save your changes. Restart the Outlook app to make sure the new settings take effect.
Reliability and Limitations
Outlook read receipts aren’t always reliable because they depend on the other person’s email program and settings.
Cross-Platform Variability
How read receipts work can change depending on which version of Outlook you’re using, like the desktop app, web version, or mobile app.
Advanced Management: GPO and Exchange
For businesses, IT admins can manage Outlook read receipts for everyone using Exchange Server or Group Policy (GPO) with special commands.
Summary
Managing read receipts in Outlook helps with privacy and professional communication, but remember they aren’t always dependable and depend on the recipient’s software.
Can I force a read receipt without the recipient’s permission?
No, you cannot force a read receipt. The recipient’s email client must support the request and their settings must allow it. If the recipient has configured their Outlook to never send responses, your request will be ignored automatically regardless of your settings or the importance level you set.
Why do I get a read receipt even if the recipient didn’t open the email?
You might get a read receipt even if the email wasn’t fully opened because of the Preview Pane, which can mark messages as read automatically.
Was this guide helpful?

About the Author
Richard
Tech Writer, IT Professional
Richard, a writer for Geek Rewind, is a tech enthusiast who loves breaking down complex IT topics into simple, easy-to-understand ideas. With years of hands-on experience in system administration and enterprise IT operations, he’s developed a knack for offering practical tips and solutions. Richard aims to make technology more accessible and actionable. He's deeply committed to the Geek Rewind community, always ready to answer questions and engage in discussions.


No comments yet — be the first to share your thoughts!