How to Enable or Disable Windows Protected Print Mode in Windows 11
You can enable or disable Windows Protected Print Mode in Windows 11 to enhance the security of your printed documents.
Windows Protected Print Mode (WPP) is a security feature designed to stop unauthorized access to your print jobs. It was introduced in Windows 11 build 26016.
When WPP is on, Windows favors trusted printer drivers and won’t load ones from less reputable sources. This offers an extra layer of security, which is particularly useful for sensitive information.
By default, WPP is disabled, allowing you to use any printer driver. If you require enhanced protection, such as in environments with confidential data, activating this mode is beneficial.
How to Turn On or Off Windows Protected Print Mode from Settings
- Press Windows key + I to open Settings.
- Click Bluetooth & devices on the left. Then choose Printers & scanners on the right. Or click here to open directly: Open Printers & scanners settings
- Find your printer. Then click on Printer preferences.
You can easily turn Windows Protected Print Mode on or off using the built-in Settings app on your Windows 11 computer.
- Click the Set Up button next to “Windows protected print mode”.
- Click Yes, continue to confirm.
- If any printers are removed as part of the setup, click Yes, continue again.
To turn off Windows Protected Print Mode (default):
- Click the Turn Off button next to “Windows protected print mode”.
- Click Yes to confirm.

How to Turn On or Off Windows Protected Print Mode Using Local Group Policy Editor
For more advanced control over Windows Protected Print Mode, you can use the Local Group Policy Editor to turn this security feature on or off.
Follow these steps:
- Open the Start menu. Type
Edit group policy. Press Enter to open the Local Group Policy Editor. ⚠️ Admin privileges required - Go to this folder path:
Computer Configuration > Administrative Templates > Printers - On the right side, double-click Configure Windows protected print.
- You will see three options:
- Not Configured: Uses default settings (WPP off).
- Enabled: Turns on Windows Protected Print Mode.
- Disabled: Turns off Windows Protected Print Mode.
- Choose your option and click OK.
- Restart your computer to apply the changes.


How to Enable or Disable Windows Protected Print Mode Using Registry Editor
If you’re comfortable making changes in the Windows Registry, you can use the Registry Editor to turn Windows Protected Print Mode on or off.
⚠️ Warning: Editing the registry can cause problems if done wrong. Be sure to back up your registry before making changes.
Here’s how:
- Open Registry Editor by typing
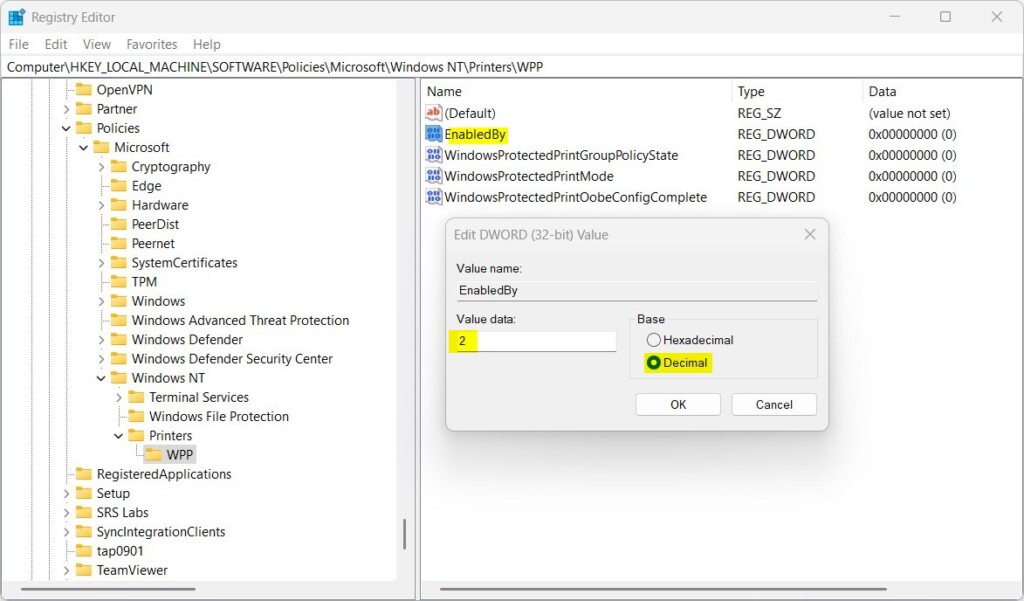
regeditin the Start menu and pressing Enter. ⚠️ Admin privileges required - Go to this key:
HKEY_LOCAL_MACHINE\SOFTWARE\Policies\Microsoft\Windows NT\Printers\WPP - Look for these items in the right pane:
- EnabledBy
- WindowsProtectedPrintGroupPolicyState
- WindowsProtectedPrintMode
- WindowsProtectedPrintOobeConfigComplete
- If they don’t exist, right-click on empty space. Choose New > DWORD (32-bit) Value. Create each with the exact names above.
To turn on WPP, adjust these values:
- EnabledBy = 2
- WindowsProtectedPrintGroupPolicyState = 1
- WindowsProtectedPrintMode = 1
- WindowsProtectedPrintOobeConfigComplete = 1
To turn WPP off, delete the first, second, and fourth items. Then, set ‘WindowsProtectedPrintMode’ to 0.
- Delete the first, second, and fourth items.
- Set WindowsProtectedPrintMode to 0.
- Restart your PC for the changes to take effect.

Summary
Windows Protected Print Mode is a security feature that keeps your printed documents safe by only using trusted printer drivers, and you can manage it through Settings, Group Policy, or the Registry Editor.- What is it? Windows Protected Print Mode helps keep your printed documents secure by using only trusted printer drivers.
- When to use it? It is especially useful for workplaces handling sensitive or private information like banks or hospitals.
- How to use it? You can turn this feature on or off easily through Windows Settings, Group Policy Editor, or Registry Editor.
- Which method should I choose? Use the method that best fits your comfort level and needs.
- Important reminder: Always restart your computer after making changes for them to work properly.
- Need more help? For more information, you can check out the official Microsoft page about this feature here: Microsoft Tech Community – Secure Print Experience
What Printers are compatible with Windows protected print mode?
This IPP stack only supports Mopria-certified printers. Users print using driverless printing via the Windows modern print stack. Once you enable Windows print protected mode, the system will automatically uninstall any printers that use third–party drivers and prevent you from installing new ones.
How to print in protected mode?
To enable it, you open Settings, then select Bluetooth & devices, and finally Printers & scanners. Under Printer preferences.
Was this guide helpful?

About the Author
Richard
Tech Writer, IT Professional
Richard, a writer for Geek Rewind, is a tech enthusiast who loves breaking down complex IT topics into simple, easy-to-understand ideas. With years of hands-on experience in system administration and enterprise IT operations, he’s developed a knack for offering practical tips and solutions. Richard aims to make technology more accessible and actionable. He's deeply committed to the Geek Rewind community, always ready to answer questions and engage in discussions.

[…] How to Enable or Disable Windows Protected Print Mode in Windows 11 […]