How to Turn On Storage Sense Temporary File Cleanup in Windows 11
You turn on Storage Sense in Windows 11 to automatically delete temporary files and free up disk space.
Storage Sense is a built-in Windows feature designed to manage your storage by removing items you don’t need, like temporary internet files and Recycle Bin contents.
This can be especially helpful if you’re running low on storage, preventing common issues like slow performance or the inability to install new updates. For example, Windows 11 suggests using Storage Sense when your drive reaches 20% free space.
You can customize Storage Sense to run daily, weekly, monthly, or only when you’re low on disk space.
Enable temporary file cleanup by setting the AllowStorageSenseTemporaryFilesCleanup value to 1 in the Registry Editor under 🗝️HKEY_LOCAL_MACHINESOFTWAREPoliciesMicrosoftWindowsStorageSense. Alternatively, in the Local Group Policy Editor, navigate to Computer Configuration > Administrative Templates > System > Storage Sense and enable the Allow Storage Sense Temporary Files cleanup setting.
What is Storage Sense?
Storage Sense is a smart Windows 11 feature that automatically cleans up your computer by getting rid of files you no longer need, like temporary files, and emptying your Recycle Bin.
- Deletes temporary files you don’t need
- Empties the Recycle Bin after a certain time
- Cleans files in your Downloads folder after a while
Why use Storage Sense? It frees up space on your hard drive without you having to do it manually.
What happens when you turn it on? Storage Sense runs automatically when your disk space gets low and removes temporary files.
By default, Storage Sense is turned off. You can turn it on anytime you want.
Method 1Using Group Policy Editor
You can turn Storage Sense temporary file cleanup on or off using the Group Policy Editor, a tool for managing Windows settings on your PC.
- Click the Start button and type
Edit group policy, then press Enter. - In the window that opens, follow this path on the left side:
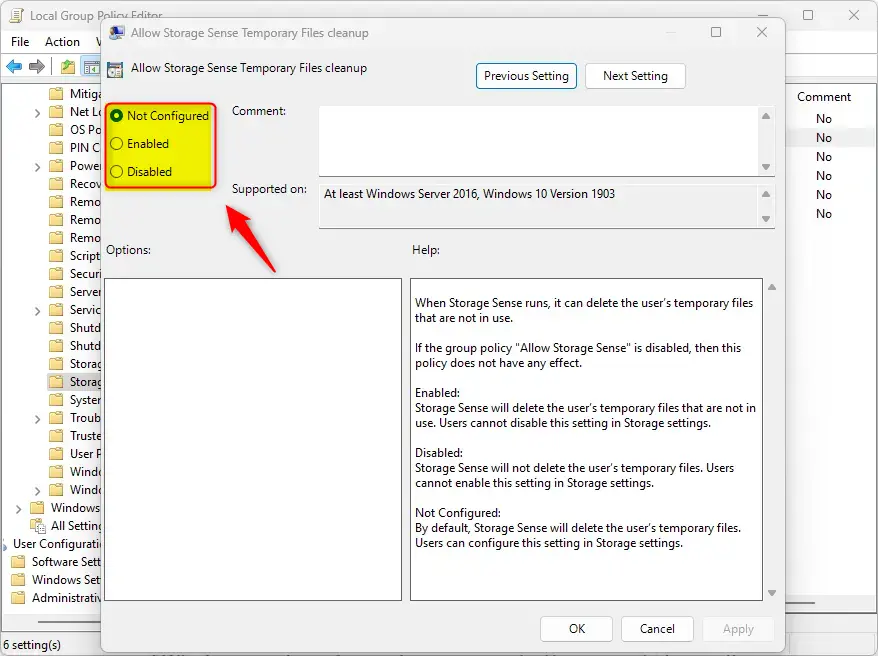
Computer Configuration > Administrative Templates > System > Storage Sense - On the right side, find
Allow Storage Sense Temporary Files cleanupand double-click it. - Choose one of these options:
Not Configured– Leaves it as default (Storage Sense can be turned on or off by users)Enabled– Storage Sense will delete temporary files automatically and users won’t be able to turn this offDisabled– Storage Sense won’t delete temporary files and users can’t turn it on
- Click
OKto save your changes. - [REQUIRES ADMIN PRIVILEGES] Restart your computer to make sure the changes take effect.
Method 2Using Registry Editor
If you’re comfortable making advanced changes, you can manage Storage Sense temporary file cleanup using the Windows Registry Editor, which requires administrator access.
- [REQUIRES ADMIN PRIVILEGES] Open the Registry Editor by typing
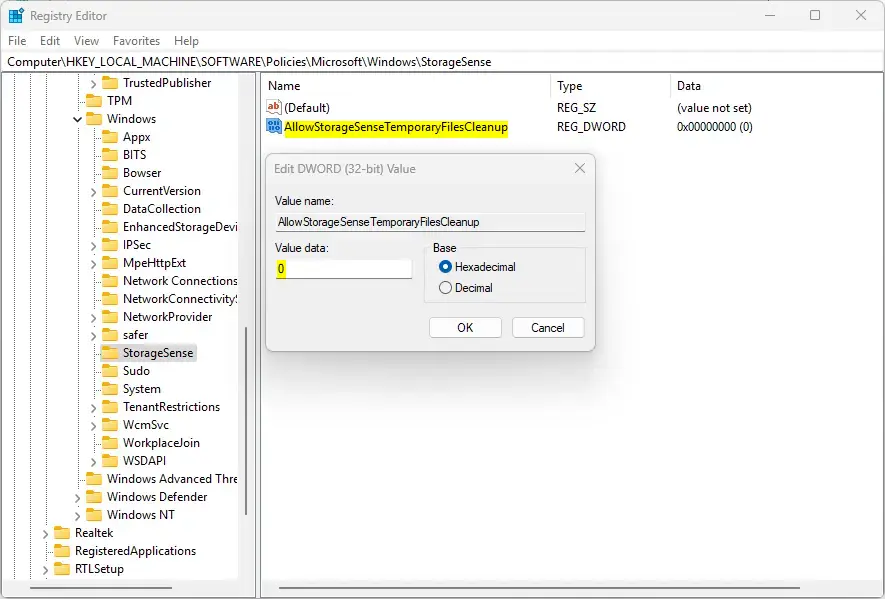
regeditin the Start menu search and running it as administrator. - Navigate to this folder:
HKEY_LOCAL_MACHINE\SOFTWARE\Policies\Microsoft\Windows\StorageSense - Look for a value called
AllowStorageSenseTemporaryFilesCleanupin the right pane. - If it exists, double-click it and set the number to:
0to turn off temporary file cleanup1to turn on the cleanup
- If it doesn’t exist:
- Right-click in the right pane and select
New > DWORD (32-bit) Value - Name it
AllowStorageSenseTemporaryFilesCleanup - Double-click it and set the value to
0to disable, or1to enable
- Right-click in the right pane and select
- Close Registry Editor and restart your PC.
Summary
Storage Sense is a useful Windows tool that automatically removes temporary files, and you can control its temporary file cleanup feature using either the Group Policy Editor or the Registry Editor.
Does storage Sense delete temporary files?
If Storage Sense is turned on with the default settings, it will run when your device is low on disk space and will clean up unnecessary temporary files.
Is it okay to delete temporary files in storage?
Yes, it’s generally safe to delete temporary files found in the Temp folder, typically located at 📁C:\Users\AppData\Local\Temp.
Was this guide helpful?

About the Author
Richard
Tech Writer, IT Professional
Richard, a writer for Geek Rewind, is a tech enthusiast who loves breaking down complex IT topics into simple, easy-to-understand ideas. With years of hands-on experience in system administration and enterprise IT operations, he’s developed a knack for offering practical tips and solutions. Richard aims to make technology more accessible and actionable. He's deeply committed to the Geek Rewind community, always ready to answer questions and engage in discussions.

No comments yet — be the first to share your thoughts!