How to Enable or Disable BitLocker Auto-Unlock in Windows 11
You can enable or disable BitLocker auto-unlock in Windows 11 to have encrypted drives automatically decrypt after you sign into your PC.
BitLocker is Windows’ built-in tool for encrypting your drives, which helps protect your data from anyone who shouldn’t see it. Auto-unlock lets you skip entering a password for certain BitLocker-encrypted drives after you log into Windows 11.
This handy feature works for different kinds of drives, including your main system drive, other internal drives, and removable ones like USB flash drives. For example, you can set your secondary internal drive to auto-unlock with BitLocker.
Enable or disable BitLocker auto-unlock by navigating to Control Panel > System and Security > BitLocker Drive Encryption. Select the desired drive and choose “Turn on auto-unlock” or “Turn off auto-unlock.” Alternatively, use Command Prompt or PowerShell with the `manage-bde` or `Enable/Disable-BitLockerAutoUnlock` commands.
How to Turn On or Off BitLocker Auto-Unlock Using Control Panel
You can turn BitLocker auto-unlock on or off for your drives using the Windows 11 Control Panel, making it simple to manage how your encrypted drives open after you sign in.
- Click the Start button. Type
Control Panel. Open it. - Go to System and Security. Then click BitLocker Drive Encryption.
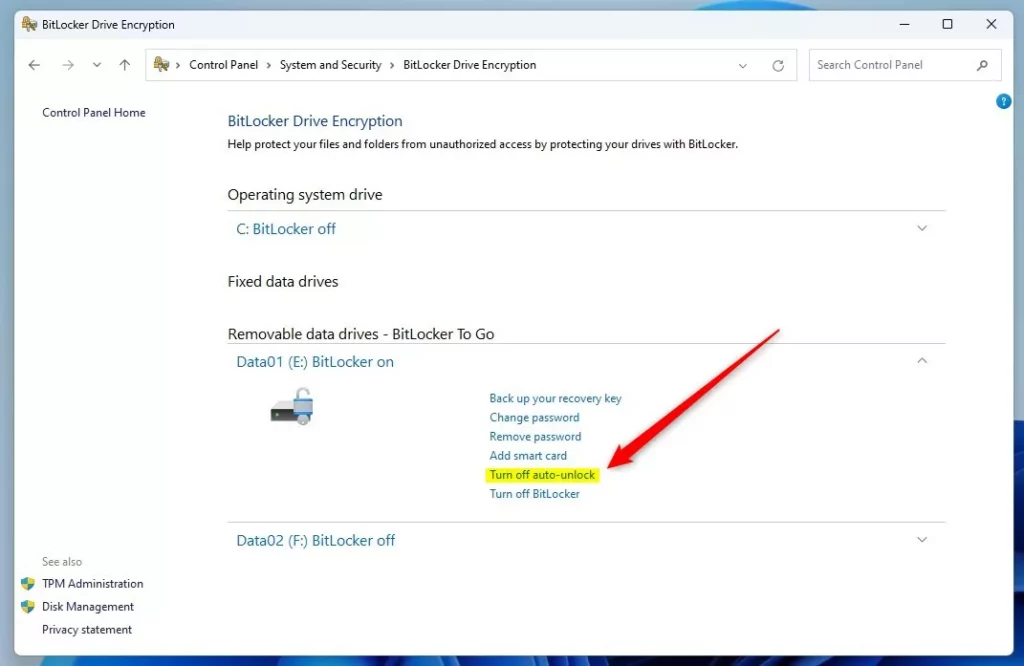
- Find the drive you want to change in the list. It will say “BitLocker On”.
- To turn auto-unlock on, click Turn on auto-unlock next to that drive.
- To turn auto-unlock off, click Turn off auto-unlock.
Here’s what it looks like when you turn auto-unlock on for a fixed drive:
And here’s the screen when auto-unlock is turned off:
How to Turn On or Off BitLocker Auto-Unlock Using Commands
If you prefer using commands, you can also manage BitLocker auto-unlock with Command Prompt or PowerShell. Here’s how:
Step 1Open Windows Terminal
Step 1: Open Windows Terminal. You can do this by right-clicking the Start button and selecting “Windows Terminal.” If you need a refresher on opening it, check out this guide.
Step 2Use the Commands
FLAG: Admin privileges required for this step.
To turn on auto-unlock for a drive (replace E with your drive letter):
manage-bde -autounlock -enable E:To turn off auto-unlock for a drive:
manage-bde -autounlock -disable E:How to Turn On or Off BitLocker Auto-Unlock Using PowerShell
If you’re comfortable with commands, you can manage BitLocker auto-unlock in Windows 11 using PowerShell, which lets you turn the feature on or off for specific drives after opening it as an administrator.
FLAG: Admin privileges required for this step.
Open PowerShell. Type PowerShell in the Start menu and click the app. See this guide if you need help.
To turn on auto-unlock, type this command and press Enter (replace E: with your drive letter):
Enable-BitLockerAutoUnlock -MountPoint "E:"To turn off auto-unlock, type this command and press Enter:
Disable-BitLockerAutoUnlock -MountPoint "E:"That’s it! Your drive will now either unlock automatically when you sign in or require manual unlocking, depending on your choice.
Summary
BitLocker auto-unlock in Windows 11 helps you balance security and convenience for your encrypted drives, letting you choose if they unlock automatically after you log in to save time or stay locked for more protection.- BitLocker helps keep your data safe by encrypting your drives.
- Auto-unlock lets your encrypted drives open automatically after you log into Windows. This saves time.
- You can easily turn auto-unlock on or off through the Control Panel, Command Prompt, or PowerShell.
- Turning off auto-unlock adds an extra layer of security. Turning it on makes accessing your files faster.
- If you want to learn more about setting up BitLocker, here’s a helpful guide: How to Turn On BitLocker in Windows 11.
Does 🪟 Windows 11 automatically activate BitLocker?
Microsoft has made BitLocker a standard feature in Windows 11, offering a strong security system for your digital life. Think of it like having a high-security lock automatically added to your front door.
How do I turn off BitLocker auto unlock?
You must remove automatic unlocking keys before you can disable BitLocker using the Disable-BitLocker cmdlet. The Clear-BitLockerAutoUnlock cmdlet can remove keys for all volumes configured for automatic unlocking, rather than just specific ones.
How does BitLocker auto unlock work?
You can set up BitLocker to automatically unlock volumes that don’t contain the operating system. Once a user unlocks the operating system volume, BitLocker uses encrypted information from the registry and volume metadata to unlock any data volumes that use automatic unlocking.
Was this guide helpful?

About the Author
Richard
Tech Writer, IT Professional
Richard, a writer for Geek Rewind, is a tech enthusiast who loves breaking down complex IT topics into simple, easy-to-understand ideas. With years of hands-on experience in system administration and enterprise IT operations, he’s developed a knack for offering practical tips and solutions. Richard aims to make technology more accessible and actionable. He's deeply committed to the Geek Rewind community, always ready to answer questions and engage in discussions.


No comments yet — be the first to share your thoughts!