How to Turn On DNS over HTTPS (DoH) in Windows 11
You can turn on DNS over HTTPS (DoH) in Windows 11 to encrypt your DNS queries, making your web browsing more private and secure.
DNS over HTTPS is a protocol that encrypts your DNS traffic, preventing eavesdropping and manipulation by your ISP or anyone else on your network.
Starting with Windows 11 version 21H2, Microsoft integrated native support for DoH, allowing you to enable it directly through your network settings.
This feature helps protect your online activity from being easily tracked. You’ll need administrator privileges to make these changes.
What is DNS over HTTPS (DoH)?
Your computer uses something called DNS (Domain Name System) to find websites. Think of it like a phone book. When you type a website name like example.com, DNS translates it into a number your computer can understand. Normally, these lookups happen without any protection. This means others can see which websites you visit or even trick your computer into going to the wrong site.
DNS over HTTPS (DoH) fixes this problem. It sends these lookups through a secure, encrypted connection. It uses the same safe method your browser uses to talk to websites. This keeps your web activities private from spies and hackers.
How to Turn On DNS over HTTPS in 🪟 Windows 11
Follow these simple steps to turn on DoH on your Windows 11 computer:
- Open Settings: Click the Start button (Windows logo) at the bottom left of your screen. Then click the Settings gear icon.
- Go to Network settings: In the Settings window, click Network & internet from the left menu.
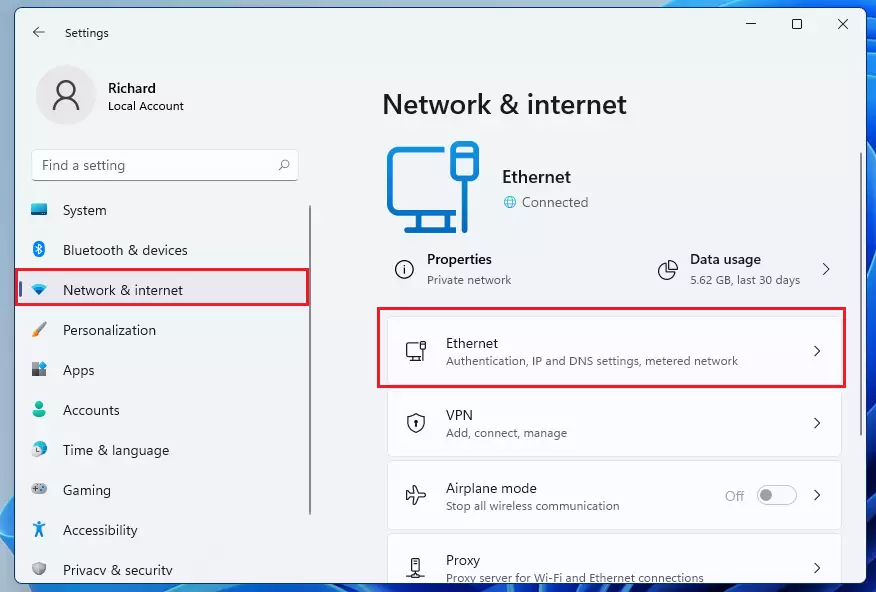
- Choose your connection: Click on the network you use. If you have a wired connection, click Ethernet. If you use Wi-Fi, click Wi-Fi instead.
- Find DNS settings: Scroll down until you see DNS server assignment. Click the Edit button next to it.

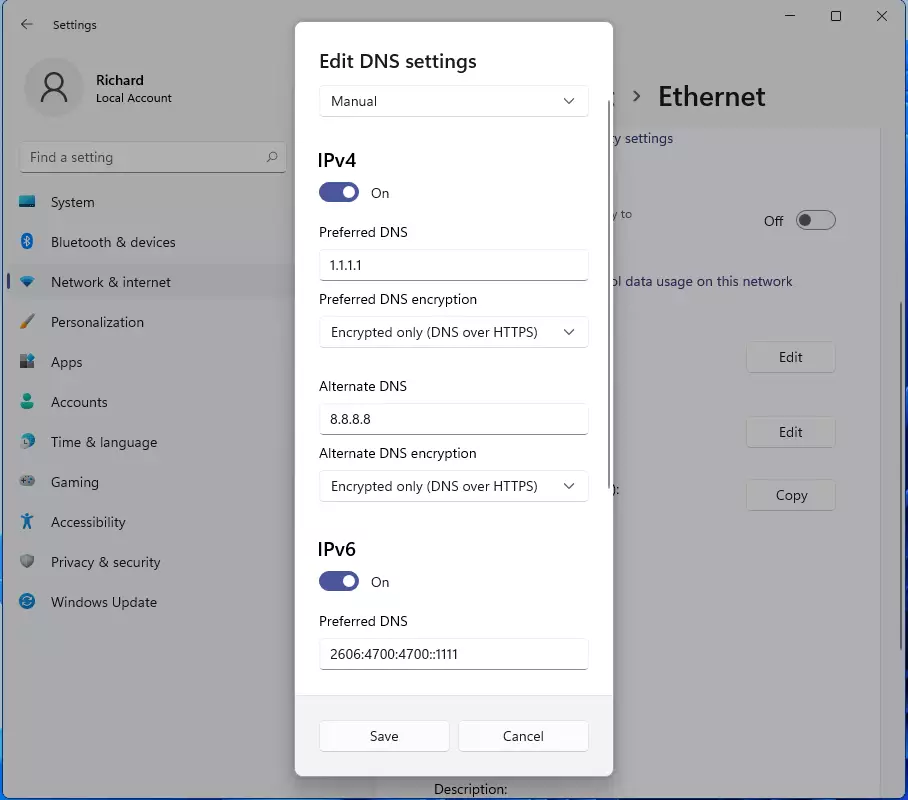
- Change to manual: In the Edit DNS settings window, click the dropdown menu. Change it from Automatic (DHCP) to Manual.
- Turn on IPv4 or IPv6: Turn on the switch for IPv4 or IPv6. You can turn on both if you want.
- Add DNS addresses: Type in the DNS addresses you want to use. See the list below for popular choices.
- Enable encryption: Under Encryption, select Encrypted only (DNS over HTTPS).
- Save your changes: Click Save to apply the settings.
Popular DNS Servers You Can Use
Here are some trusted DNS servers that support DoH. Pick the type that matches your setup (IPv4 or IPv6).
| DNS Provider | Type | Primary DNS | Secondary DNS |
|---|---|---|---|
| Google Public DNS (IPv4) | IPv4 | 8.8.8.8 | 8.8.4.4 |
| Cloudflare (IPv4) | IPv4 | 1.1.1.1 | 1.0.0.1 |
| Quad9 (IPv4) | IPv4 | 9.9.9.9 | 149.112.112.112 |
| Google Public DNS (IPv6) | IPv6 | 2001:4860:4860::8888 | 2001:4860:4860::8844 |
| Cloudflare (IPv6) | IPv6 | 2606:4700:4700::1111 | 2606:4700:4700::1001 |
| Quad9 (IPv6) | IPv6 | 2620:fe::fe | 2620:fe::fe:9 |
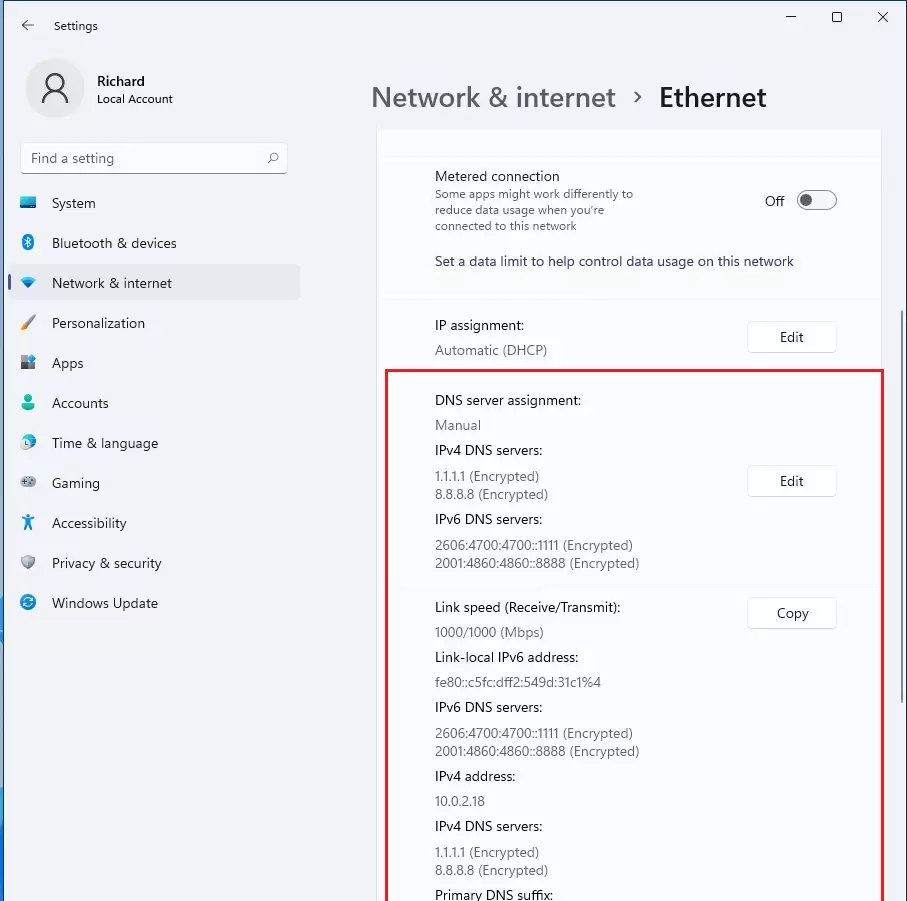
After you save, your DNS settings will look like this:
Tip: If you use Wi-Fi or have more than one network connection, repeat these steps for each one. This keeps all your internet traffic safe.
Summary
- Turning on DNS over HTTPS (DoH) makes your web browsing more private and secure.
- It stops others from spying on or changing the websites you visit.
- You can choose from trusted DNS services like Google, Cloudflare, or Quad9.
- The setup is quick and easy. You do it right inside Windows 11’s Network settings.
- Remember to update all your network connections for full protection.
- If you want to learn more about DNS over HTTPS, check out this simple Cloudflare explanation page.
Was this guide helpful?

About the Author
Richard
Tech Writer, IT Professional
Richard, a writer for Geek Rewind, is a tech enthusiast who loves breaking down complex IT topics into simple, easy-to-understand ideas. With years of hands-on experience in system administration and enterprise IT operations, he’s developed a knack for offering practical tips and solutions. Richard aims to make technology more accessible and actionable. He's deeply committed to the Geek Rewind community, always ready to answer questions and engage in discussions.


No comments yet — be the first to share your thoughts!