How to Disable Windows Firewall on Windows 11
This guide explains how to manage or disable the Windows Defender Firewall on Windows 11. This built-in security tool acts as a digital gatekeeper, monitoring inbound rules and outbound rules to block harmful traffic. Understanding your network security settings is essential for maintaining a healthy system.
Why disable the firewall?
Most users should keep the firewall active. You might need to disable it temporarily for troubleshooting connectivity issues or when setting up a third-party security suite that manages its own protection.
What happens when done?
Once you disable the firewall, your computer loses its primary defense against unauthorized access. Your system becomes vulnerable to external threats and malicious software. Always re-enable it immediately after testing.
How to Check if Windows Firewall is Active
You can verify your status via the Windows Security Center. If the shield icon has a green checkmark, your protection is active. If it shows a red ‘X’, your firewall is likely disabled.
Method 1: Using Windows Settings (Standard Method)
Note: This process requires admin privileges.
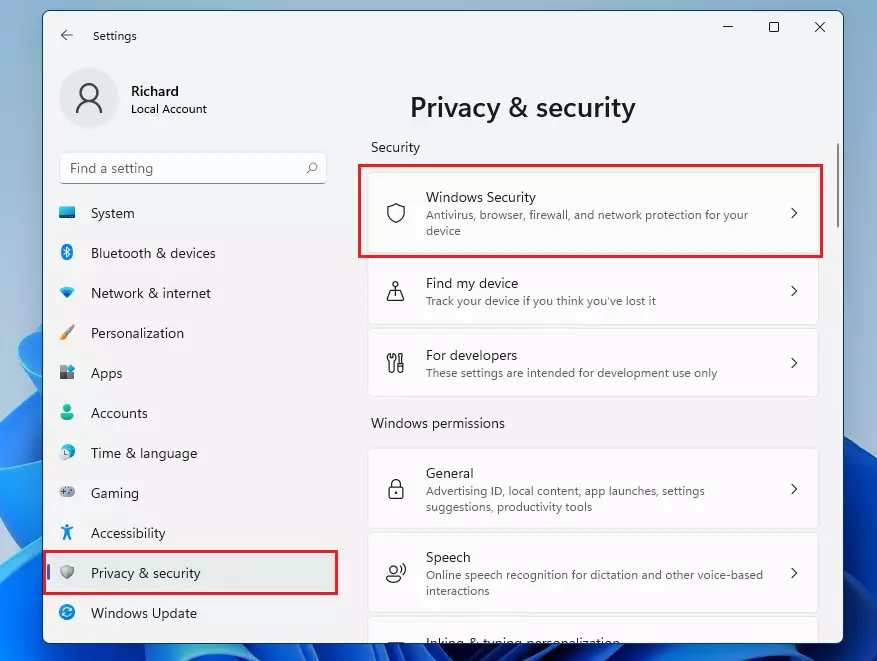
1. Press Windows key + I to open Settings.

2. Go to Privacy & security > Windows Security.
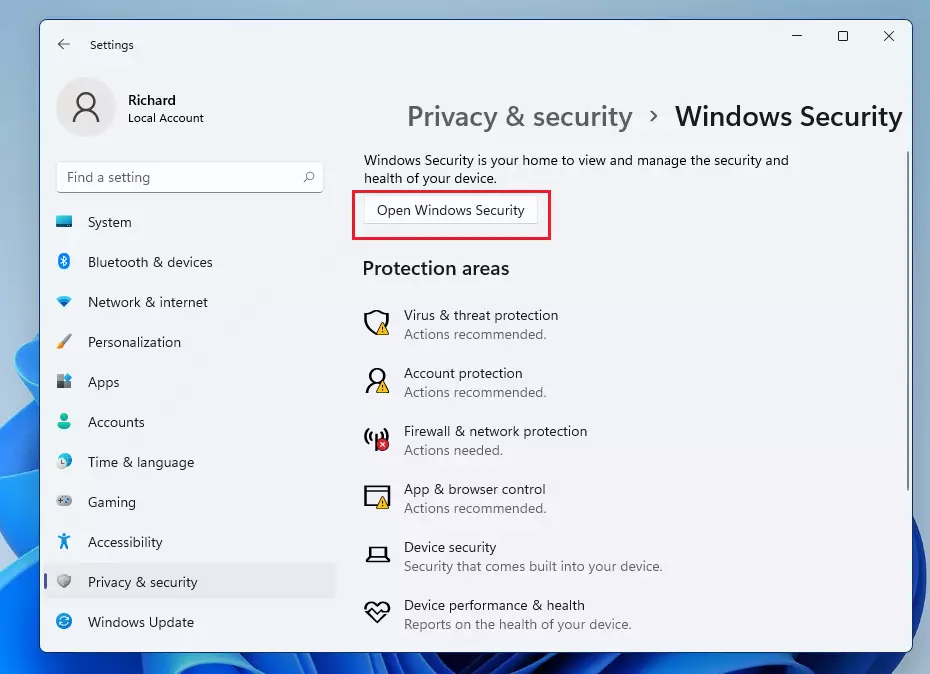
3. Click Open Windows Security.
4. Select Firewall & network protection. You will see three profiles: Domain profile, Private profile, and Public profile.

5. Click your active network and toggle the Microsoft Defender Firewall switch to Off.

Method 2: Using Command Prompt (Advanced)
Note: This process requires admin privileges.
You can use the netsh advfirewall command to manage settings quickly.
1. Search for cmd in the Start menu, right-click it, and select Run as administrator.
2. To disable the firewall for all profiles, type the following command and press Enter:
netsh advfirewall set allprofiles state off
3. To turn it back on, use:
netsh advfirewall set allprofiles state on
Method 3: Using PowerShell
Note: This process requires admin privileges.
1. Right-click the Start button and select Terminal (Admin) or PowerShell (Admin).
2. Run this command to disable the firewall:
Set-NetFirewallProfile -Profile Domain,Public,Private -Enabled False
Method 4: Using Group Policy Editor
Note: This process requires admin privileges and is for Windows Pro/Enterprise users.
1. Press Windows key + R, type gpedit.msc, and hit Enter.
2. Navigate to: Computer Configuration\Administrative Templates\Network\Network Connections\Windows Defender Firewall\Standard Profile.
3. Double-click Windows Defender Firewall: Protect all network connections and set it to Disabled.
Best Practices: Allowing Apps vs. Disabling Firewall
Instead of turning off the firewall, you should allow specific apps through. This keeps your system secure while fixing connectivity issues.
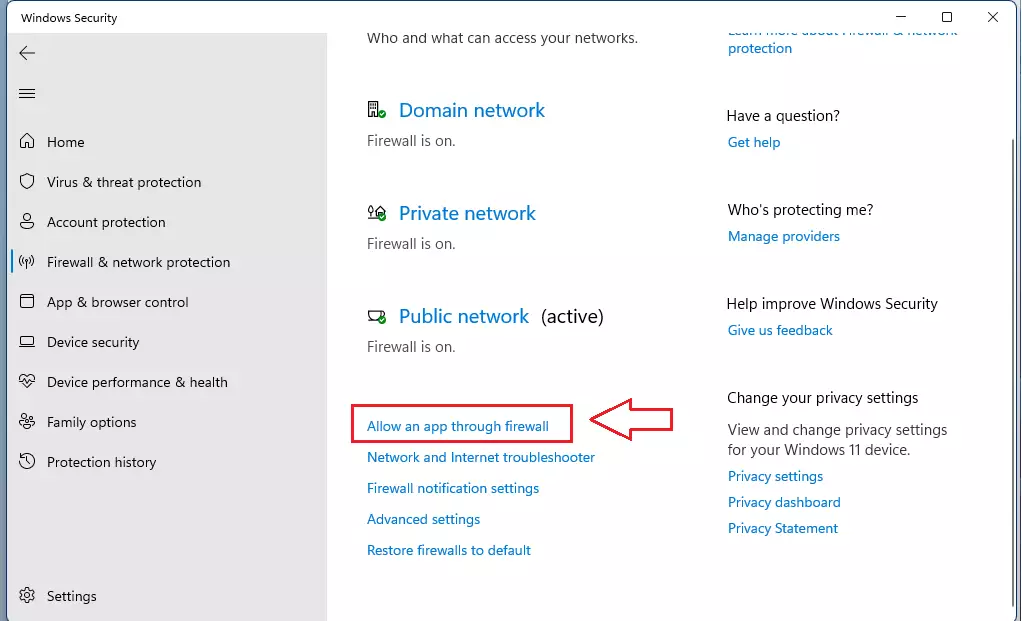
1. Go to Firewall & network protection and click Allow an app through the firewall.
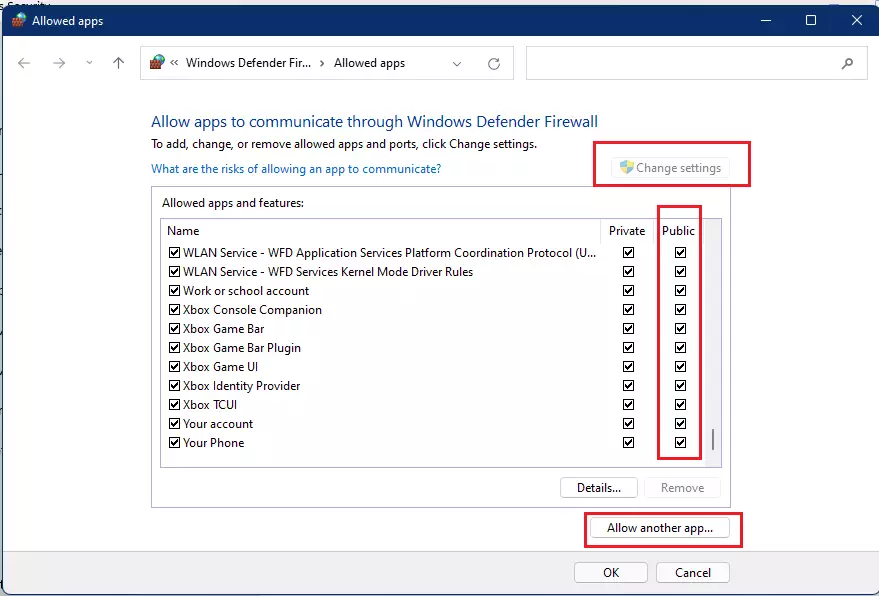
2. Click Change settings (requires admin privileges) and select Allow another app to add your program.
Summary
Disabling the Windows Defender Firewall is a high-risk action that should only be performed when necessary. Always prefer allowing specific apps through the firewall rather than turning it off entirely. If you must disable it, use the Settings app or PowerShell, and remember to re-enable it immediately to maintain your system’s security.” }
Is it safe to disable Windows Firewall?
No, it is not safe. Disabling the firewall removes a critical layer of protection, leaving your computer exposed to hackers and malware. Only disable it temporarily for troubleshooting purposes and ensure you have an alternative security solution active if you must keep the firewall off for an extended period.
Can I disable the firewall for specific networks only?
Yes. Windows allows you to manage the Domain, Private, and Public profiles separately. You can disable the firewall for a Private network while keeping it active for Public networks to ensure your data remains protected when you connect to untrusted Wi-Fi hotspots in public locations.
Was this guide helpful?


Leave a Reply Cancel reply