How to Enable or Disable Dark Mode in Outlook for Windows 11
You enable or disable dark mode in Outlook for Windows 11 by changing its appearance settings.
Dark mode in Outlook provides a high-contrast interface with a dark background and light text, designed to reduce eye strain and improve readability, especially in dim environments.
This feature benefits users with OLED screens by potentially conserving battery life. You can apply dark mode to the new Outlook for Windows or the classic Outlook version.
Once you select your preferred theme, Outlook instantly updates your mailbox, calendar, and all settings to match.
In New Outlook, go to Settings > General > Appearance and select your theme. In Classic Outlook, go to File > Office Account and choose a theme under Office Theme. The reading pane also has a sun/moon icon to toggle message backgrounds.
New Outlook vs. Classic Outlook
The New Outlook for Windows is built on web technologies, while Classic Outlook uses traditional desktop software. The New Outlook syncs more closely with your Windows 11 system settings, while Classic Outlook often requires manual theme selection within the Office account settings.
How to change to Dark Mode in New Outlook
No admin privileges are required for these steps.
- Open the Outlook app.
- Click the Settings (gear icon) in the top-right corner.
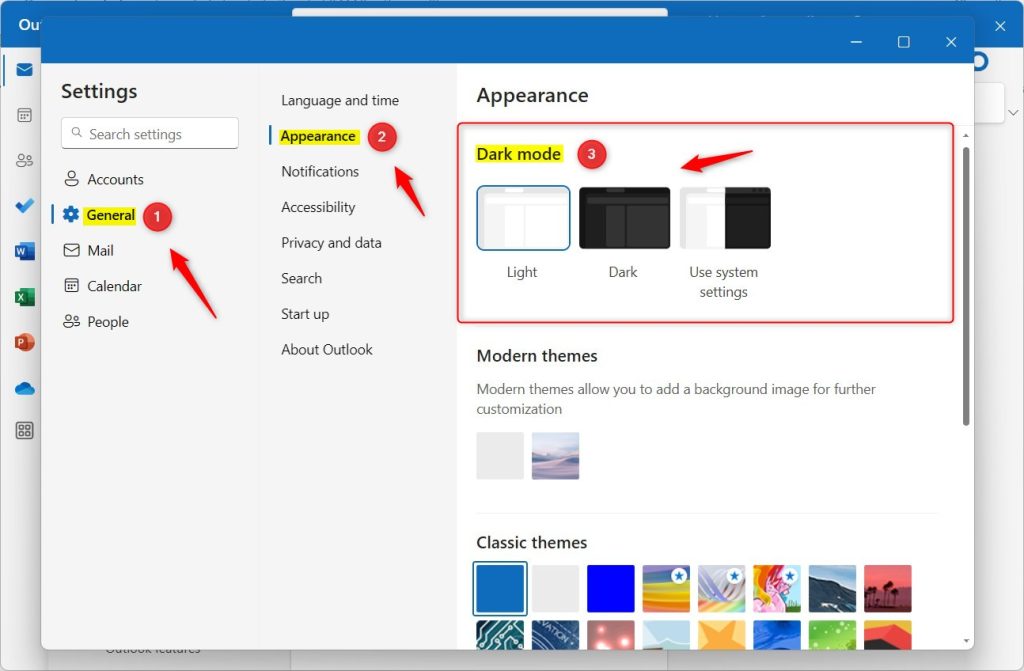
- Go to General > Appearance.
- Select Light, Dark, or System Default.
- Click Save.
How to change to Dark Mode in Classic Outlook
- Open Outlook.
- Click File > Office Account.
- Under Office Theme, select Black or Dark Gray.
Managing the Reading Pane Background
Sometimes the reading pane stays white even in dark mode. To fix this:
- Open an email.
- Look for the Sun/Moon icon in the reading pane toolbar.
- Click it to toggle the background color of the message body.
Troubleshooting Outlook Dark Mode Bugs
Outlook’s dark mode bugs on Windows 11 can be frustrating, but simple fixes often sort them out. Check for Office updates first, as newer versions usually fix known issues. If that doesn’t help, a quick check in the Windows Registry might be needed to ensure the theme setting is correct.
- Check Office Updates: Go to File > Office Account > Update Options > Update Now.
- Registry Check: Press ⊞ Win+R, type regedit, and navigate to 🗝️HKEY_CURRENT_USER\Software\Microsoft\Office\16.0\Common. Ensure the UI Theme value is set correctly. [Requires Admin Privileges]
- Repair Office: Go to Settings > Apps > Installed Apps > Modify > Online Repair. [Requires Admin Privileges]
Summary
Customizing your Outlook appearance improves productivity and comfort. By using the Appearance settings in New Outlook or the Office Theme menu in Classic Outlook, you can easily toggle between modes. If issues persist, use the reading pane toggle or perform an Office repair to restore functionality.
Why does my reading pane stay dark when I turn off dark mode?
Your Outlook reading pane might stay dark even after you turn off dark mode because the message background has its own setting.
How to fix Outlook dark mode bugs in 🪟 Windows 11?
If Outlook fails to follow your Windows 11 theme, first check for pending Office updates. If that fails, perform an Online Repair via the Apps settings menu. For advanced users, checking the registry path 🗝️HKEY_CURRENT_USER\Software\Microsoft\Office\16.0\Common can help reset stuck theme configurations.
Was this guide helpful?

About the Author
Richard
Tech Writer, IT Professional
Richard, a writer for Geek Rewind, is a tech enthusiast who loves breaking down complex IT topics into simple, easy-to-understand ideas. With years of hands-on experience in system administration and enterprise IT operations, he’s developed a knack for offering practical tips and solutions. Richard aims to make technology more accessible and actionable. He's deeply committed to the Geek Rewind community, always ready to answer questions and engage in discussions.


No comments yet — be the first to share your thoughts!