How to Start Windows 11 in Safe Mode
To start Windows 11 in Safe Mode, you’ll need to access the advanced startup options. This loads a minimal set of drivers and services, helping you troubleshoot system issues.
Safe Mode is a diagnostic startup mode for Windows 11. It loads only the essential files and drivers your operating system needs to run. This stripped-down environment helps you identify and resolve problems that might prevent your PC from starting up correctly, like driver conflicts or malware.
For example, if your Windows 11 PC constantly crashes or freezes, entering Safe Mode can help you pinpoint the cause. You can then uninstall problematic software or drivers, or run system scans to fix deeper issues.
Access advanced startup options by holding Shift while clicking Restart from the Power menu. Then, navigate to Troubleshoot > Advanced options > Startup Settings and press the corresponding number key for your desired Safe Mode.
What is Safe Mode?
Safe Mode: This starts Windows with only basic drivers and no internet. It doesn’t load extra software or drivers that might be causing problems. If your computer works fine in Safe Mode, it means the problem is likely from something that doesn’t start in Safe Mode.
Types of Safe Mode:
- Safe Mode: Starts Windows with only basic drivers and no internet.
- Safe Mode with Networking: Starts Windows with basic drivers plus internet and network access.
- Safe Mode with Command Prompt: Starts Windows with basic drivers and opens a command window instead of the normal desktop. This is for advanced users.
Windows 11 offers different Safe Mode options to help you fix problems. You can choose between standard Safe Mode, Safe Mode with Networking to access the internet, or Safe Mode with Command Prompt for advanced troubleshooting.
How to Start Safe Mode in 🪟 Windows 11
Option 1Use Advanced Startup Settings
Starting Windows 11 in Safe Mode is easy using the Advanced Startup settings. This method involves restarting your PC and navigating through a few blue screens to reach the Safe Mode options.
- Click the Start button, then click the Power icon.
- Hold the Shift key and click Restart.
- Your computer will restart and show a blue screen with options. Click Troubleshoot.
- Click Advanced options.
- Click Startup Settings.
- Click Restart.
- When your PC restarts, you will see a list of options. Press the number key or function key for the Safe Mode you want:
| Key to Press | Mode |
|---|---|
| 4 or F4 | Safe Mode |
| 5 or F5 | Safe Mode with Networking |
| 6 or F6 | Safe Mode with Command Prompt |
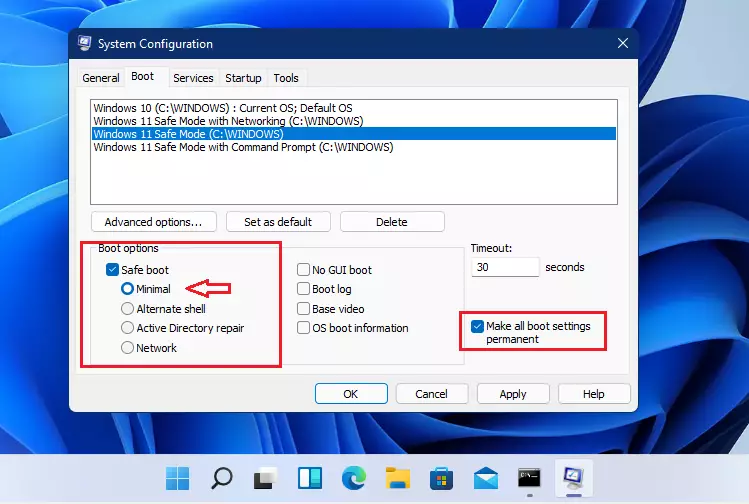
Option 2Use System Configuration (msconfig)
You can use the System Configuration tool, also known as msconfig, to automatically start Windows 11 in Safe Mode. This handy tool lets you choose which type of Safe Mode you want before restarting your computer.
- Press Windows + R, type
msconfig, and press Enter. - In the window that opens, click the Boot tab.
- Under Boot options, check Safe boot.
- Choose the type of Safe Mode you want:
- Minimal: Standard Safe Mode
- Network: Safe Mode with Networking
- Alternate shell: Safe Mode with Command Prompt
- Click OK.
- You will be asked to restart your computer. Click Restart to enter Safe Mode.
Option 3Use Command Prompt
For those comfortable with commands, you can start Windows 11 in Safe Mode using the Command Prompt. Opening Command Prompt as an administrator allows you to type specific commands to enter Safe Mode or Safe Mode with Networking.
- Open Windows Terminal or Command Prompt as an administrator. To do this, right-click the Start button and select Windows Terminal (Admin).
- Type one of the following commands and press Enter:
| Command | What it Does |
|---|---|
bcdedit /set {current} safeboot minimal | Start in Safe Mode |
bcdedit /set {current} safeboot network | Start in Safe Mode with Networking |
bcdedit /set {current} safeboot minimalbcdedit /set {current} safebootalternateshell yes
| Start in Safe Mode with Command Prompt |
bcdedit /deletevalue {current} safebootbcdedit /deletevalue {current} safebootalternateshell
| Return to Normal Mode |
After typing your command, restart your computer to enter Safe Mode.
Option 4Use Command Prompt at Boot
If you can open Command Prompt before Windows starts:
- Type
bcdeditand press Enter. - Look for the identifier under the Windows Boot Loader section (usually
{default}). - Use the same commands as Option 3 but replace
{current}with your identifier (for example,{default}). - Restart your computer to apply changes.
Important Tips
- Use Safe Mode to find and fix problems by running only essential parts of Windows.
- Choose the Safe Mode version that fits your needs (with or without internet or command prompt).
- After fixing your problem, make sure to restart your computer normally.
When using Windows 11 Safe Mode, remember it’s designed to help you fix problems by running only the most basic parts of Windows. Always choose the right Safe Mode option for your needs and restart your computer normally once you’re done.

Is F8 Safe Mode for 🪟 Windows 11?
Hi Andrew, getting into Safe Mode on Windows 11 can be tricky because the old F8 shortcut doesn't work anymore. The main reason is that Windows now boots too fast for that key to register, so you need to use the recovery options instead.
Was this guide helpful?

About the Author
Richard
Tech Writer, IT Professional
Richard, a writer for Geek Rewind, is a tech enthusiast who loves breaking down complex IT topics into simple, easy-to-understand ideas. With years of hands-on experience in system administration and enterprise IT operations, he’s developed a knack for offering practical tips and solutions. Richard aims to make technology more accessible and actionable. He's deeply committed to the Geek Rewind community, always ready to answer questions and engage in discussions.


No comments yet — be the first to share your thoughts!