How to Locate Your Mouse Pointer in Ubuntu Linux


Pressing the Left Ctrl key in Ubuntu Linux makes your mouse pointer flash and displays an orange circle around it. This built-in pointer locator helps you spot your cursor on a busy desktop or a large monitor without shaking the mouse.
The default cursor is small and easy to lose, especially while you type fast or after you look away from the screen. Tapping the key brings your eyes straight back to the arrow. The feature is switched off by default, so you need to turn it on once in Settings. The steps below show how.
Press the CTRL key to reveal a visual spotlight around your mouse pointer. This feature, called “Locate Pointer,” is enabled in System Settings under Accessibility, in the Pointing & Clicking section.
How to find your mouse pointer fast on Ubuntu Linux
To locate the pointer in Ubuntu, open the Settings app and turn on the accessibility option called Locate Pointer. After that, pressing the Ctrl key shows a visual ripple around your cursor. The feature is built in, so you don’t need to install any extra software. It works well on busy screens and on multi-monitor setups.
The whole change takes about a minute. You don’t need to restart or log out, and you can switch it off again at any time.
Ubuntu keeps most of its settings in one place, the Settings app (some older guides call it System Settings). From there you can change system options, create new user accounts, and manage updates. The pointer option we need is in its Accessibility section.
There are two ways to open it. The first is from the Activities overview:
- Click Activities in the top-left corner of the screen, or press the Super key (the Windows key on most keyboards). The overview opens with a search box at the top.
- Type Settings in the search box. The Settings icon appears in the results.
- Click the Settings icon. The Settings window opens.
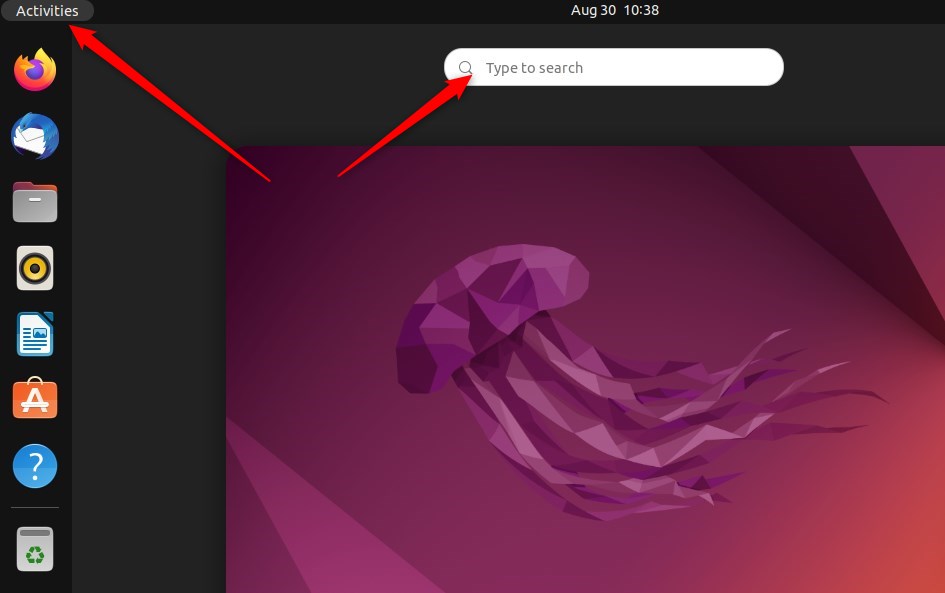
Alternatively, you can reach Settings from the system menu in the top-right corner of your desktop bar. It's the small area that holds the network, volume and power icons.
- Click the System menu in the top-right corner. A panel opens with quick toggles and a row of buttons.
- Select Settings from the menu, as shown in the image below. The Settings window opens. On some Ubuntu versions this is a gear icon rather than a text label.
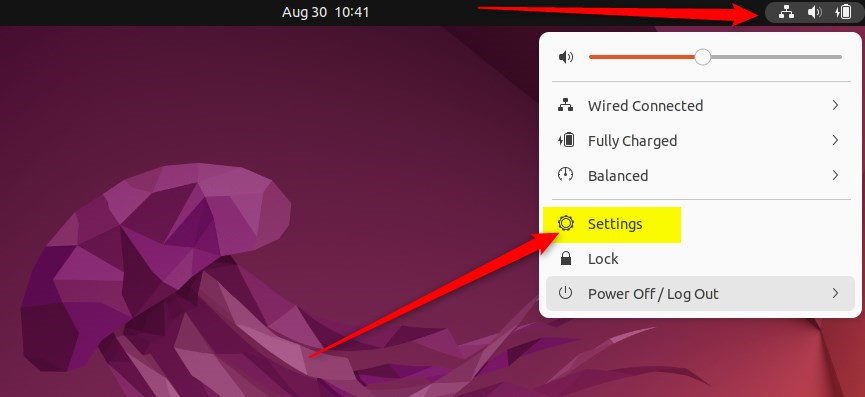
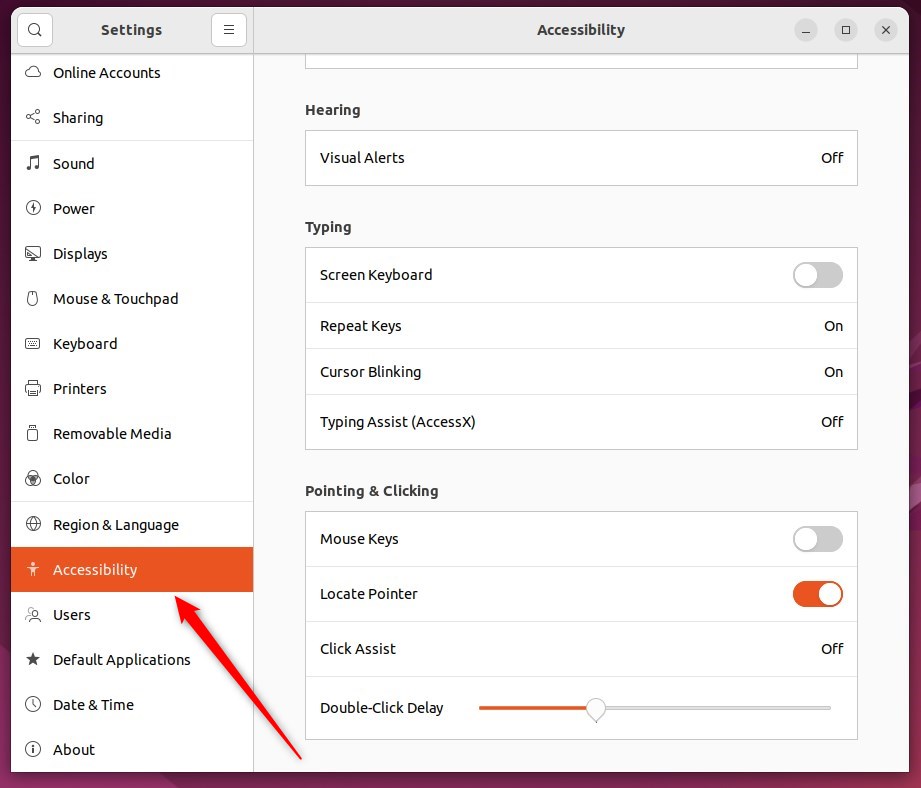
Now find the accessibility options.
- In the Settings app, look at the list of categories on the left side of the window.
- Click the Accessibility tile to open that section. The right side of the window now shows the accessibility options, grouped by topic.
If you don't see it, scroll down the list or use the search icon at the top of the window and type Accessibility. The exact layout varies a little between Ubuntu releases, but the section is always named Accessibility.
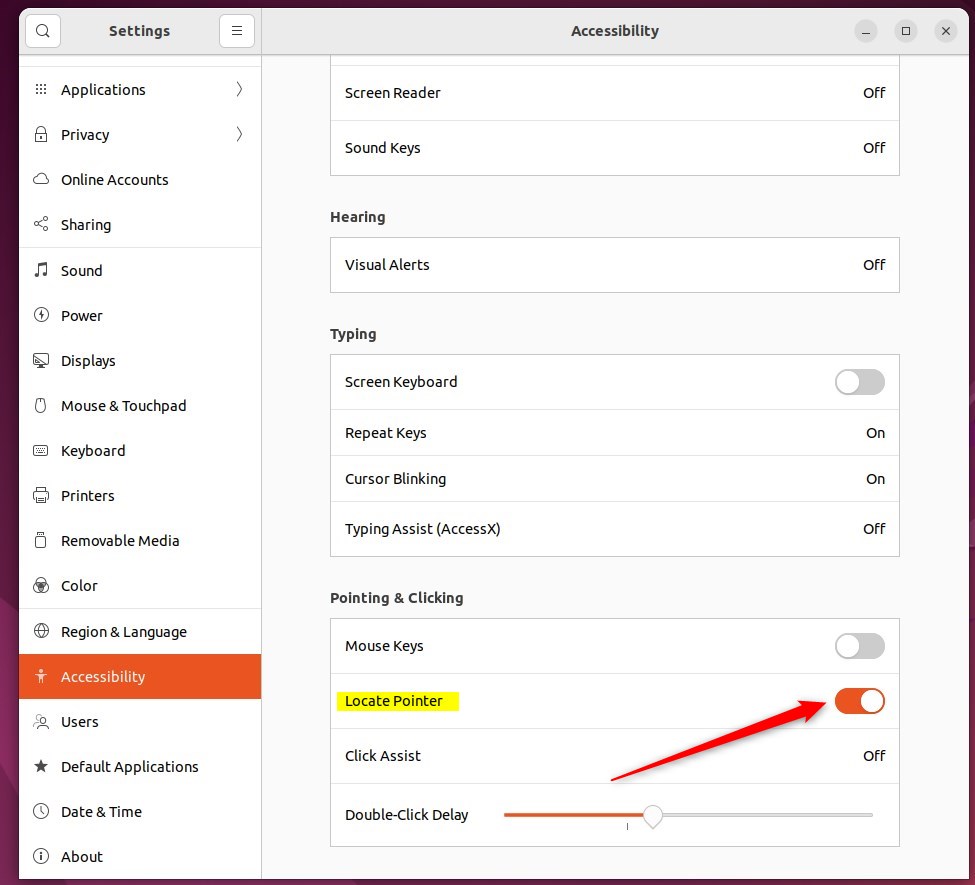
Next, switch the feature on.
- In Settings Accessibility, scroll to the Pointing & Clicking group. On some versions you may need to click the Pointing & Clicking entry to open it.
- Find the Locate Pointer option.
- Click the switch to turn it On. The switch changes colour and moves to the right to show it is active.
The setting applies to your user account only. Other users on the same computer need to turn it on for themselves.
To turn it off, open the same page and flip the switch back to Off. The change takes effect straight away, and the Ctrl key goes back to doing nothing on its own.
Now test it.
- Move the mouse to a spot on the screen, then let go of it.
- Press and hold the Ctrl key. A circle appears around the pointer and shrinks toward it, so you can see exactly where it is.
If nothing happens, make sure the Settings window has finished applying the change. Check that the switch still shows On, and try the Left Ctrl key on your keyboard.
That completes the process. Close the Settings app by clicking the close button in the top corner of its window. Your choice is saved automatically, so there is no Apply or Save button to press.
Conclusion:
- Enabling the Locate Pointer feature in Settings Accessibility helps you quickly find the mouse pointer on Ubuntu Linux. It needs no restart and no extra software.
- This feature is especially useful for people with poor vision, or for anyone using wide, high-resolution screens or several monitors.
- Once the feature is on, the Ctrl key shows the pointer's location whenever you need it. To undo the change, flip the switch back to Off.
Have a question about this guide?
Answered by AI from this guide. Good questions may be added to this page — please don't include personal details.
Did this guide fix your problem?

About the Author
Richard
Tech Writer, IT Professional
Richard is a writer at Geek Rewind who turns complex IT tasks into clear, step-by-step guides. He draws on years of hands-on experience in system administration and enterprise IT operations, focusing on Windows, Linux and WordPress: the problems people actually run into, and the fixes that work. His server and WordPress guides come from systems he runs himself. Richard builds and maintains the platform behind Geek Rewind, from its Ubuntu servers and Nginx configuration to its custom WordPress plugins. Many new tutorials start with readers' questions, and he's always glad to answer them in the comments.
[…] features one can enable in Ubuntu Linux. From increasing the mouse pointer size to enabling the pointer locater. These features are there to […]