

This article explains removing an input language keyboard layout in Windows 11.
Windows allow users to install additional languages to support Windows features like Settings and File Explorer.
When you install an input language, the default keyboard layout for that Language will also be installed to support language-preference orders for websites and apps, and change your keyboard language.
Windows also allows for multiple input language keyboards to support additional features. With multiple languages and keyboard layouts installed, you can change your keyboard layout to type in another language or input method.
If you have too many keyboard layouts installed and want to remove some or no longer need a specific keyboard layout, the steps below should help you do that in Windows 11.
How to uninstall the input language keyboard in Windows 11
As mentioned above, Windows also allows multiple input language keyboards to support additional features. If you no longer need a specific input language keyboard, you can remove it using a few steps.
This only works if you have multiple input language keyboard layouts. Below are some posts that help you install or use additional input language layouts.
- How to add an input language keyboard in Windows 11
- How to change input language keyboard layouts in Windows 11
- How to override input language default methods in Windows 11
You can remove input language keyboards using the steps below.
To see a list of input language keyboards in Windows 11, navigate to the Start menu > Settings > Time & Language> Preferred languages.
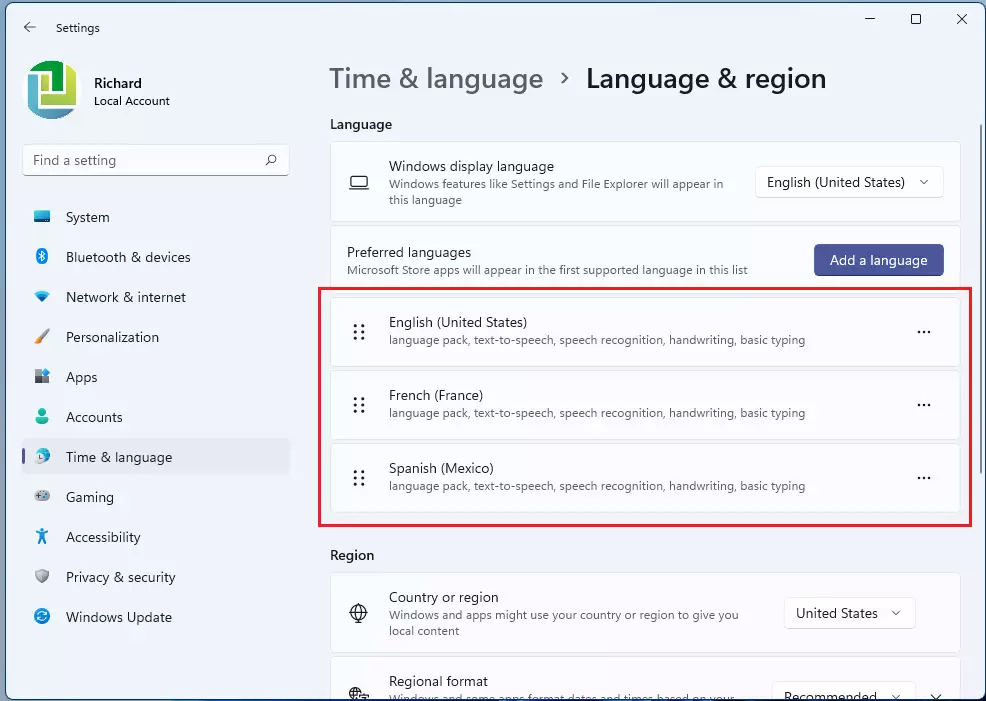
On the Language & region settings pane, under Language, click the Preferred languages tile, select the Language with the keyboard you want, then select Options (ellipses or 3-dots).

Next, scroll down to the Keyboards section. On the Installed keyboards tile, select the option (ellipses or 3-dots) button, then click the Remove button to remove the input language keyboard.

That should do it!
Conclusion:
Removing an input language keyboard layout in Windows 11 is a straightforward process. Here are the key takeaways:
- Manage Multiple Layouts: Windows 11 supports various input language keyboards, allowing users to switch between them as needed.
- Access Settings Easily: To remove a keyboard layout, navigate to Settings > Time & Language > Preferred languages.
- Simple Steps: Select the preferred language, access options, and use the remove function to delete unwanted layouts.
- Useful Resources: For further assistance, refer to articles on adding and changing keyboard layouts or overriding input methods.
- Customization of User Experience: Adjusting keyboard settings enhances the typing experience according to individual language preferences.
Leave a Reply Cancel reply