How to leave a Microsoft family group
You can leave a Microsoft family group by removing yourself as a member, or as an organizer if you are designated as such.
A Microsoft family group helps you manage screen time, set content filters, and share purchases across devices for your family. If you no longer need to be part of this group, you can easily exit it.
For users under 18, a parent or guardian must remove them from the family group first. If you are 18 or older, you can remove yourself directly through your Microsoft account settings.
To leave, simply go to the Microsoft family safety website and follow the prompts to remove yourself from the group.
Sign into account.microsoft.com/family and locate your name on the members list. Click “Leave family group” next to your name and confirm your decision. If you don’t see the option, you’ll need an organizer to remove you.
Removing Yourself From a Microsoft Family Group
So, you’ve decided it’s time to go your own way from a Microsoft family group. This is usually a quick process, but it depends on one key thing: your role in the group. If you are not an organizer, you cannot remove yourself. But if you’re an organizer, or a regular member ready to leave, here’s what to do.
Head to the Family Safety Website
Your first stop is the Microsoft Family Safety website. You’ll need to sign in with the Microsoft account that is part of the family group you want to leave. The web address you need is:account.microsoft.com/family
This website is your central hub for all things related to your Microsoft family setup.
Practical Tip: Make sure you sign in with the correct Microsoft account. It’s easy to have more than one. Using the wrong one means you won’t see the family group you want to leave.
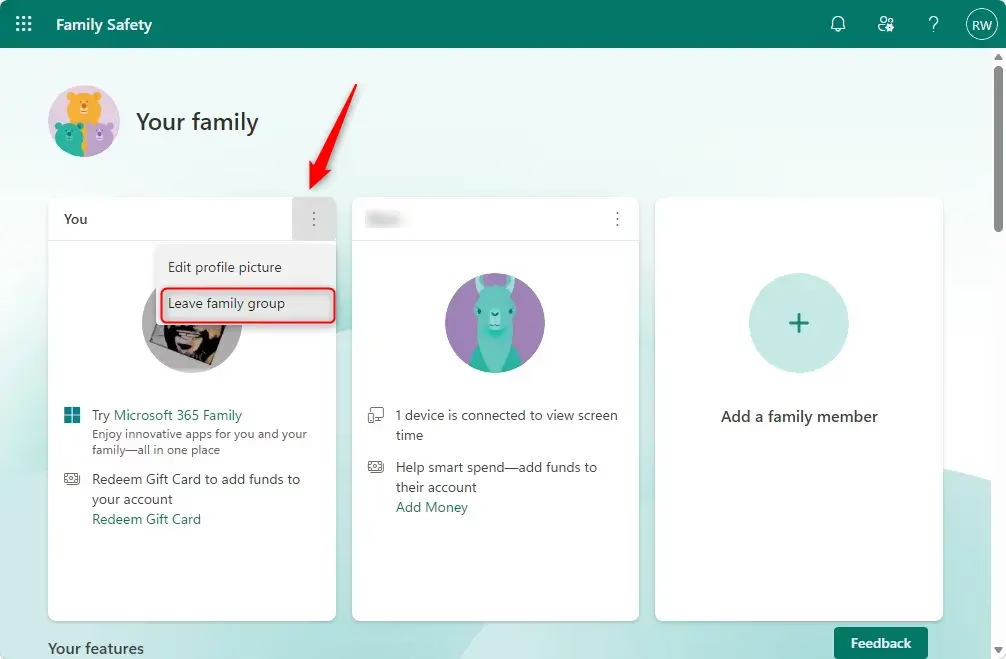
Locate Your Name and the “Leave” Option
Once you’re signed in and looking at your family group’s main page, you’ll see a list of members. Find your own name in that list. Right next to your name, you should see an option that says “Leave family group.” It might be a small picture or just text. Click on it.
Warning: If you don’t see the “Leave family group” option next to your name, it’s a strong sign that you are not an organizer in this family group. In that case, you’ll need to ask an organizer to remove you. We’ll cover that in the next section.
Confirm Your Decision
Microsoft wants to make sure you’re certain. After you click ‘Leave family group,’ you’ll probably see a confirmation message. Take a moment to double-check here. Once confirmed, you’ll be removed.
Important Note: Leaving a family group means you’ll lose access to any shared benefits. This includes things like a Microsoft 365 Family subscription another member might be sharing. So, before you confirm, consider what you might be giving up.
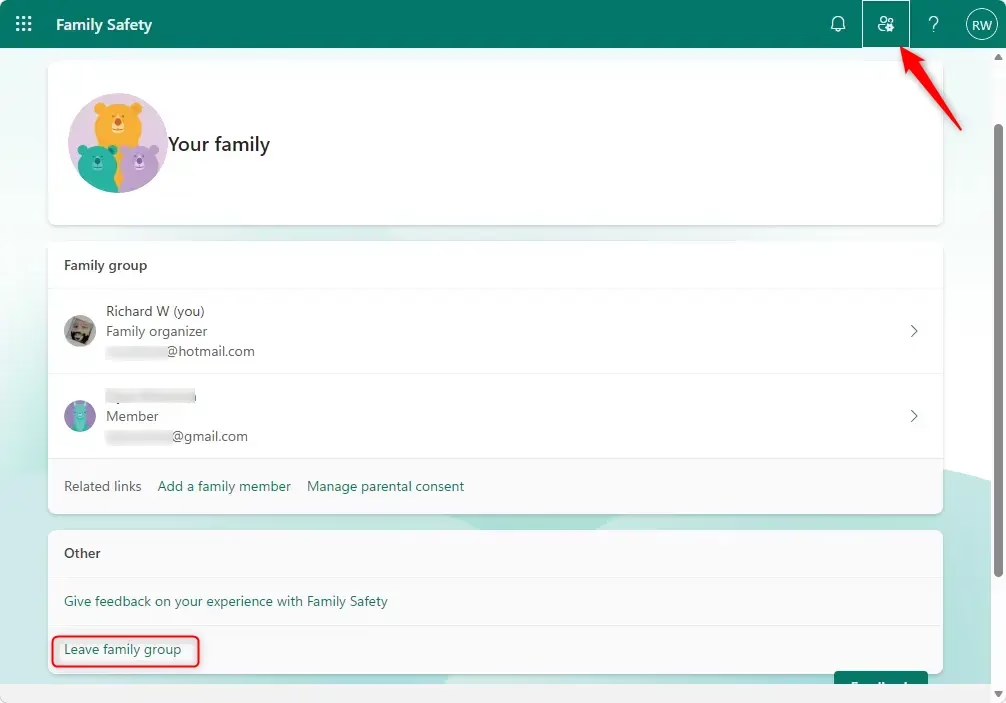
When You Need an Organizer to Remove You
What if you are not an organizer and you can’t find the “Leave family group” button? Don’t worry, there’s still a way. The Microsoft family group system is set up so that only chosen organizers have the power to add or remove members. So, if you’re not an organizer, you’ll need to ask someone who is.
How an Organizer Removes a Member
If you are in charge of the family group, and you need to remove someone else (maybe a child who is now an adult, or another family member who no longer needs to be in the group), here’s how you do it. Remember, you need to be signed in as an organizer to do these things.
Sign In as an Organizer
As before, go to:account.microsoft.com/family
This time, make sure you sign in with the Microsoft account that’s the organizer of the family group. This is crucial for accessing the management tools.
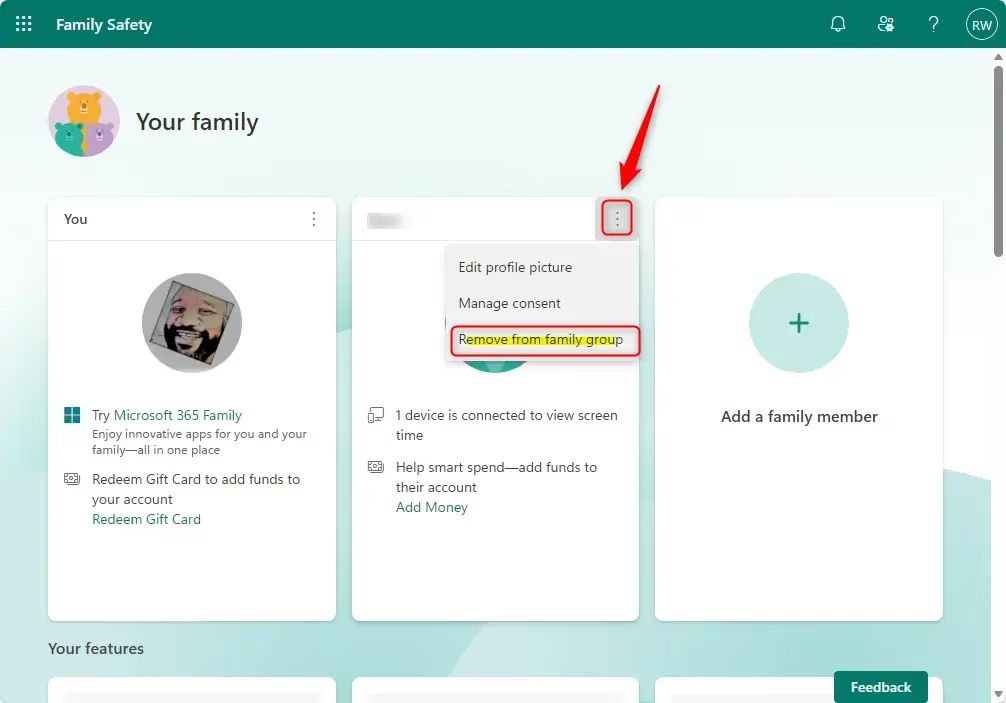
Select the Member to Remove
On the family group page, you’ll see a list of all the members. Find the name of the person you want to remove from the group. Click on the three dots (or sometimes a “…” icon) next to their name. A list of options should appear.
Tip: If you’re removing a child’s account, you may need to first remove their consent. Look for an option like ‘Remove consent for this child’s account’ before you can fully remove them from the family group. This is a specific step for child accounts.
Choose “Remove from family group”
From the list of options that appears next to the member’s name, select the option that says “Remove from family group.” This action will start the process of removing that person from your Microsoft family.
Confirm the Removal
You will be asked to confirm that you want to remove this person. Click “Remove” to finish the action. Once confirmed, they will no longer be a member of your family group.
Warning: When you remove someone from a family group, they lose access to any features or shared purchases that were part of that group. This includes things like shared Microsoft 365 Family subscriptions. Make sure the person being removed knows this before you proceed.
Deleting the Entire Family Group
If your goal is to completely get rid of the family group, you need to remove everyone else first. This means going through each member one by one and removing them using the organizer tools we talked about.
Remove All Other Members
Sign in as an organizer and go to:account.microsoft.com/family
For each member of the group (except yourself), click the options next to their name and select “Remove from family group.” You will need to confirm each removal.
Practical Tip: If you manage a large family group, it might be helpful to make a quick list of who needs to be removed before you start. This way, you won’t miss anyone.
Remove Yourself
Once every other member has been successfully removed, you will be the only person left in the group. Now, you can follow the steps for removing yourself from the group. You should see the “Leave family group” option next to your name. Click it and confirm.
Important: Remember that removing members means they lose access to shared benefits. Be sure to tell them this clearly if you are removing multiple people.
Summary
Managing a Microsoft family group is all about understanding who can do what. Whether you’re stepping down as an organizer, leaving as a member, or cleaning up the group completely, the process is done through the Microsoft Family Safety website. Keep in mind what happens when you leave or remove members, especially regarding shared subscriptions and services. By following these steps, you can confidently manage your Microsoft family group memberships.
Was this guide helpful?

About the Author
Richard
Tech Writer, IT Professional
Richard, a writer for Geek Rewind, is a tech enthusiast who loves breaking down complex IT topics into simple, easy-to-understand ideas. With years of hands-on experience in system administration and enterprise IT operations, he’s developed a knack for offering practical tips and solutions. Richard aims to make technology more accessible and actionable. He's deeply committed to the Geek Rewind community, always ready to answer questions and engage in discussions.


No comments yet — be the first to share your thoughts!