This article explains how to install and use FOSSBilling, an open-source and efficient web platform that helps you manage and automate your billings and client management.
The FOSSBilling software can be hosted on your server in your environment and help with invoicing, incoming payments, client management, and communication.
The software is extensible and integrates easily with standard payment gateways that are already available online. In addition, it works with a web server, running PHP and a MySQL database.
Below is how to install and use FOSSBilling on Ubuntu Linux.
As mentioned above, if you want to run your own billing and client management suite, FOSSBilling can help.
Below are the steps to install and use it.
Install Nginx on Ubuntu Linux
FOSSBilling is a web application and requires a web server. For this post, we will install and use the Nginx web server to run FOSSBilling.
To install the Nginx web server on Ubuntu, use the instructions below.
Open the Ubuntu terminal and run the commands below to install the Nginx web server.
sudo apt update
sudo apt install nginx
Once Nginx is installed, the commands below can start, stop, and enable the Nginx web server to start when your server boots up automatically.
sudo systemctl stop nginx
sudo systemctl start nginx
sudo systemctl enable nginx
You test that the Nginx web server is running by opening your web browser and browsing to the server’s localhost or IP address.
http://localhost
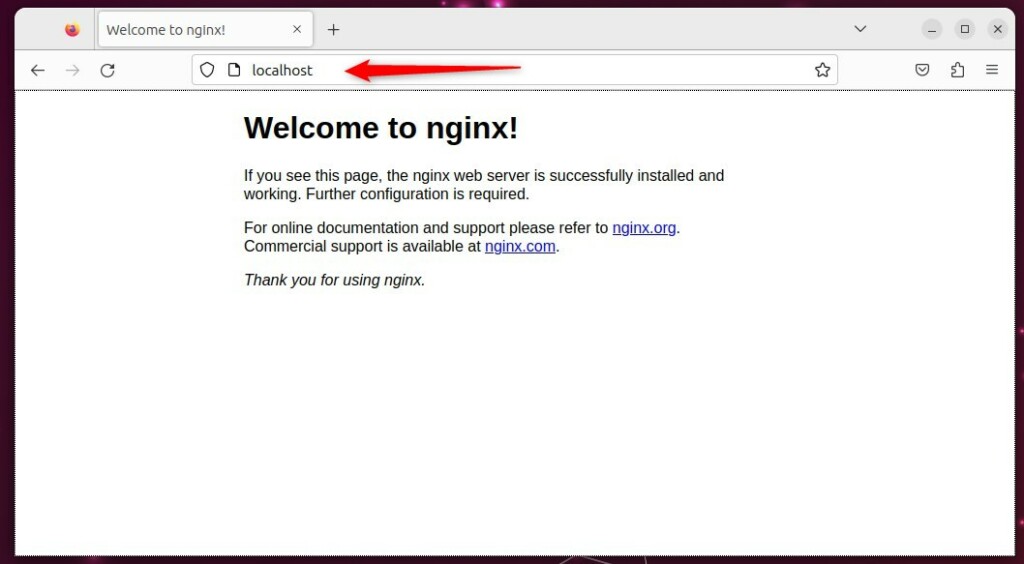
When you see the Welcome to nginx!, it means Nginx is successfully installed.
Additional help on installing Ngnix
How to install Nginx on Ubuntu
Install MariaDB on Ubuntu Linux
The next component that is required to run FOSSBilling is a database server. This post will install and use the MariaDB database server to run FOSSBilling.
To install and use the MariaDB database server, use the instructions below.
Open the Ubuntu terminal and run the commands below to install the MariaDB database server.
sudo apt update
sudo apt install mariadb-server
Once the MariaDB database server is installed, use the comments below to stop, start, and enable the MariaDB server to start up when the server boots automatically.
sudo systemctl stop mariadb
sudo systemctl start mariadb
sudo systemctl enable mariadb
Run the following commands to validate and test if the MariaDB database server is installed successfully.
sudo mariadb
Once you run the commands above, it will log you onto the MariaDB console and display a message similar to the one below.
Welcome to the MariaDB monitor.  Commands end with ; or \g.
Your MariaDB connection id is 32
Server version: 10.11.2-MariaDB-1 Ubuntu 23.04

Copyright (c) 2000, 2018, Oracle, MariaDB Corporation Ab and others.

Type 'help;' or '\h' for help. Type '\c' to clear the current input statement.

MariaDB [(none)]>
The message tells you that the server is installed successfully.
Additional help on installing MariaDB.
Create FOSSBilling database
After installing the MariaDB database server, you should create a blank database for the FOSSBilling application on the server.
This database will store the FOSSBilling application content and data.
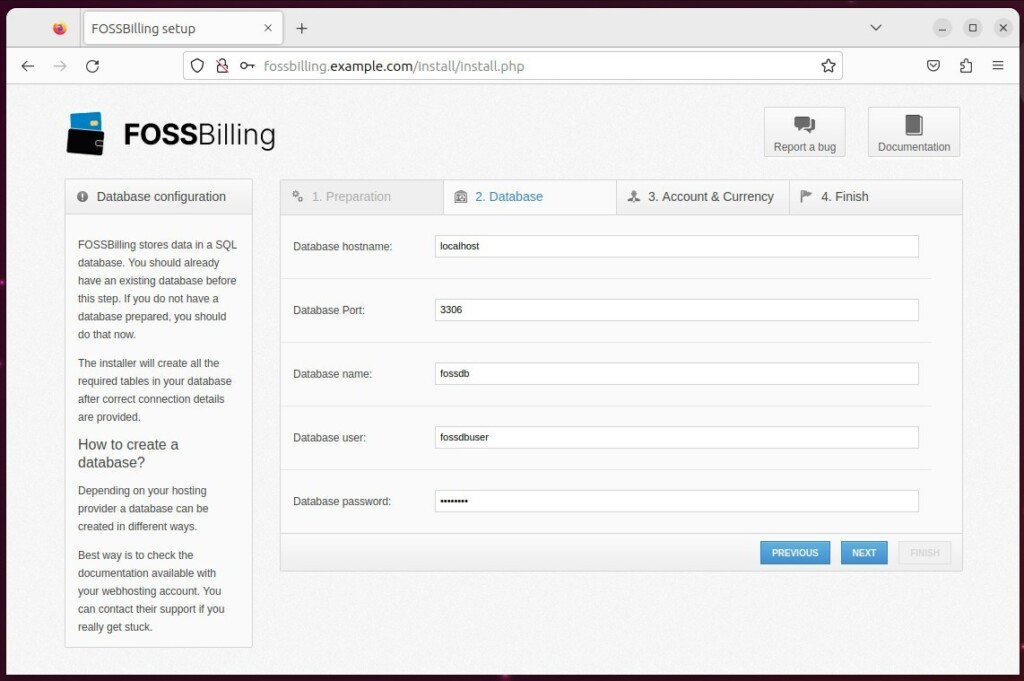
We will create a database called fossdb. We will also create a database user account called fossdbuser.
Finally, we’ll grant the fossdbuser full access to the fossdb database.
All the database steps above can be done using the commands below:
But first, log on to the MariaDB database server:
sudo mariadb
Then run the commands below to complete the steps:
CREATE DATABASE fossdb;
CREATE USER fossdbuser@localhost IDENTIFIED BY 'type_new_password';
GRANT ALL ON fossdb.* TO fossdbuser@localhost WITH GRANT OPTION;
FLUSH PRIVILEGES;
exit
Install PHP-FPM on Ubuntu Linux
The last component you will need to run FOSSBilling is PHP or PHP-FPM. The FOSSBilling application is a PHP-based application. It supports the latest versions of PHP and PHP-FPM.
Run the commands below to install PHP-FPM version 8.2.
If the version of Ubuntu doesn’t support PHP-FPM 8.2, then run the commands below to install the latest versions of PHP-FPM from this repository.
sudo apt install software-properties-common ca-certificates lsb-release apt-transport-https
sudo add-apt-repository ppa:ondrej/php
Finally, install PHP-FPM 8.2 by running the commands below:
sudo apt install php8.2-fpm php8.2-intl php8.2-mysql php8.2-curl php8.2-cli php8.2-zip php8.2-common php8.2-mbstring php-xml
Once PHP-FPM and related modules have been installed, the commands below can stop and enable PHP-FPM to start when the server boots automatically.
sudo systemctl stop php8.2-fpm
sudo sysetmctl start php8.2-fpm
sudo systemctl enable php8.2-fpm
Additional help on installing PHP
How to install PHP on Ubuntu Linux
Download FOSSBilling
We are ready to download and configure the FOSSBilling files on Ubuntu Linux.
Run the commands below to download and extract the FOSSBilling files to the Nginx web server root directory.
The command block below will download FOSSBilling and create a new folder for FOSSBilling in the Nginx root directory. Then extract the FOSSBilling files and allow the Nginx web server to interact with the files.
cd /tmp
sudo apt install curl unzip
curl https://fossbilling.org/downloads/stable -L --output FOSSBilling.zip
sudo mkdir -p /var/www/fossbilling
sudo unzip FOSSBilling.zip -d /var/www/fossbilling
sudo chown -R www-data:www-data /var/www/fossbilling
Once all the steps above are done, continue below to configure the Nginx web server to serve the FOSSBilling content.
Run the commands below to create a Nginx server block for FOSSBilling.
sudo nano /etc/nginx/sites-available/fossbilling.conf
Then, copy and paste the content block below into the Nginx server block.
server {
    listen 80;

    set $root_path '/var/www/fossbilling';
    server_name fossbilling.example.com;

    index index.html index.htm index.php;
    root $root_path;
    try_files $uri $uri/ @rewrite;
    sendfile off;

    include /etc/nginx/mime.types;

    # Block access to sensitive files and return 404 to make it indistinguishable from a missing file
    location ~* .(ini|sh|inc|bak|twig|sql)$ {
        return 404;
    }

    # Block access to hidden files except for .well-known
    location ~ /\.(?!well-known\/) {
        return 404;
    }

    # Disable PHP execution in /uploads
    location ~* /uploads/.*\.php$ {
        return 404;
    }

    # Deny access to /data
    location ~* /data/ {
        return 404;
    }

    location @rewrite {
        rewrite ^/page/(.*)$ /index.php?_url=/custompages/$1;
        rewrite ^/(.*)$ /index.php?_url=/$1;
    }

    location ~ \.php {
        fastcgi_split_path_info ^(.+\.php)(/.+)$;
        fastcgi_pass unix:/run/php/php8.2-fpm.sock;
        fastcgi_param PATH_INFO       $fastcgi_path_info;
        fastcgi_param SCRIPT_FILENAME $document_root$fastcgi_script_name;
        fastcgi_intercept_errors on;
        include fastcgi_params;
    }

    location ~* ^/(css|img|js|flv|swf|download)/(.+)$ {
        root $root_path;
        expires off;
    }
}
Save the file.
Then, run the commands below to enable the server block and restart the Nginx server.
sudo ln -s /etc/nginx/sites-available/fossbilling.conf /etc/nginx/sites-enabled/
sudo systemctl restart nginx
Once you have restarted the Nginx web server, open your browser and browse to the server hostname or IP address defined in the Nginx server block.
http://fossbilling.example.com
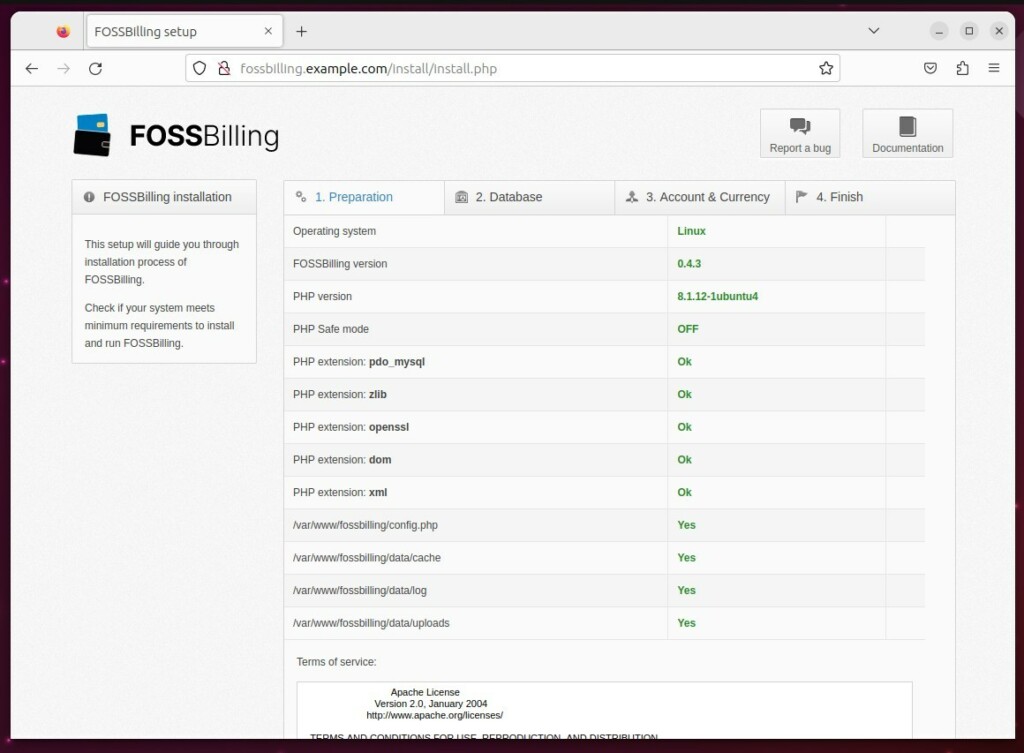
You should see a setup wizard for FOSSBilling. On the Setup page, confirm that all requirements are met.
Click Next to continue.
Type in the database name and user account created above and click Next.
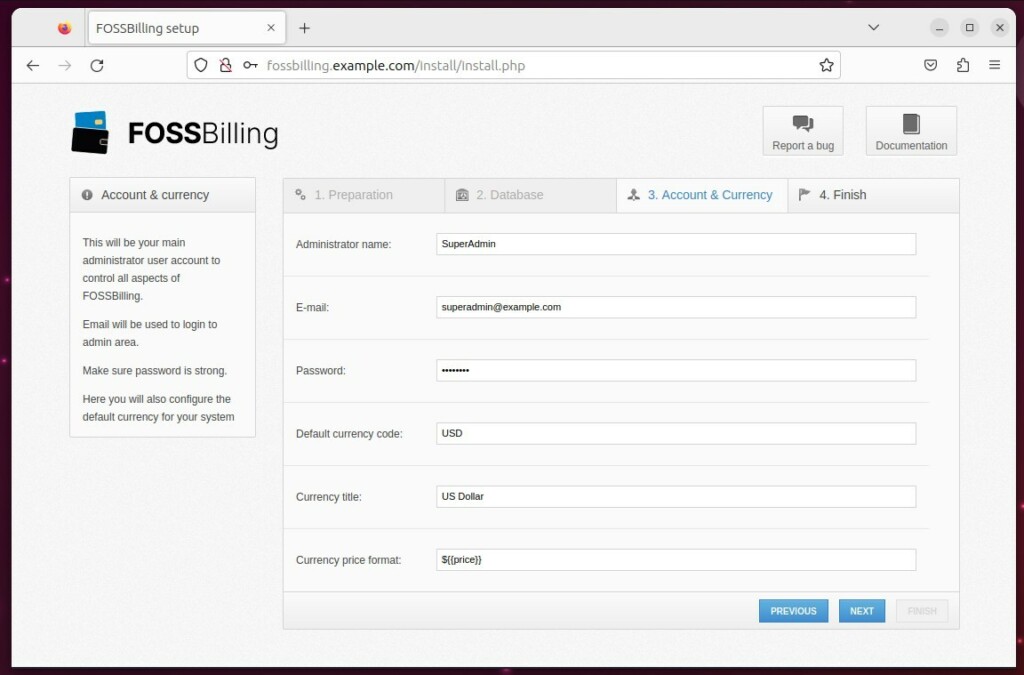
Create an administrator account and click Next.
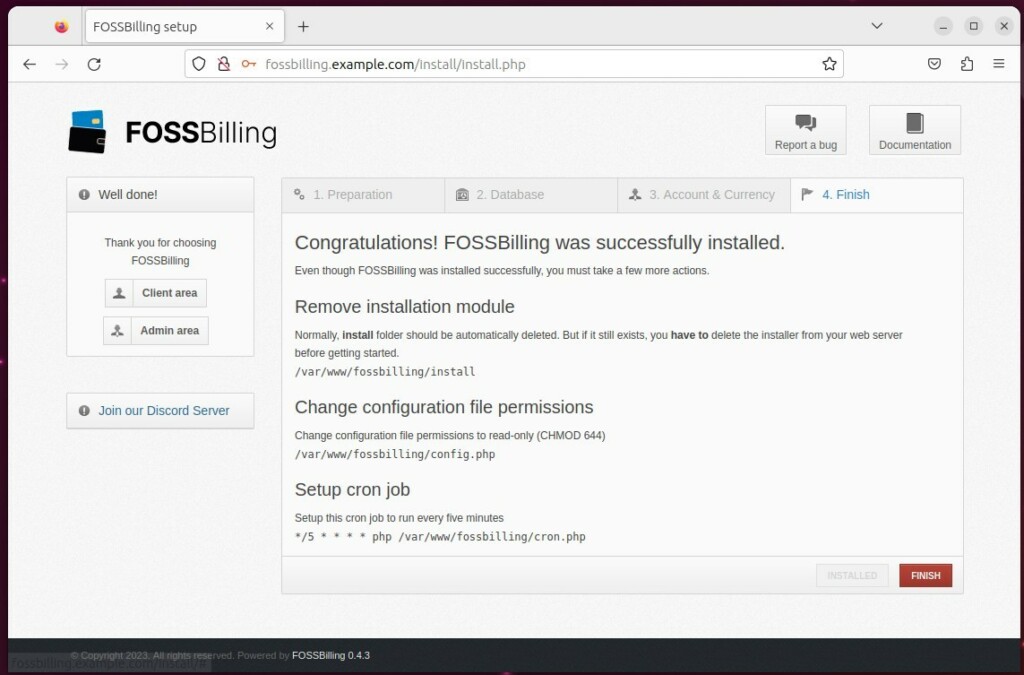
Finally, run the commands below to remove the installation directory and configure a cron job. Then click Finish.
sudo rm -rf /var/www/fossbilling/install
sudo chmod 0644 /var/www/fossbilling/config.php
sudo crontab -u www-data -e
*/5 * * * * php /var/www/fossbilling/cron.php
Login to the dashboard using the credentials created above.
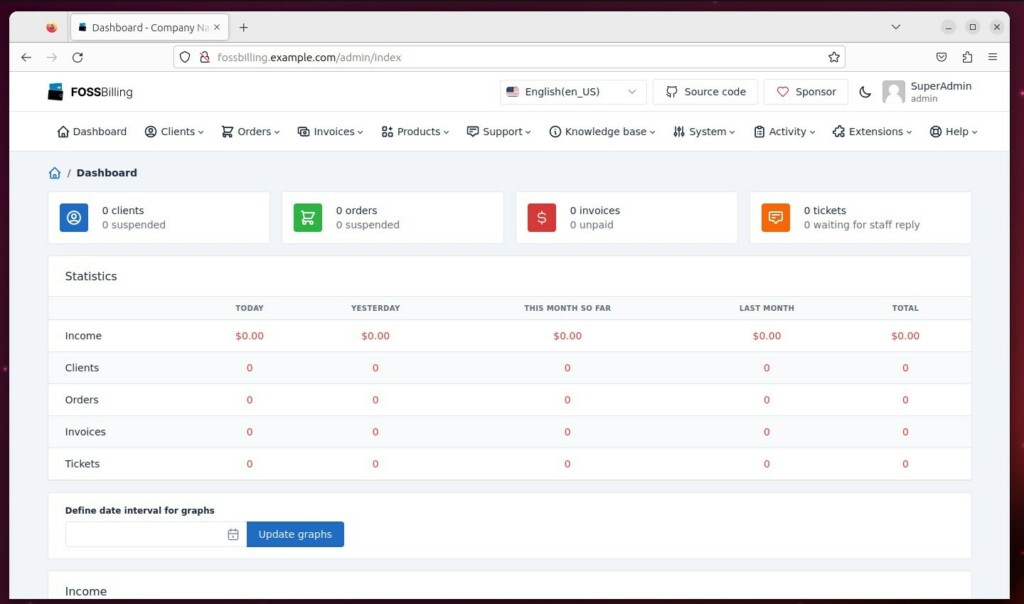
That should do it!
If you want to enable SSL using Let’s Encrypt, use the post below to learn how to incorporate SSL with FOSSBilling.
How to setup Let’s Encrypt with Nginx web server
Conclusion:
- FOSSBilling is a powerful open-source web platform for managing and automating billings and client management, providing invoicing, payment handling, client communication, and extensible integration with standard payment gateways.
- By following the steps, Ubuntu Linux users can set up FOSSBilling on their server using Nginx as the web server, MariaDB as the database server, and PHP-FPM for PHP support.
- The installation process involves setting up Nginx, installing and configuring MariaDB, creating the FOSSBilling database, installing PHP-FPM, downloading and configuring FOSSBilling files, creating the Nginx server block, and completing the setup wizard.
- Once the setup is complete, users can remove the installation directory, configure a cron job, and log in to the FOSSBilling dashboard.
- Users can also learn how to set up SSL using Let’s Encrypt with Nginx through a provided post for enhanced security.
- This comprehensive guide has equipped users with the knowledge and resources to install and utilize FOSSBilling on their Ubuntu Linux environment for efficient billing and client management.

Leave a Reply