How to Install Asterisk 22 PBX on Ubuntu 24.04

You install Asterisk 22 PBX on Ubuntu 24.04 to create a robust, open-source telephone system for your business or home.
Asterisk is powerful telecommunications software that turns a computer into a feature-rich PBX, supporting both VoIP and traditional phone lines.
With Asterisk 22, you gain access to advanced capabilities like voicemail, conference calls, call recording, and custom interactive voice response (IVR) menus.
This open-source solution offers significant cost savings over proprietary systems, providing features like call queuing and automated attendants right out of the box.
Install essential packages with `sudo apt install wget build-essential subversion`. Download Asterisk 22 using `wget`, then extract, navigate, and run `contrib/scripts/install_prereq install`. Finally, configure, compile, and install with `sudo ./configure`, `sudo make menuselect`, `sudo make -j2`, and `sudo make install`.
Install Asterisk
Installing Asterisk on Ubuntu 24.04 involves first getting the tools you need, like wget and build-essential, to download and prepare the software.
sudo apt update
sudo apt install wget build-essential subversion
We’ll be downloading Asterisk packages manually, so let’s put them in the [/usr/src] directory where most source files are stored.
To accomplish that, navigate to the /usr/src directory and download Asterisk.
As of this writing, the current version is [22].
cd /usr/src/
sudo wget http://downloads.asterisk.org/pub/telephony/asterisk/asterisk-22-current.tar.gz
sudo tar zxf asterisk-22-current.tar.gz
cd asterisk-22.*/
sudo contrib/scripts/get_mp3_source.sh
sudo contrib/scripts/install_prereq install
After running the commands above, the script will download and install all necessary packages. It will then display a success message similar to the one shown below:
Current status: 51 (-9) upgradable.
#############################################
## install completed successfully
#############################################
Next, run the commands below to configure Asterisk, perform checks, and validate that everything is working correctly.
sudo ./configure
Upon successful completion, the output should display lines similar to the following:
configure: Menuselect build configuration successfully completed

               .$$$$$$$$$$$$$$$=..
            .$7$7..          .7$$7:.
          .$$:.                 ,$7.7
        .$7.     7$$$$           .$$77
     ..$$.       $$$$$            .$$$7
    ..7$   .?.   $$$$$   .?.       7$$$.
   $.$.   .$$$7. $$$$7 .7$$$.      .$$$.
 .777.   .$$$$$$77$$$77$$$$$7.      $$$,
 $$$~      .7$$$$$$$$$$$$$7.       .$$$.
.$$7          .7$$$$$$$7:          ?$$$.
$$$          ?7$$$$$$$$$$I        .$$$7
$$$       .7$$$$$$$$$$$$$$$$      :$$$.
$$$       $$$$$$7$$$$$$$$$$$$    .$$$.
$$$        $$$   7$$$7  .$$$    .$$$.
$$$$             $$$$7         .$$$.
7$$$7            7$$$$        7$$$
 $$$$$                        $$$
  $$$$7.                       $$  (TM)
   $$$$$$$.           .7$$$$$$  $$
     $$$$$$$$$$$$7$$$$$$$$$.$$$$$$
       $$$$$$$$$$$$$$$$.

configure: Package configured for:
configure: OS type  : linux-gnu
configure: Host CPU : x86_64
configure: build-cpu:vendor:os: x86_64 : pc : linux-gnu :
configure: host-cpu:vendor:os: x86_64 : pc : linux-gnu :
Next, you will need to choose some modules to compile and install. You can access the menu system using the commands below:
sudo make menuselect
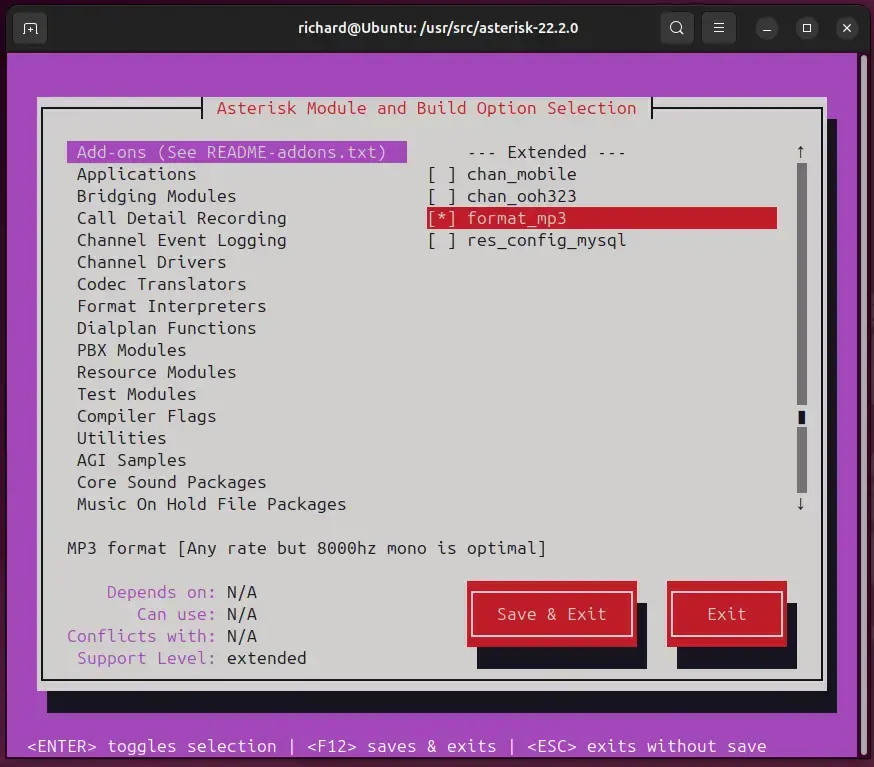
To save and exit, press F12 or select the Save and Exit button and press Enter.
After finishing everything, run the commands below to begin the compilation process.
sudo make -j2
After compiling the packages and modules, you should see a success message like the one below:
+--------- Asterisk Build Complete ---------+
 + Asterisk has successfully been built, and +
 + can be installed by running:              +
 +                                           +
 +                make install               +
 +-------------------------------------------+
Once you have completed the previous steps, you can proceed to install Asterisk by executing the following commands:
sudo make install
After the installation, you should see a similar message as below:
 +---- Asterisk Installation Complete -------+
 +                                           +
 +    YOU MUST READ THE SECURITY DOCUMENT    +
 +                                           +
 + Asterisk has successfully been installed. +
 + If you would like to install the sample   +
 + configuration files (overwriting any      +
 + existing config files), run:              +
 +                                           +
 + For generic reference documentation:      +
 +    make samples                           +
 +                                           +
 + For a sample basic PBX:                   +
 +    make basic-pbx                         +
 +                                           +
 +                                           +
 +-----------------  or ---------------------+
 +                                           +
 + You can go ahead and install the asterisk +
 + program documentation now or later run:   +
 +                                           +
 +               make progdocs               +
 +                                           +
 + **Note** This requires that you have      +
 + doxygen installed on your local system    +
 +-------------------------------------------+
The installation is complete.
You can start configuring your system now. First, consider adding some sample data to assist in configuring your platform. To do this, run the commands below:
sudo make samples
sudo make basic-pbx
Finish the configuration by running the commands below:
sudo make config
sudo ldconfig
Create Asterisk User
Creating a dedicated user for Asterisk on Ubuntu is safer than using your main account, so we’ll set up a new user and group named ‘asterisk’.
To accomplish this, run the commands below to create a user account and a group named Asterisk.
sudo addgroup --quiet --system asterisk
sudo adduser --quiet --system --ingroup asterisk --no-create-home --disabled-password asterisk
After creating the account above, open the /etc/default/asterisk file and make the highlighted changes below:
sudo nano /etc/default/asterisk
Then, make the highlighted changes below and save the file.
# Uncomment the following and set them to the user/groups that you
# want to run Asterisk as. NOTE: this requires substantial work to
# be sure that Asterisk's environment has permission to write the
# files required  for  its  operation, including logs, its comm
# socket, the asterisk database, etc.
AST_USER="asterisk"
AST_GROUP="asterisk"
After that, add an asterisk user to the dialout and audio groups:
sudo usermod -a -G dialout,audio asteriskPermissions for all Asterisk files and directories should be modified to grant ownership to the respective users.
sudo chown -R asterisk: /var/{lib,log,run,spool}/asterisk /usr/lib/asterisk /etc/asterisk
sudo chmod -R 750 /var/{lib,log,run,spool}/asterisk /usr/lib/asterisk /etc/asterisk
Start Asterisk
After setting everything up, you can turn on and start the Asterisk service using simple commands, then check if it’s running correctly.
sudo systemctl enable asterisk
sudo systemctl start asterisk
To verify that Asterisk is running, run the commands below:
sudo asterisk -vvvr
You’ll see the default Asterisk CLI prompt:
Asterisk 22.2.0, Copyright (C) 1999 - 2025, Sangoma Technologies Corporation and others.
Created by Mark Spencer <markster@digium.com>
Asterisk comes with ABSOLUTELY NO WARRANTY; type 'core show warranty' for details.
This is free software, with components licensed under the GNU General Public
License version 2 and other licenses; you are welcome to redistribute it under
certain conditions. Type 'core show license' for details.
=========================================================================
Connected to Asterisk 22.2.0 currently running on Ubuntu (pid = 54532)
Ubuntu*CLI>
Many Ubuntu installations do not have a firewall enabled. You should be allowed access through the ports listed below if you have one.
By default, SIP operates on UDP port 5060. Please ensure that this port is open.
sudo ufw allow 5060/udp
For Real-Time Protocol (RTP), open the following port range:
sudo ufw allow 10000:20000/udp
That should do it!
Conclusion:
- Asterisk 22 PBX on Ubuntu 24.04 provides a flexible and cost-effective solution for telecommunication needs.
- The installation process, while detailed, allows users to customize their PBX system according to specific requirements.
- Leveraging Asterisk’s features such as voicemail, call conferencing, and IVR can enhance communication capabilities significantly.
- Proper configuration and management through a dedicated user ensure security and efficient operation.
- Regular updates and maintenance will help keep your Asterisk system running smoothly and securely.
- Utilize community resources and documentation for troubleshooting and expanding functionalities as needed.
Was this guide helpful?
100% of readers found this helpful (1 votes)

About the Author
Richard
Tech Writer, IT Professional
Richard, a writer for Geek Rewind, is a tech enthusiast who loves breaking down complex IT topics into simple, easy-to-understand ideas. With years of hands-on experience in system administration and enterprise IT operations, he’s developed a knack for offering practical tips and solutions. Richard aims to make technology more accessible and actionable. He's deeply committed to the Geek Rewind community, always ready to answer questions and engage in discussions.


No comments yet — be the first to share your thoughts!