

This article explains how to show or hide the Workspaces button on the toolbar in the Microsoft Edge browser.
The Microsoft Edge browser is the default browser in Windows 11. However, users can switch to their preferred or favorite browser anytime. Edge is based on Chromium, similar to Google Chrome and other Chromium-based browsers today.
A new feature added to the Microsoft Edge browser called Workspaces allows users to share a set of browser tabs where everyone can view the same websites and files in one place in real time.
Edge Workspaces can be used individually or as a group to help manage projects and keep websites and files in one place. For example:
- Instead of sharing multiple project links back and forth with a working group, you can create an Edge Workspace with your project’s websites and working files open as browser tabs and share it with the group with a single link. Updates to the tabs happen in real-time so everyone can stay on the same page using the Edge Workspace.
- If you’re working on multiple projects, you can create an Edge Workspace to organize your open tabs for each one. Then, whenever you want to work on a project, open the project’s Edge Workspace, and you’ll have all your websites and working files open in one place.
Show or hide the Workspaces button on the toolbar in the Microsoft Edge browser
As mentioned above, a new feature added to the Microsoft Edge browser called Workspaces allows users to share browser tabs individually or as a group to help manage projects and keep websites and files in one place.
Here’s how to enable or disable Workspaces in Edge.
First, open the Microsoft Edge browser.
Then click on Setting and more (Alt+F) 3 horizontal dots button on the top right corner and select Settings.

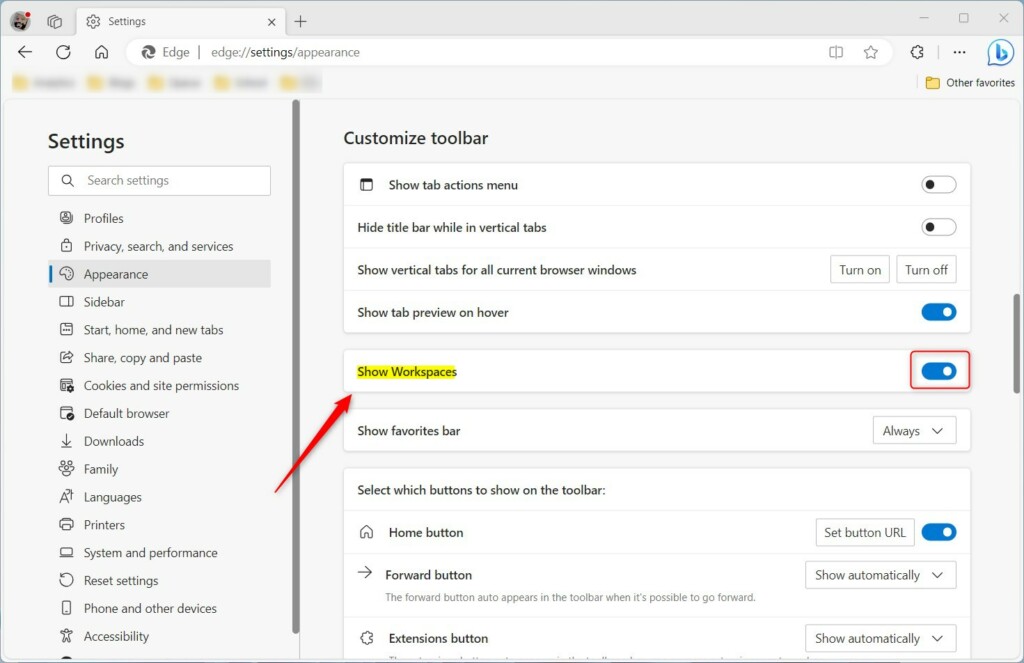
Next, click on Appearance on the left panel.

Under the Customize toolbar section on the Appearance settings page, select the “Show workspaces” tile. Then toggle the switch button to the On position to enable it.
To disable it, toggle the button back to the Off position.
Your changes should apply immediately. Exit and restart the Microsoft Edge browser.
Enable or disable Workspaces in Edge via the Windows Registry Editor
Alternatively, users can use the Windows registry editor to enable or disable Workspaces in Edge.
To do that, open the Windows Registry, and navigate to the folder key below.
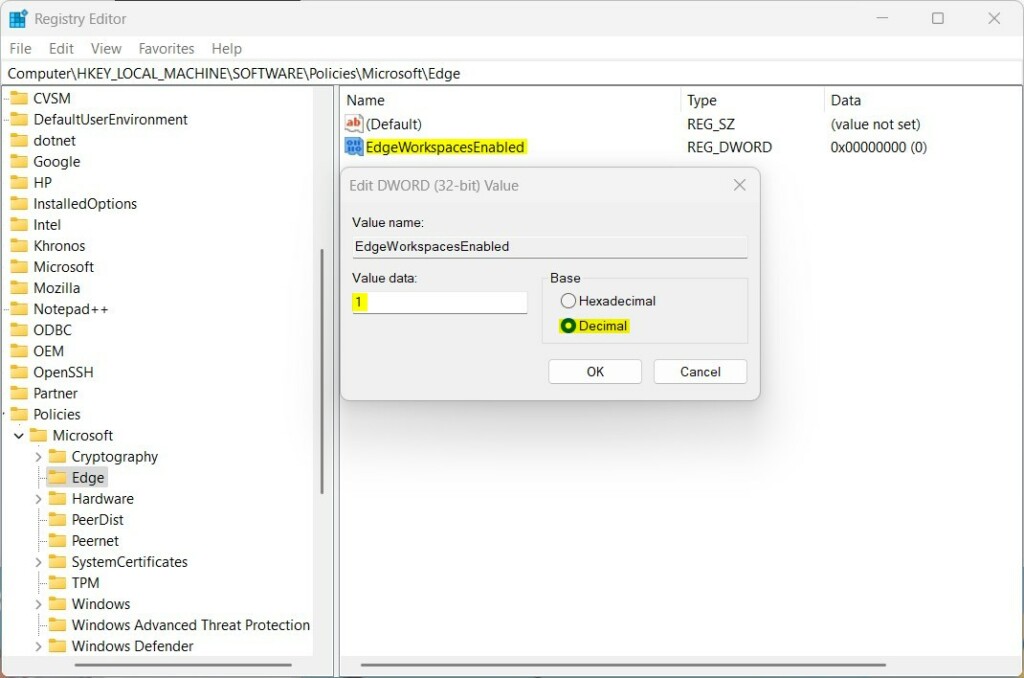
HKEY_LOCAL_MACHINE\SOFTWARE\Policies\Microsoft\Edge
If you don’t see the Edge folder key, right-click on the Microsoft parent key, then create the subkey (Edge) folder.

Right-click on the Edge folder key’s right pane and select New -> DWORD (32-bit) Value. Type a new item named EdgeWorkspacesEnabled.
Double-click the new item you created (EdgeWorkspacesEnabled) and make sure the Base option is Decimal, and then update the Value data:
- To enable Workspaces for all users in Edge, type 1.
- To disable Workspaces for all users in Edge, type 0.
That should do it. Restart your computer to apply the changes.
That should do it!
Reference:
That should do it!
Conclusion:
- In conclusion, this article has provided a comprehensive guide on enabling or disabling Workspaces in the Microsoft Edge browser, catering to both the browser settings and the Windows Registry Editor.
- The step-by-step instructions accompanied by visual aids make it easy for users to follow along and customize their Edge browser according to their preferences.
- Using the information provided in this post, users can effectively manage their projects and keep their browsing experience organized through the innovative Workspaces feature.
- You are encouraged to use the comments section below the article to clarify additional insights or contribute further to this topic.

Leave a Reply Cancel reply