Enable or Disable Dim Screen in Ubuntu Linux

Dim screen is a power-saving feature in Ubuntu. After a short period with no keyboard or mouse activity, it lowers the display brightness to save battery. Ubuntu 22.04 and newer releases include it in the GNOME desktop settings. It also acts as a warning that the screen is about to switch off if you stay idle.
If you hate the screen going dark while you read or watch something, you can turn the feature off. The control is in Settings Power It is a single switch, the change takes effect straight away, and you can reverse it at any time. You don’t need to restart or sign out.
To turn dim screen on or off in Ubuntu, open Settings , click Power in the sidebar, and switch Dim Screen When Inactive on or off. The change applies immediately, with no restart or sign-out needed. On is the default on most installs. Dimming is separate from Screen Blank, which turns the display off completely.
How to turn on or off the dim screen in Ubuntu Linux
The short version is to open Settings Power and switch Dim Screen When Inactive on or off. On is the default on most installs. Leave it on and the display dims after a short idle period. Turn it off and the screen stays at the brightness level you set until the screen blank timer runs out.
It is not. Privacy has screen lock and other privacy options. Dimming is a power setting, so it lives under Power.
Turn dimming off if you want the screen to stay at its current brightness. This suits reading long pages, following a video or a recipe, or watching a build or log output with no input from you. A dimmed screen is harder to read from a distance.
Keep dimming on if you work on battery a lot. The display is one of the biggest power drains in a laptop, so dimming it while you are away helps extend battery life a little. It also costs you nothing, because the screen brightens again the moment you touch the keyboard or move the mouse.
Dimming lowers brightness. Blanking turns the display off completely. Blanking has its own setting, Screen Blank (called Blank Screen in some releases), in the same Power page. If you want the screen to stay lit all the time, turn dimming off and also set that timer to Never.
Follow these steps to change the setting. They apply to the default GNOME desktop in Ubuntu 22.04 and newer. Exact labels can vary a little between releases.
- Open the Activities overview by clicking Activities in the top-left corner or pressing the Super (Windows) key, then type Settings.
- Click the Settings icon. The Settings window should open.
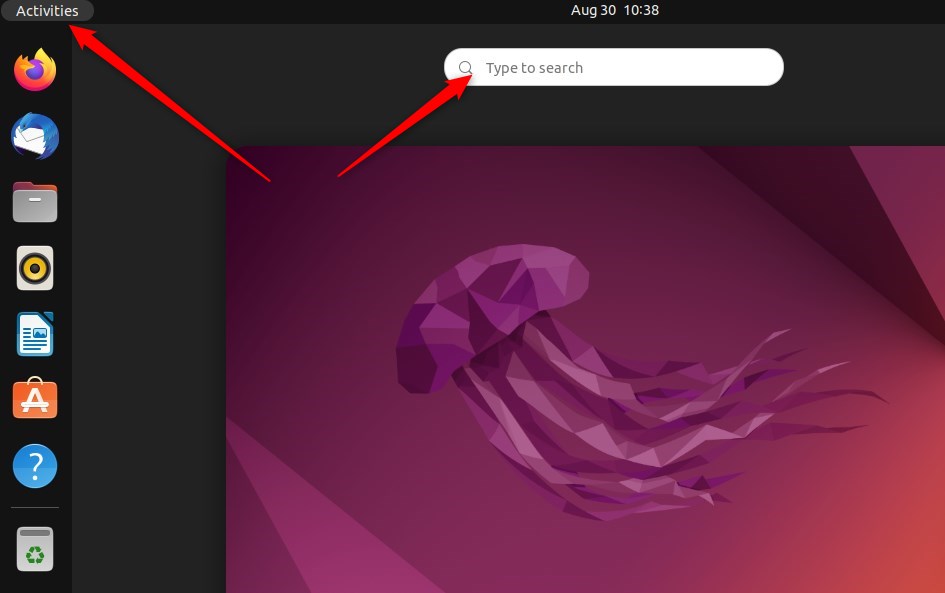
ubuntu linux activities overview - Alternatively, click the system menu in the top-right corner of the screen (the area with the network, sound and battery icons) and select Settings.
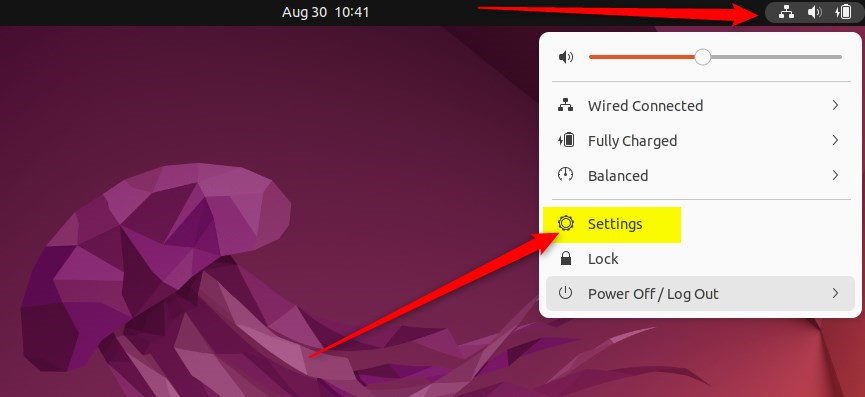
ubuntu linux system menu top bar settings - In the sidebar on the left, click Power (it may appear as Power & Battery depending on your hardware). The power options should appear on the right.
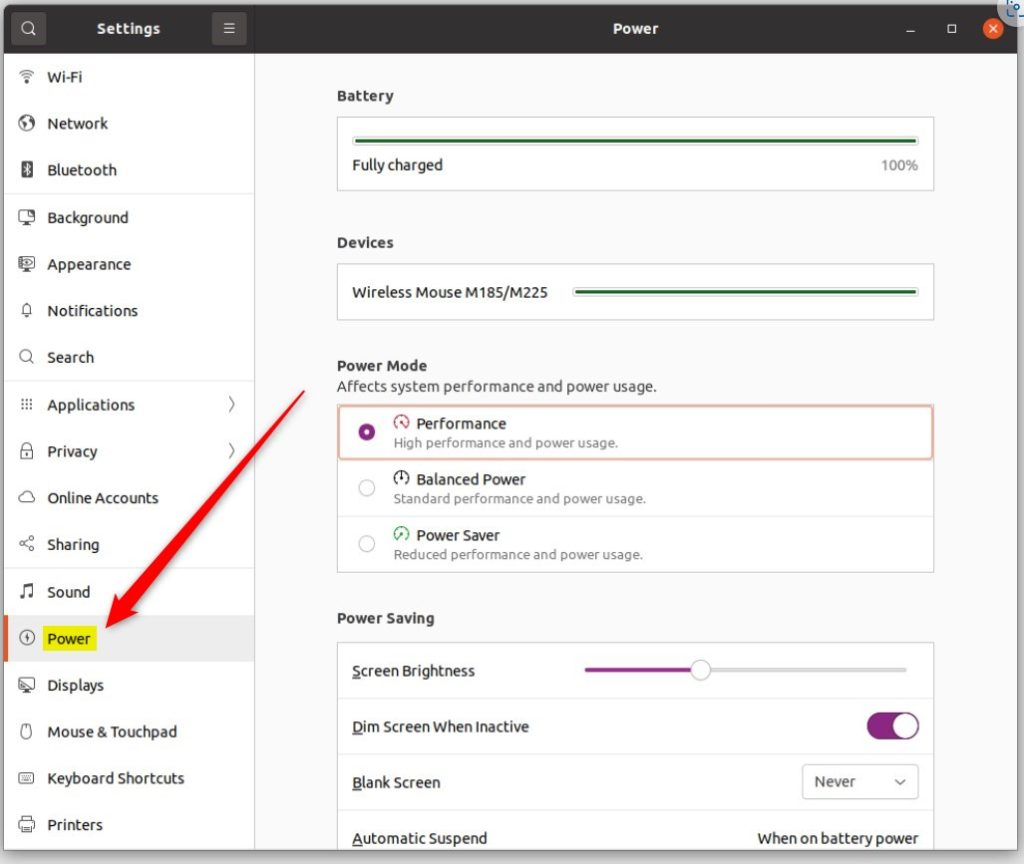
ubuntu linux power tile - Look for the Power Saving section. In some releases it is titled Power Saving Options.
- Find the Dim Screen When Inactive option.
- Toggle the switch to On to save power, or Off to keep your screen bright. The change applies immediately. To undo it, flip the switch back.
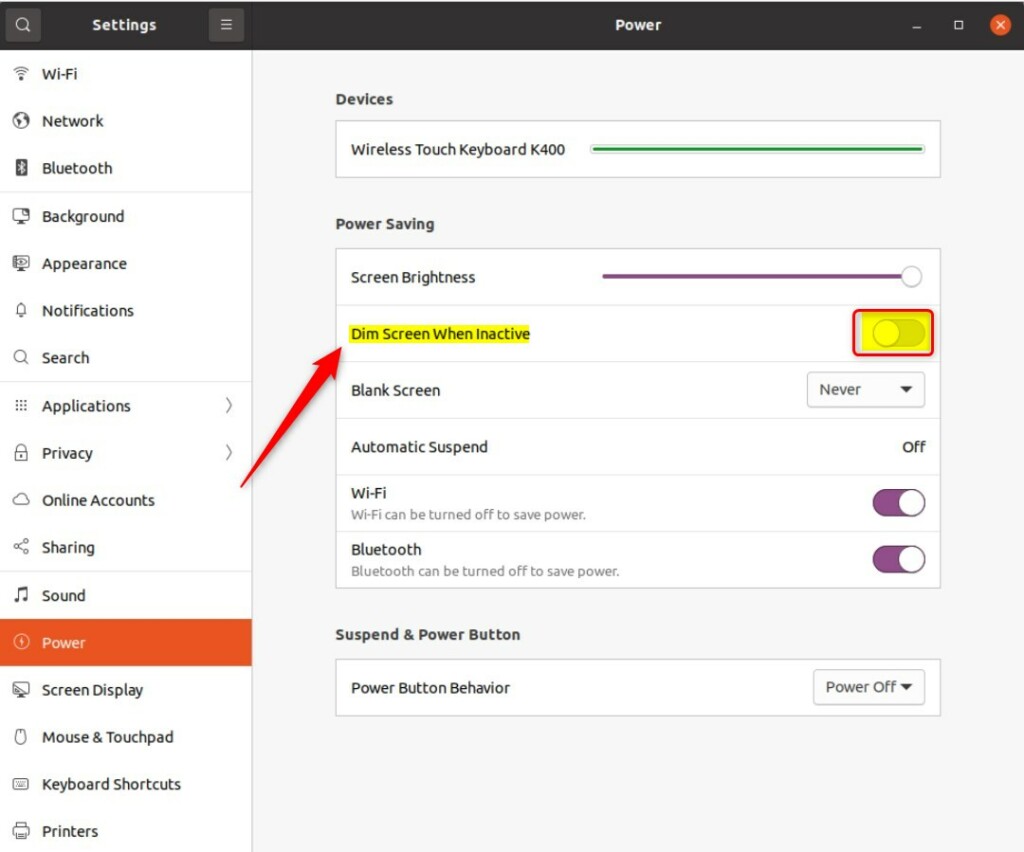
ubuntu linux dim screen button
If you can't find Dim Screen When Inactive, check two things. A desktop PC with no battery shows fewer power options, and the dimming switch may be missing. Also, on a few Ubuntu releases and flavours the option sits in a different place or has a slightly different name. Ubuntu flavours that don't use GNOME, such as Kubuntu or Xubuntu, have their own power settings, so these steps don't apply to them.
Conclusion
Changing how your screen dims in Ubuntu is quick, and it helps you manage your laptop's energy use. Keep in mind that other power settings can also affect brightness. Screen Blank and Automatic Suspend in the same Power page can still turn the screen off or put the machine to sleep. The power mode and your keyboard brightness keys can change the brightness as well. If the screen still behaves in a way you didn't expect, check those settings next.
Have a question about this guide?
Answered by AI from this guide. Good questions may be added to this page — please don't include personal details.
Did this guide fix your problem?

About the Author
Richard
Tech Writer, IT Professional
Richard is a writer at Geek Rewind who turns complex IT tasks into clear, step-by-step guides. He draws on years of hands-on experience in system administration and enterprise IT operations, focusing on Windows, Linux and WordPress: the problems people actually run into, and the fixes that work. His server and WordPress guides come from systems he runs himself. Richard builds and maintains the platform behind Geek Rewind, from its Ubuntu servers and Nginx configuration to its custom WordPress plugins. Many new tutorials start with readers' questions, and he's always glad to answer them in the comments.
No comments yet — be the first to share your thoughts!