
This article explains how to enable or disable the ability to create Dev Drive in Windows 11.
The “Dev Drive” feature in Windows 11 allows developers to create a separate partition on their system’s hard drive. This partition stores development tools, source code, and other related files.
The Dev Drive is designed to provide a separate space for developers to work without worrying about accidentally deleting important system files or data.
If you don’t want users to create a “Dev Drive” on a machine, you can use the steps below.
However, you can disable the feature if users don’t want to create “Dev Drive” on a machine. This may be necessary in specific environments where security and control are top priorities.
By disabling the feature, you can prevent unauthorized software installations and ensure your system remains secure.
Enable or disable the ability to create Deve Drive in Windows
As mentioned, admins can enable or disable the ability to develop Dev Drive in Windows.
Here’s how to do it. (There are multiple ways to do it).
Enable or disable Dev Drive creation using the Terminal
The way to enable or disable Dev Drive creation is to use the Windows Terminal app.
First, open the Windows Terminal app as administrator.
Then, run the command below to enable Dev Drive creation.
fsutil devdrv enable
To disable it, run the command below.
fsutil devdrv disable
Enable or disable Dev Drive creating using Local group policy
Another way to enable or disable the ability to create “Dev Drive” in Windows is to use the Local group policy editor.
First, open the Local Group Policy Editor (gpedit.msc). (Search for “Edit group policy”) on the Start menu.
Then, navigate the folders below:
Computer Configuration > Administrative Templates > System > Filesystem
In the Group Policy details pane on the right, locate and double-click the “Enable dev drive” settings.

On the “Enable dev drive” window, set the option to Not Configure, Enabled, or Disabled.
- Not Configured (default)
- Enabled – enable developer volumes while allowing antivirus filter to attach on a developer volume.
- Disabled – disallow creation of new developer volumes; existing developer volumes will mount as regular volumes.
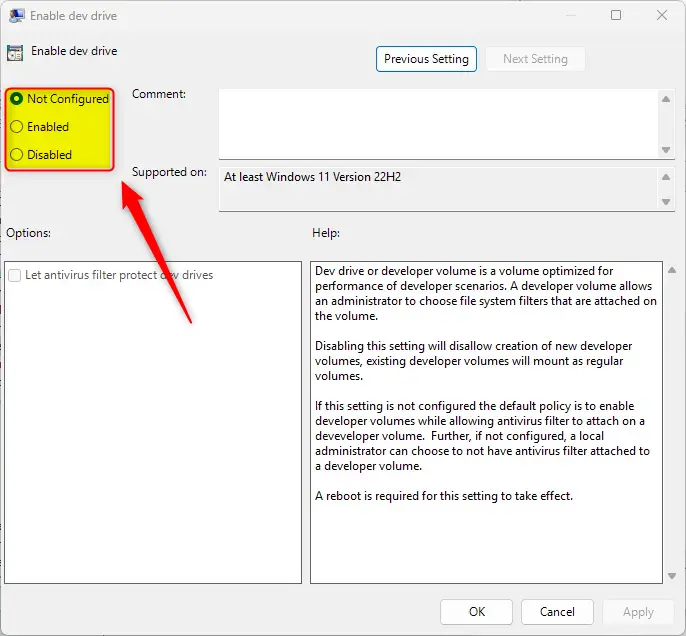
Click OK to save your changes. You may have to reboot your device for the settings to apply.
Turn on or off Dev Drive creation using the Windows Registry Editor
Yet another way to enable or disable Dev Drive creation is to use the Windows Registry editor.
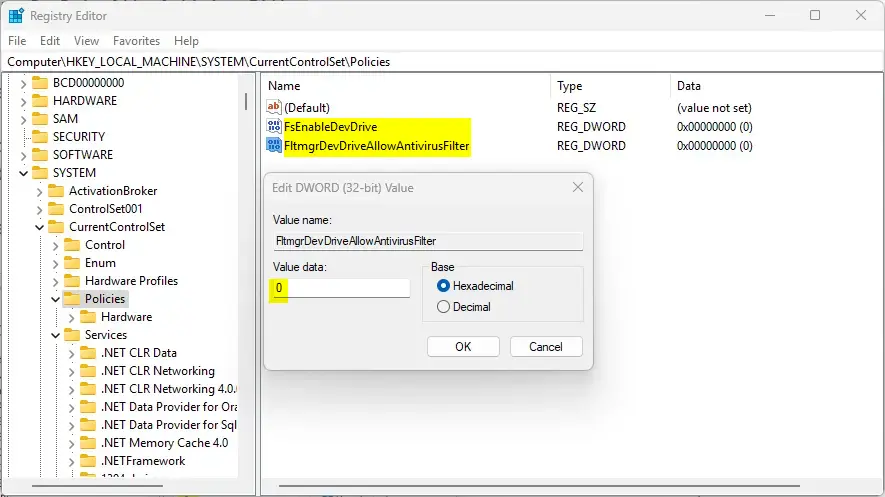
First, open the Windows Registry and navigate to the folder key path below.
Computer\HKEY_LOCAL_MACHINE\SYSTEM\CurrentControlSet\Policies
Next, double-click these two (REG_DWORD) names on the Policies key’s right pane to open it.
FsEnableDevDrive
FltmgrDevDriveAllowAntivirusFilter
Then, enter a value 0 for both to disable Dev Drive creation.
If you do not see the two items, right-click a blank area and create a new DWORD (32-bit) registry item for both.
Then, enter a value 0
To restore the default behavior and allow “Deve Drive” creation, delete both items created above.
FsEnableDevDrive
FltmgrDevDriveAllowAntivirusFilter
Save your changes and restart your computer.
That should do it!
Conclusion:
- Various methods, including the Windows Terminal, Local Group Policy Editor, and Windows Registry Editor, can enable or disable the ability to create a Dev Drive in Windows.
- Administrators can use these methods to customize system settings according to specific security and control requirements.
- By following the steps outlined in this article, users can effectively manage the creation of developer volumes, ensuring system security and integrity.
- For further clarifications or additional insights, readers can utilize the comment section below to contribute or seek further assistance.

Leave a Reply