

IPv6 is a newer internet protocol that comes turned on by default in Windows 11. You might want to disable it or change how it works on your computer. This guide shows you how to do that.
Why disable or change IPv6?
Some people prefer to use the older IPv4 protocol instead. Others want to turn off IPv6 tunnel interfaces that automatically connect when your computer detects certain network conditions. Disabling IPv6 completely isn’t recommended, but you have options to control how it works.
Understanding IPv6 settings
IPv6 settings are stored in the Windows registry at this location:
HKEY_LOCAL_MACHINE\SYSTEM\CurrentControlSet\Services\Tcpip6\ParametersThe setting you need to change is called DisabledComponents. It uses a number system called hexadecimal to control different IPv6 features.
IPv6 options and what they do
Prefer IPv4 over IPv6
What happens: Your computer will use the older IPv4 protocol when possible instead of IPv6.
Recommended: This is the best option instead of completely disabling IPv6.
To confirm this is working, follow these steps:
- Open Command Prompt or PowerShell
- Type:
ping bing.com - Look at the response. If IPv4 is preferred, you should see an IPv4 address returned
You can also check network settings by running:
netsh interface ipv6 show prefixpoliciesLook for entries with higher precedence numbers. These will be preferred over lower numbers.
Disable IPv6 completely via Registry – Recommended
Disabling IPv6 completely via registry in Windows 11 turns off most IPv6 features by modifying the DisabledComponents value in HKEY_LOCAL_MACHINE\SYSTEM\CurrentControlSet\Services\Tcpip\Parameters, though IPv6 continues running internally for system operations. Administrator rights are required, and using the correct value (0xFF for full disable or 0x20 to prefer IPv4) prevents startup delays.
⚠️ Admin Required: You need administrator rights to make these changes.
- Right-click on Command Prompt and select “Run as administrator“
- Type this command and replace with the number you want (like 0x20 or 0xFF):
reg add "HKEY_LOCAL_MACHINE\SYSTEM\CurrentControlSet\Services\Tcpip6\Parameters" /v DisabledComponents /t REG_DWORD /d 0xFF /f - Press Enter
- Restart your computer for changes to take effect
Unbinding IPv6 from your network adapter – Not Recommended
What this means: Completely removing IPv6 from your network connection.
⚠️ Warning: We don’t recommend doing this. Windows works best with IPv6 enabled. Some programs and features need it.
If you still want to unbind IPv6, you have two options:
Option 1: Using Network Settings
- Right-click on the network icon in your taskbar
- Select “Network and internet settings”
- Find your network adapter
- Uncheck “Internet Protocol Version 6 (TCP/IPv6)“

Option 2: Using PowerShell
⚠️ Admin Required: Open PowerShell as administrator.
Replace <MyAdapter> with your network adapter name (like “Ethernet” or “WiFi“):
Disable-NetAdapterBinding -Name "<MyAdapter>" -ComponentID ms_tcpip6IPv6 tunnel interfaces explained
What are they? Tunneling is a way for IPv6 to travel through IPv4 networks. By default, Windows automatically creates these tunnels when it detects certain network conditions.
Why disable them? If you don’t need IPv6 or these automatic connections cause problems, you can turn them off.
The main tunneling methods are:
- 6to4 tunneling
- ISATAP
- Teredo
How to disable tunnel interfaces
Method 1: Using the registry
⚠️ Admin Required
Set the DisabledComponents value to 0x01
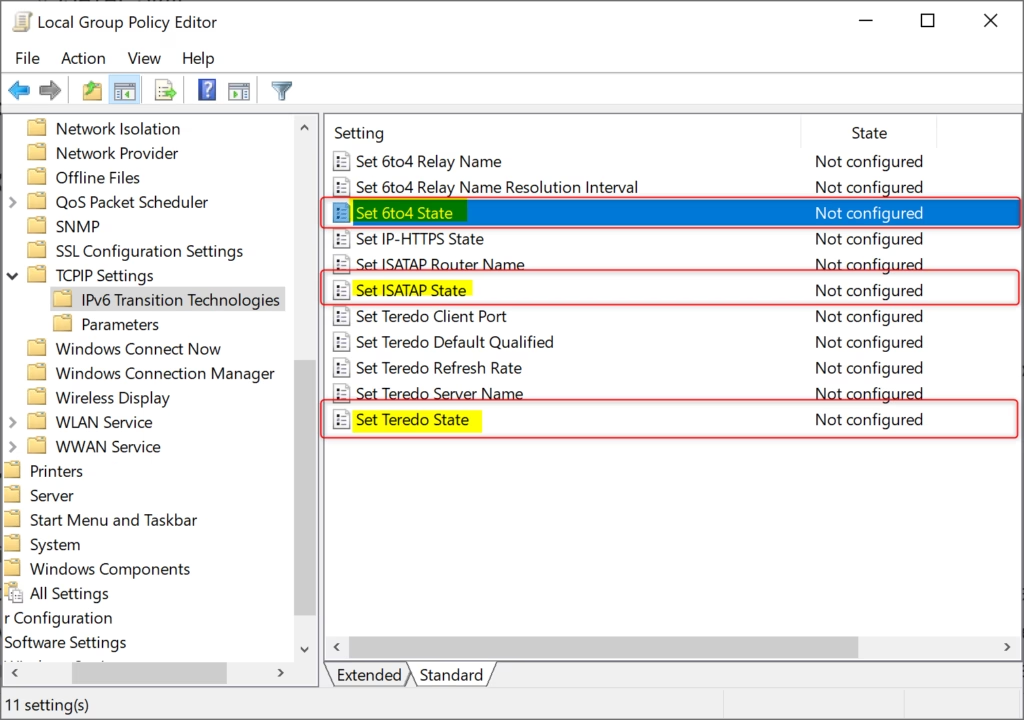
Method 2: Using Group Policy (Windows Pro/Enterprise only)
⚠️ Admin Required
- Press Windows key + R
- Type
gpdit.mscand press Enter - Navigate to:
Computer Configuration\Administrative Templates\Network\TCPIP Settings\IPv6 Transition Technologies - Set the following to “Disabled”:
- 6to4 State
- ISATAP State
- Teredo State
Note: ISATAP and Teredo are already disabled by default in Windows 11.
Important things to remember
- Changing the DisabledComponents registry setting doesn’t change the checkbox in network properties. The checkbox and the registry setting work separately.
- You cannot completely disable IPv6. It runs internally for system tasks.
- Disabling IPv6 incorrectly (using 0xffffffff instead of 0xff) can delay your computer startup by five seconds.
- Some programs and features expect IPv6 to work properly.
Summary
IPv6 is enabled by default in Windows 11. You can control how it works by changing a registry setting called DisabledComponents. The best approach is to prefer IPv4 over IPv6 (value 0x20) rather than completely disabling IPv6. If you want to disable tunnel interfaces that connect automatically, use the value 0x01. Remember that you need administrator rights to make these changes, and you should restart your computer afterward. Completely disabling or unbinding IPv6 is not recommended because Windows and many programs need it to work properly.


Leave a Reply