
You create a new profile in Microsoft Edge to keep your browsing data separate for different users or purposes.
Microsoft Edge profiles allow you to maintain distinct sets of bookmarks, history, passwords, and extensions for each profile. This is incredibly useful if you share your PC or want to segregate work browsing from personal browsing.
For instance, you can set up a dedicated profile for your work, ensuring your professional bookmarks and history don’t clutter your personal browsing sessions. Microsoft Edge version 120 currently supports these independent user profiles.
Step 1Find Your Profile Settings
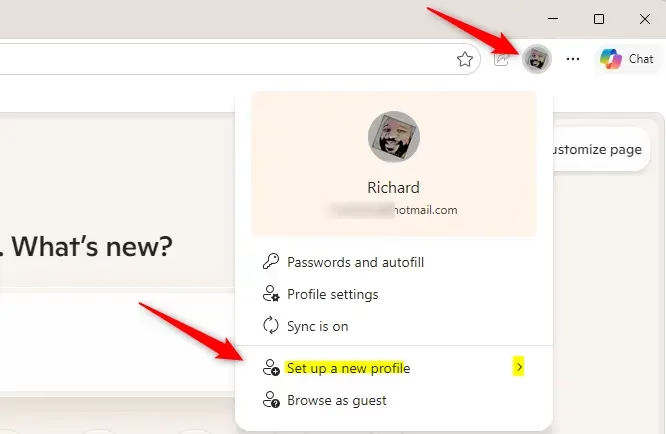
First, open Microsoft Edge. Look at the top right corner of the browser window. You should see an icon. It often looks like a person.
Clicking this icon lets you manage your browser’s different identities. This is a key step toward better organization.
Step 2Start Creating a New Profile
After clicking your profile icon, a small menu will appear. Find an option that says “Add profile” or “Set up a new profile.” The words might change a little with updates, but it will be clear.
This is where you begin creating your new digital space. It will be exclusively yours.
Step 3Pick Your Profile Type
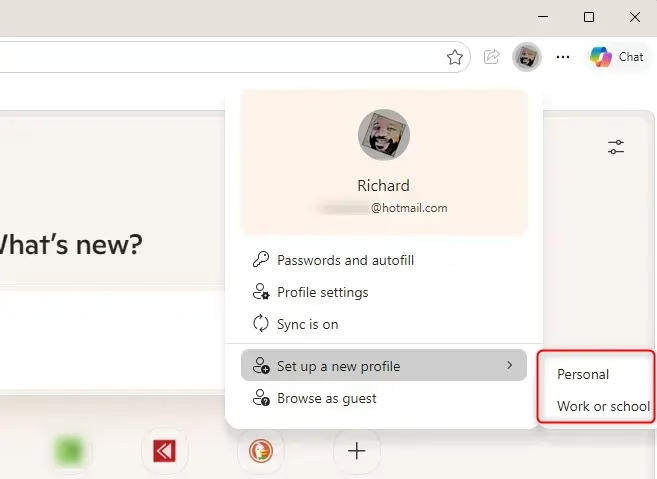
Edge will ask how you want to set up this new profile. You’ll usually see choices like “Personal” and “Work or school.”
- Personal: This is for everyday browsing. Use it for social media, shopping, personal emails, and hobbies. It’s your digital playground.
- Work or school: This profile is great for keeping your job or school life separate. Use it for work emails, project tools, and anything related to your job or studies.
Choosing one helps Edge give you better initial settings. You can change it later if you need to. The main point is to keep things separate.
Step 4Decide About Syncing Data
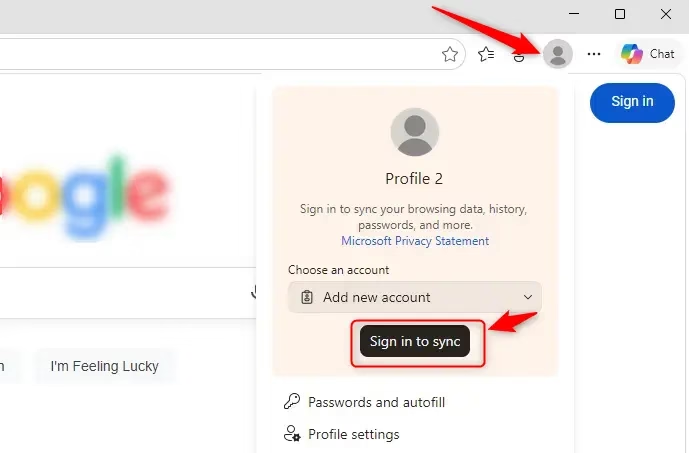
This is an important step. Edge will ask if you want to “Sign in to sync data” or “Start without your data.”
- Sign in to sync data (Recommended): If you pick this, you’ll sign in with your Microsoft account (like an Outlook.com account). Edge will then copy your bookmarks, passwords, history, extensions, and settings to all your devices where you use this same account and profile. This is very helpful if you use Edge on more than one computer or your phone.
- Start without your data: If you choose this, your new profile will be completely empty. It will be like a brand-new browser. No bookmarks, history, or extensions will be brought over. This is good if you want a completely separate profile. Maybe you want to test something or use a shared computer and don’t want personal information saved.
For most people, signing in and syncing is the best option. It makes using Edge on different devices much easier. If you are setting up a profile for someone else, or need extra privacy, starting without data might be better.
Step 5Confirm and Start Browsing
After choosing whether to sync data, you’ll likely see a button like “Confirm and start browsing.” Click it!
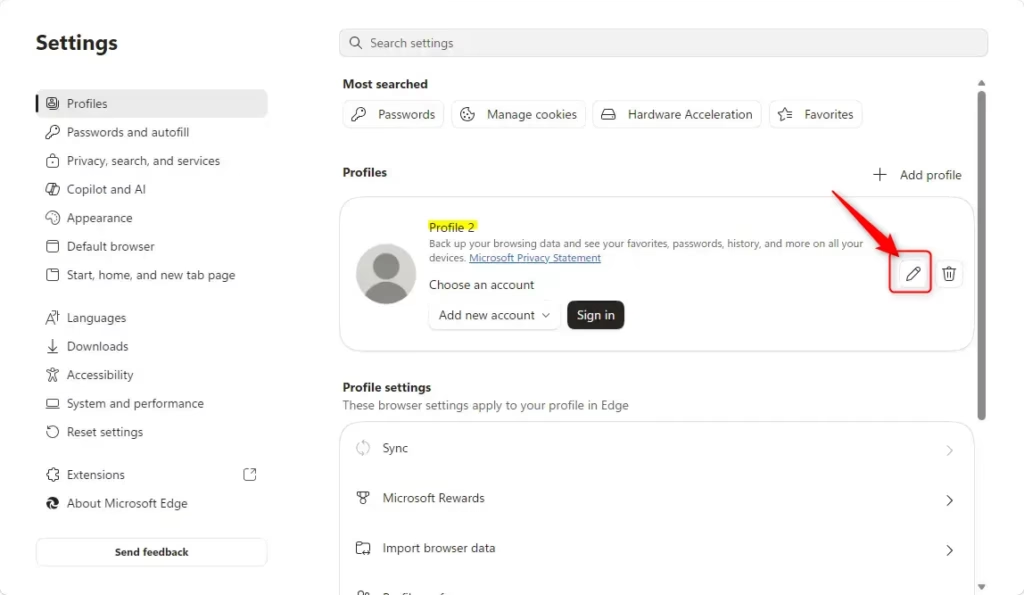
And there you go! A new Microsoft Edge window will open. This window is for your new profile. It might look a little different. Maybe a new background or no bookmarks yet. You’ve successfully made a new profile!
This new window is now your own space. Anything you do here, like saving bookmarks or adding extensions, will only affect this profile. Your other profiles will still be there and work the same.
Reference:
https://support.microsoft.com/en-us/edge/sign-in-and-create-multiple-profiles-in-microsoft-edge
Summary
Creating a new profile in Microsoft Edge is quite straightforward. It helps you organize your browsing by keeping different activities separate. You can create profiles for work, personal use, shopping, or really anything else. This makes your browser cleaner, helps you find things faster, and keeps your digital life more manageable. Simply click your profile icon, add a new profile, and then choose whether to sync your data. It’s a powerful way to make your browsing experience work better for you.
Was this guide helpful?

About the Author
Richard
Tech Writer, IT Professional
Richard, a writer for Geek Rewind, is a tech enthusiast who loves breaking down complex IT topics into simple, easy-to-understand ideas. With years of hands-on experience in system administration and enterprise IT operations, he’s developed a knack for offering practical tips and solutions. Richard aims to make technology more accessible and actionable. He's deeply committed to the Geek Rewind community, always ready to answer questions and engage in discussions.



No comments yet — be the first to share your thoughts!