How to Resize the Touch Keyboard in Windows 11
You resize the touch keyboard in Windows 11 by adjusting its size settings to improve your typing experience.
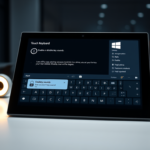
The touch keyboard is Windows’ virtual keyboard, perfect for touch-enabled devices like tablets and 2-in-1 laptops.
If the default touch keyboard size hinders your workflow, you can easily make it wider or taller to suit your preferences. This is especially useful if you’re running Windows 11 version 22H2 or a newer build.
Open Settings, go to Personalization, then Touch keyboard. Use the Keyboard size slider to adjust the width and height of the touch keyboard to your preference. The change takes effect immediately.
Why resize the Touch keyboard?
You might find the keys too small to tap accurately, or perhaps the keyboard takes up too much space on your screen. Adjusting the size helps you find the perfect balance for your comfort and screen space. This is particularly helpful on high-resolution screens, where the default scaling might make the keyboard appear tiny or blurry.
What happens when done?
Once you finish these steps, your touch keyboard will immediately snap to the new size you selected. It will remember this setting whenever you open the keyboard in the future. Your changes will apply to the TabTip, which is the technical name for the Windows touch input panel, across all your apps.
Understanding TabTip vs. Touch Keyboard
In Windows 11, the Touch keyboard is often known by its system process name, TabTip.exe. It’s different from the On-Screen Keyboard (OSK), which is an accessibility tool for mouse users. The touch keyboard, on the other hand, is built specifically for touchscreens. Knowing this difference can help you figure out why the keyboard might not show up or might be cut off at the bottom of your screen.
How to resize the Touch keyboard
You can change these settings using the main Windows Settings menu. You do not need special permissions to do this.
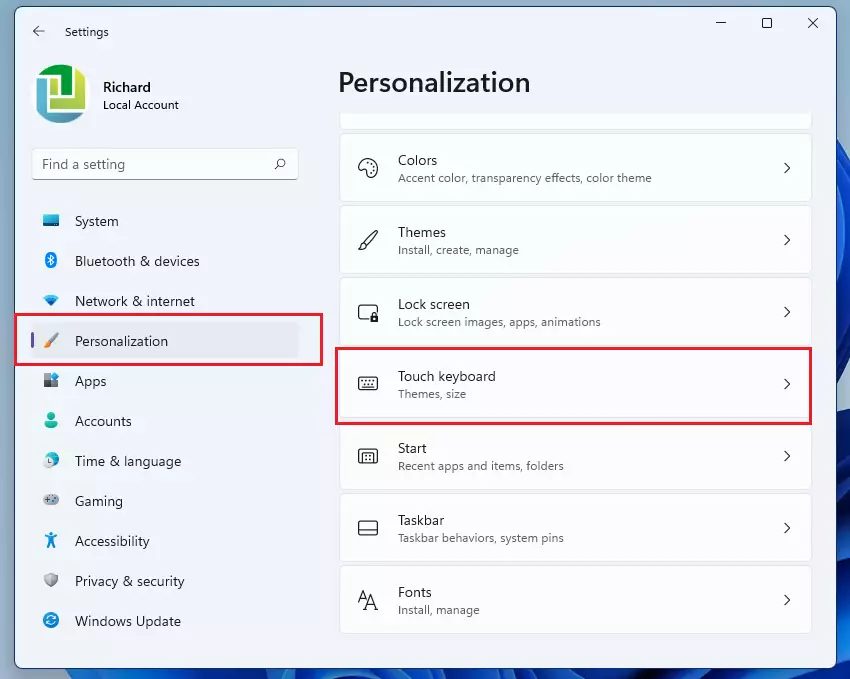
- Open the Settings app. You can do this by pressing the Windows key + I on your keyboard, or by clicking Start and selecting the Settings icon. Official Microsoft Accessibility Guide
- In the Settings menu, click on Personalization in the left-hand list.
- Look for Touch keyboard on the right side of the screen and click it.
- Find the slider labeled Keyboard size.
- Slide it left or right to change the size. The default setting is 100.
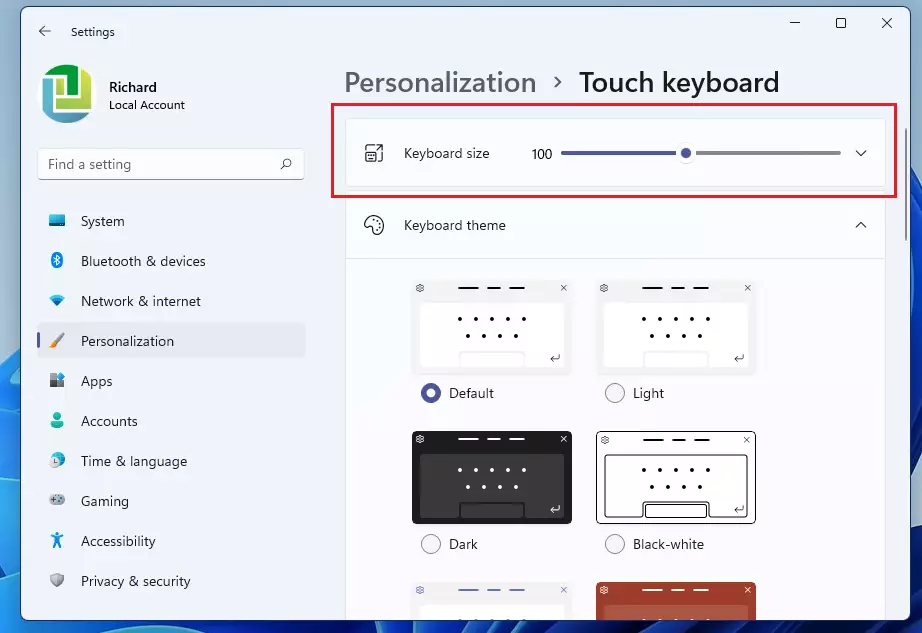
As you move the slider, the keyboard will change size instantly so you can see if it fits your screen better. 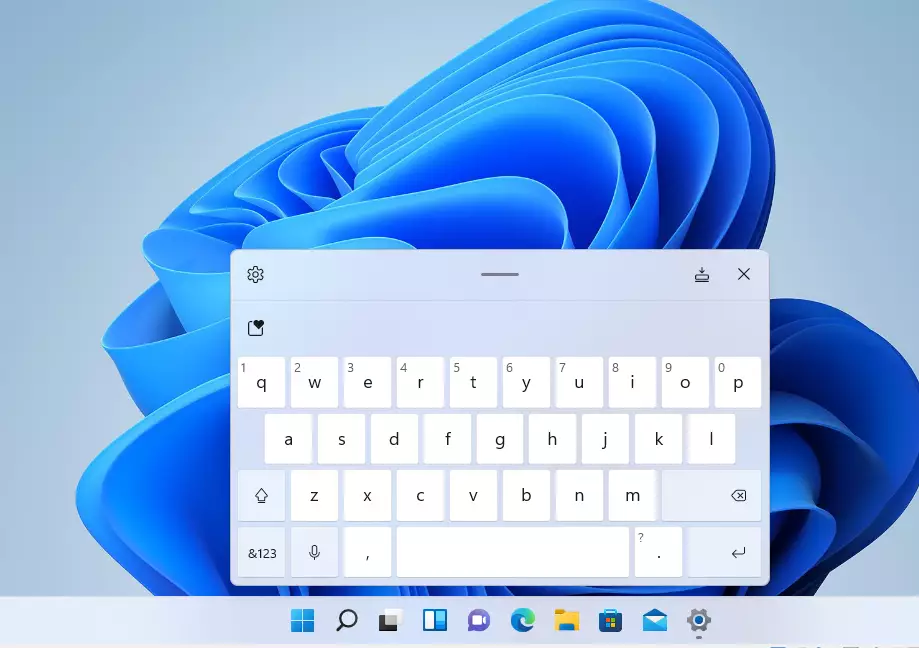
Troubleshooting Common Bugs
Having trouble with a cut-off or improperly scaled keyboard? Start by checking your Display Scaling (DPI) settings. Go to Settings > System > Display and ensure your scale is set to the recommended percentage. If the keyboard still fails to appear, you may need to restart the TabTip.exe process via the Task Manager.
Advanced Registry Workaround
Note: This step requires admin privileges. If the slider is greyed out, you can force a reset via the registry. Navigate to HKEY_CURRENT_USER\Software\Microsoft\TabletTip\1.7 and adjust the KeyboardScale value. Be careful when editing the registry as incorrect changes can affect system stability.
Summary
Resizing your touch keyboard is a quick way to improve your typing experience on Windows 11. By going to the Personalization menu, you can make the keys smaller or larger to suit your preferences. This small adjustment helps make your touchscreen device comfortable and easy to use, no matter your screen resolution or DPI settings.
Why is my touch keyboard cut off at the bottom?
This often happens due to incorrect DPI scaling settings or a display resolution mismatch. Ensure your Windows display scaling is set to the recommended percentage in System settings. If the issue persists, try undocking the keyboard or restarting the TabTip.exe process to force the interface to redraw correctly.
How do I reset the touch keyboard to default size?
To reset the keyboard to its original size, navigate to Settings > Personalization > Touch keyboard. Move the Keyboard size slider back to the 100 mark. This is the default setting provided by Windows 11 and will restore the keyboard to its standard dimensions for your specific screen resolution.
Was this guide helpful?

About the Author
Richard
Tech Writer, IT Professional
Richard, a writer for Geek Rewind, is a tech enthusiast who loves breaking down complex IT topics into simple, easy-to-understand ideas. With years of hands-on experience in system administration and enterprise IT operations, he’s developed a knack for offering practical tips and solutions. Richard aims to make technology more accessible and actionable. He's deeply committed to the Geek Rewind community, always ready to answer questions and engage in discussions.

No comments yet — be the first to share your thoughts!