This article explains how to change the brightness level for Dynamic Lighting LED devices in Windows 11.
Windows Dynamic Lighting feature controls Dynamic Lighting-compatible devices (such as LED-lit keyboards, mice, case lighting, or other devices) individually or as a group through the Windows Settings app.
When these devices are connected, they will show up as cards at the top of the page. You can select these cards to change individual device settings.
The Dynamic Lighting brightness setting lets you set the LED brightness on your devices. Selecting Reset for all devices will reset the brightness to a default value.
Changing the brightness level can help reduce eye strain or provide a more comfortable experience when using your computer in a dimly lit environment. Additionally, some users may prefer a brighter or dimmer lighting effect for aesthetic reasons.
Change Dynamic Lighting LED brightness for devices
As described above, users can change the brightness level for Dynamic Lighting devices to reduce eye strain or provide a more comfortable experience.
Here’s how to do it.
First, open the Windows Settings app.
You can do that by clicking on the Start menu and selecting Settings. Or press the keyboard shortcut (Windows key + I) to launch the Settings app.
When the Setting app opens, click the Personalization button on the left.

Select the Dynanic Lighting tile on the right to expand it.

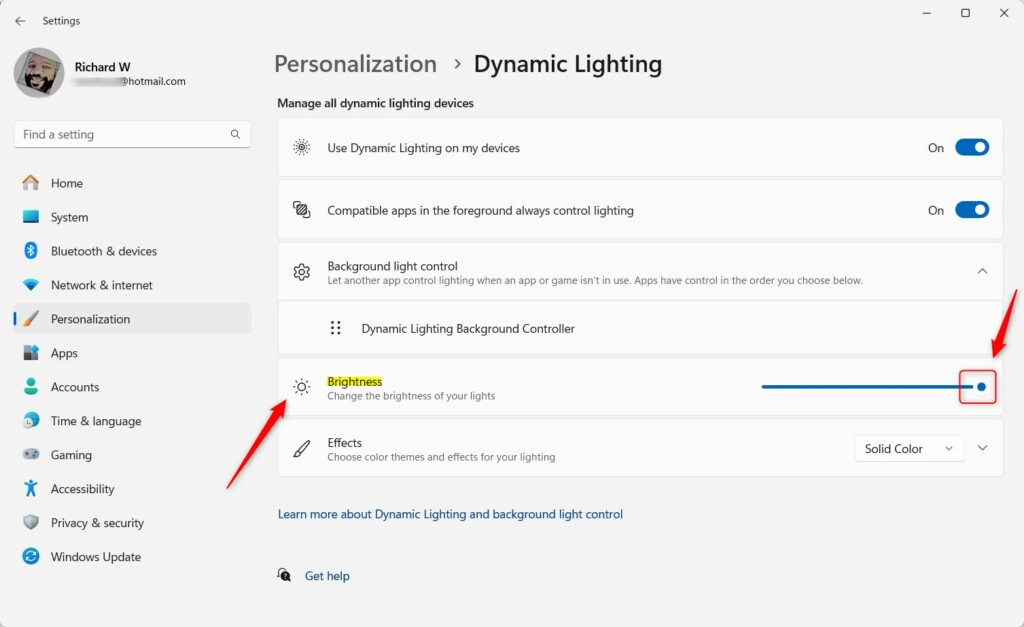
On the Personalization -> Dynamic Lighting setting pane, select the “Brightness” tile.
Then, use the Brightness slider to adjust the brightness level between 0 and 100 percent.
Selecting Reset for all devices will reset the brightness to a default value.
Exit the Settings app when you’re done.
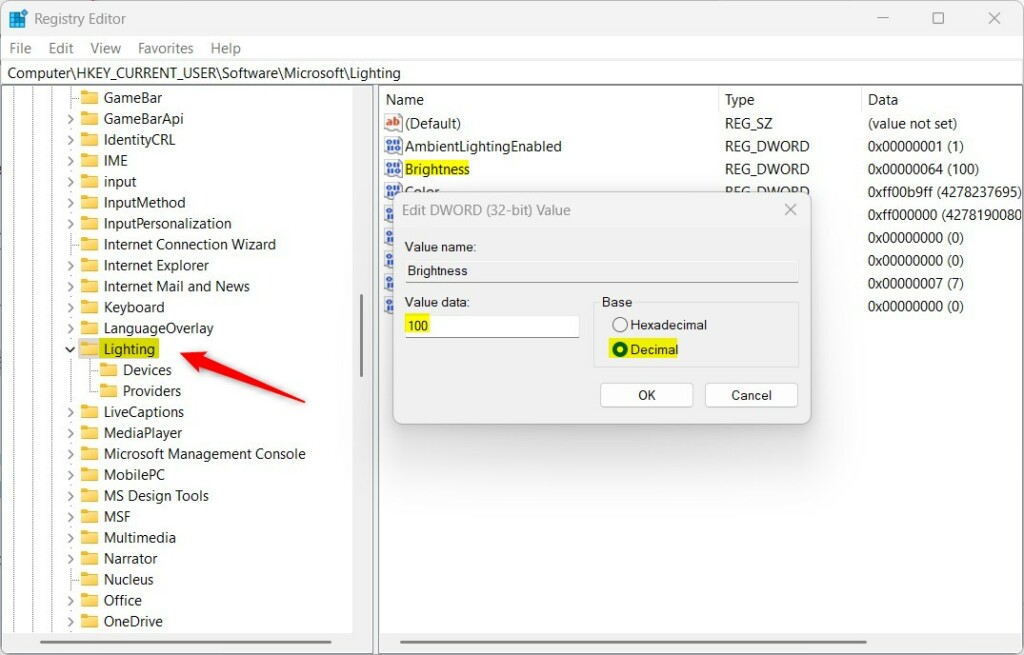
The brightness level can also be changed in the Windows Registry editor. To do that, navigate to the registry key below.
HKEY_CURRENT_USER\Software\Microsoft\Lighting
Next, double-click the Brightness (REG_DWORD) name on the Lighting key’s right pane to open it. Then, enter a value between 0 and 100, and click OK to save your changes.
That should do it!
Conclusion:
- Adjust the brightness level for Dynamic Lighting LED devices to reduce eye strain or create a more comfortable computing experience.
- Follow the simple steps outlined in this article to change the brightness level using the Windows Settings app or the Windows Registry editor.
- Customizing the brightness level can also cater to aesthetic preferences, providing a personalized lighting effect.
- Experiment with different brightness levels to find the ideal setting for your specific environment and needs.

Leave a Reply to Customize Dynamic Lighting on Windows 11 LED Devices – Geek Rewind Cancel reply