How to Change BitLocker Password in Windows 11
You can change your BitLocker password in Windows 11 using either the Control Panel or File Explorer.
BitLocker is a built-in feature in Windows that encrypts your entire drive. This means it secures your data, preventing unauthorized access if your device gets lost or stolen. You usually set a password or use a USB drive to unlock the drive.
Changing your BitLocker password isn’t difficult, especially when you know your current password. It’s a good security practice to update your password periodically to keep your sensitive files well-protected.
To start, make sure your BitLocker-encrypted drive is unlocked. You’ll need to enter your current password before you can set a new one.
Right-click the BitLocker-encrypted drive in File Explorer, select “Show more options,” then “Change BitLocker password.” Enter your old password, then your new password twice to confirm. Alternatively, use the Control Panel under System and Security.
How to Change Your BitLocker Password
Here’s how you can change your BitLocker password in Windows 11. You have three options; pick the one that feels most comfortable for you.
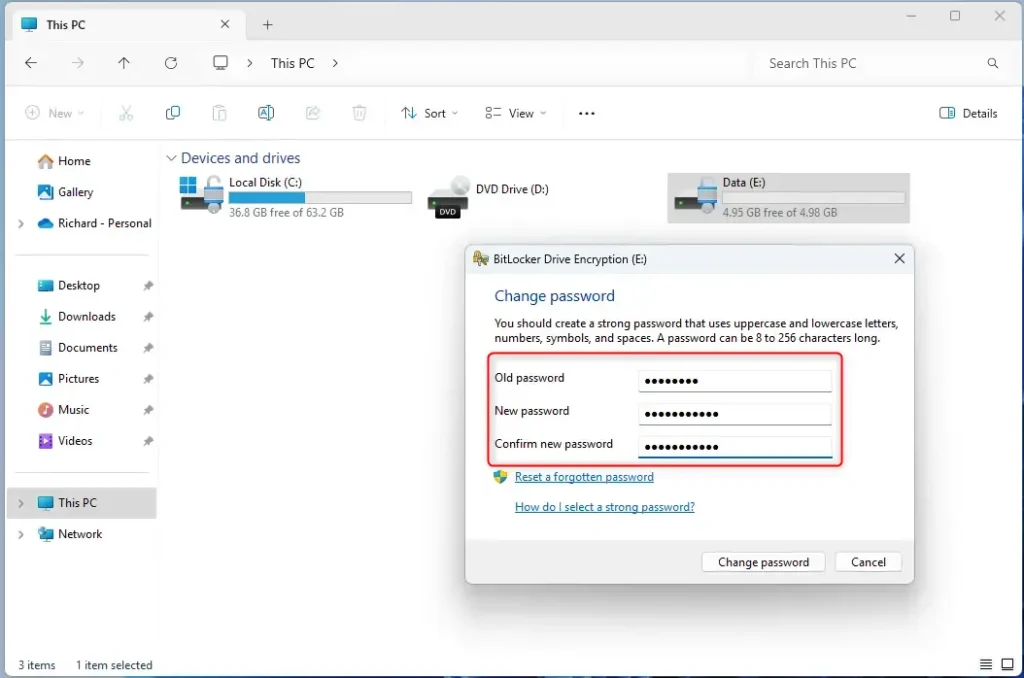
1Change Password Using File Explorer
- Open File Explorer. Click the folder icon on your taskbar or press ⊞ Win+E on your keyboard.
- Find the drive that is protected by BitLocker. It will have a lock icon.
- Right-click on that drive. Choose “Show more options”. Click “Change BitLocker password”.
- A window will pop up. Type your old password. Then enter your new password twice to confirm.
- Click “Change password” to finish.
You can easily change your BitLocker password right from File Explorer. Just open File Explorer, find the drive with the lock icon, right-click it, and select ‘Change BitLocker password’ from the options.
You can easily change your BitLocker password right from File Explorer. Just open File Explorer, find the drive with the lock icon, right-click it, and select ‘Change BitLocker password’ from the options.
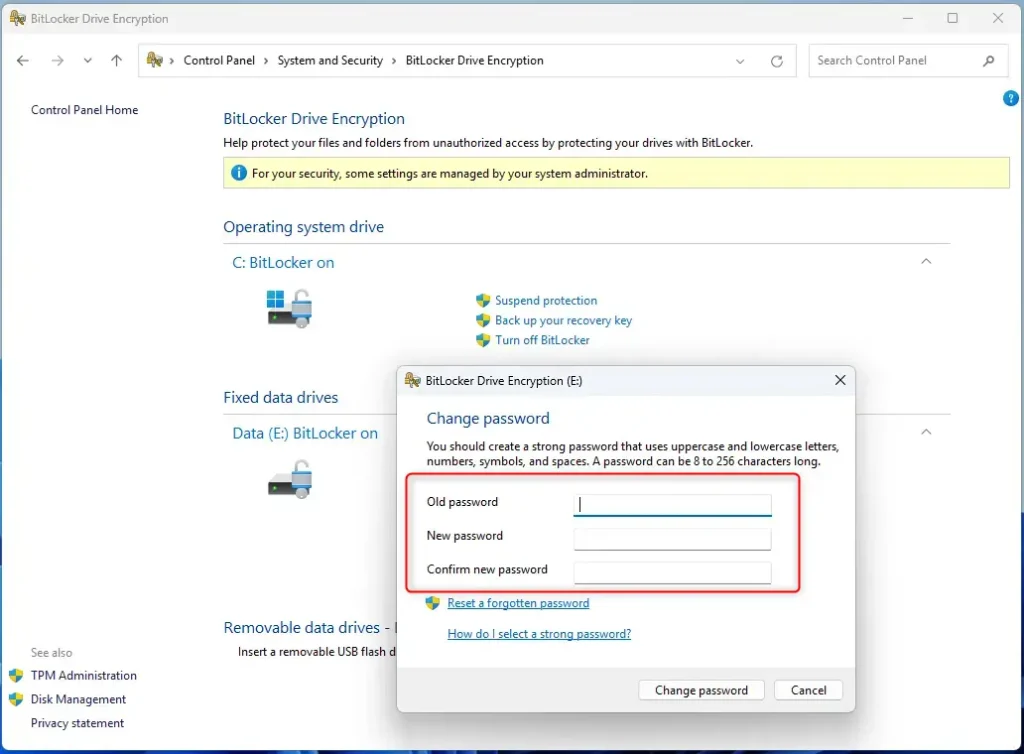
2Change Password Using Control Panel
- Open Control Panel. Type “Control Panel” in the Start menu search and click it.
- Go to System and Security → BitLocker Drive Encryption.
- Find the drive you want to change the password for. Click “Change password”.
- Enter your old password. Then enter your new password twice. Click “Change password” to apply.
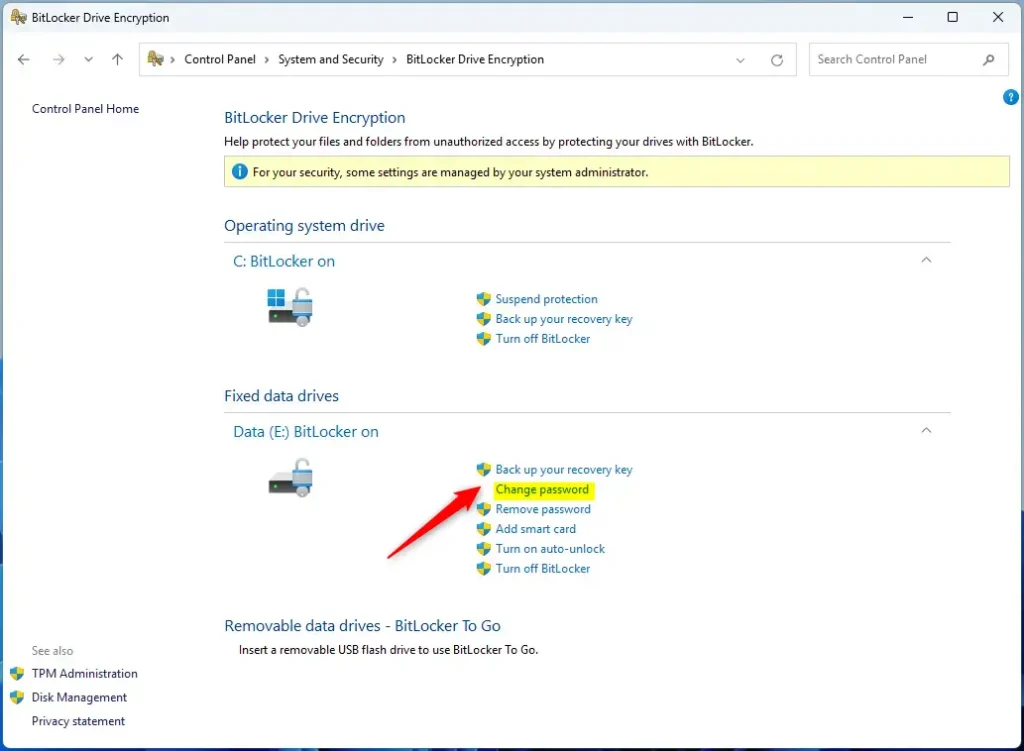
Changing your BitLocker password through the Control Panel is straightforward. Open the Control Panel, go to System and Security, then click on BitLocker Drive Encryption to find the option to change your password.
Changing your BitLocker password through the Control Panel is straightforward. Open the Control Panel, go to System and Security, then click on BitLocker Drive Encryption to find the option to change your password.
3Change Password Using Windows Terminal
For those who prefer using commands, you can change your BitLocker password using Windows Terminal. First, open Windows Terminal as an administrator, then type the manage-bde -changepassword command followed by your drive letter.
If you like using commands, this method might be for you.
- Open Windows Terminal as an administrator. Search for “Windows Terminal” in Start. Right-click it. Select “Run as administrator”.
- Type the following command and press Enter. Replace
E:with your drive letter:
manage-bde -changepassword E:
- When prompted, enter your old password. Then enter your new password twice.
- Press Enter to finish.
Tip: To find your drive letter, open File Explorer. Look for the letter next to your drive. For example: C:, D:, or E:.
Summary
- Changing your BitLocker password helps keep your data safe.
- You can change the password using File Explorer, Control Panel, or Windows Terminal.
- Make sure your drive is unlocked before starting.
- Use a strong, unique password that you can remember.
- Changing your password regularly gives extra protection.
Changing your BitLocker password is a simple way to keep your data secure. You have three main options: use File Explorer, the Control Panel, or Windows Terminal to update your password, ensuring you always use a strong, memorable code.
Was this guide helpful?

About the Author
Richard
Tech Writer, IT Professional
Richard, a writer for Geek Rewind, is a tech enthusiast who loves breaking down complex IT topics into simple, easy-to-understand ideas. With years of hands-on experience in system administration and enterprise IT operations, he’s developed a knack for offering practical tips and solutions. Richard aims to make technology more accessible and actionable. He's deeply committed to the Geek Rewind community, always ready to answer questions and engage in discussions.


No comments yet — be the first to share your thoughts!