
This article explains how to enable the Print screen key as a shortcut to open the new Snip & Sketch app in Windows 11 to take screenshots.
In most cases, the easiest way to make a copy of something is to take a snapshot of your screen.
You can still capture your screen using your Keyboard’s PrtScn button. However, you’ll have to press the Windows logo key + Shift + S to open the new and modern Snip & Sketch app in Windows 11.
Instead of using three keys on your Keyboard to open Snip & Sketch to take screenshots, you can enable the Keyboard’s Print (PrtScr, Prt Sc, Print Screen) key to open and Snip & Sketch app and create a capture quickly and the steps below will show you how to do that.
Snip & Sketch is a new app that merges the classic Snipping Tool for screen capture.
To get started with enabling the Print Screen key as a shortcut for Snip & Sketch, follow the steps below:
How to turn on the keyboard shortcut for Snip & Sketch apps in Windows 11
As mentioned above, one can use the Windows logo key + Shift + S to open the new and modern Snip & Sketch app in Windows 11. But why press three keys if you can only do one to do the task?
Windows 11 has a centralized location for the majority of its settings. Everything can be done, from system configurations to creating new users and updating Windows from its System Settings pane.
To get to System Settings, you can use the Windows key + I shortcut or click on Start ==> Settings, as shown in the image below:

Alternatively, you can use the search box on the taskbar and search for Settings. Then select to open it.
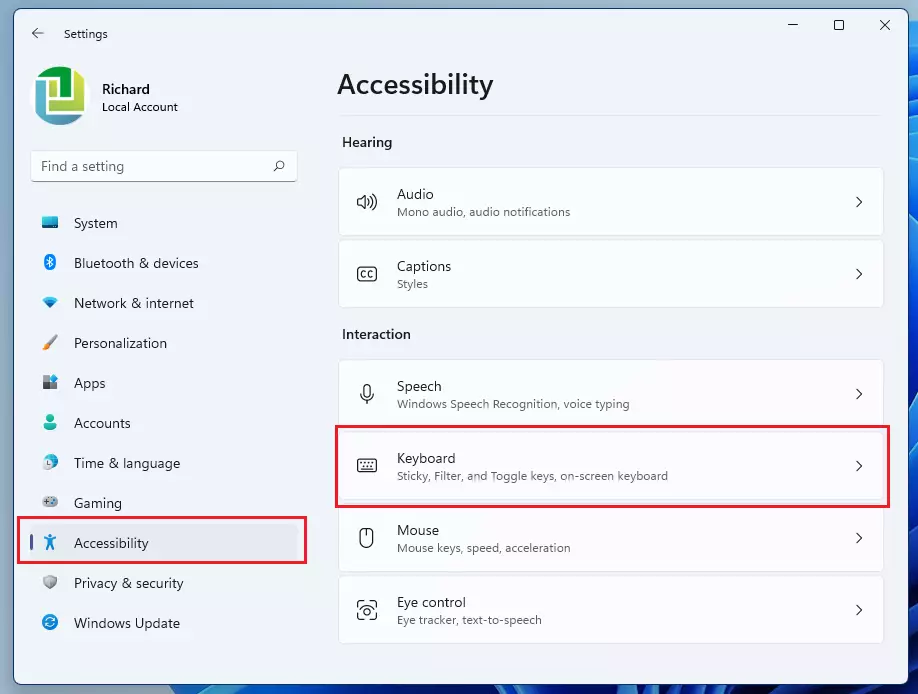
Windows Settings pane should look similar to the image below. In Windows Settings, click Accessibility, and select Keyboard on the right pane of your screen shown in the image below.
On the Keyboard settings pane, toggle the “Use the Print Screen button to open snipping.“
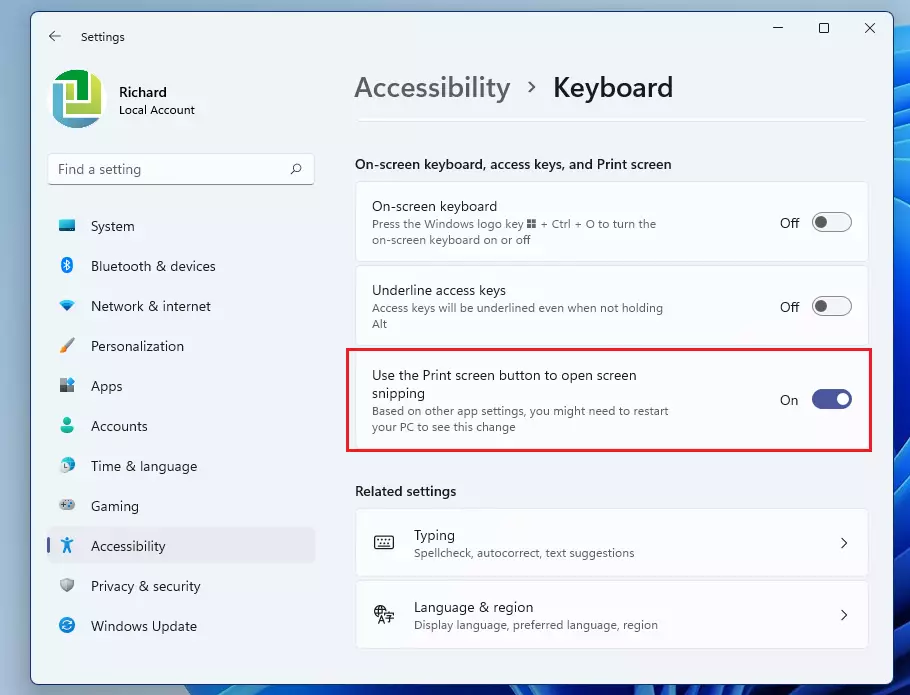
Once enabled, restart your computer for the changes to apply. When you log in back in, simply press the Print Screen, or PrtScn will open the Snip & Sketch app and allow you to capture. No need to press the Windows logo key + Shift + S to accomplish the same task.

You may have to press the FN + PRT SCN keys on laptops since laptops have smaller keyboards than regular-size desktop ones.
That should do it!
Conclusion:
- The Print Screen key can be easily configured to open the Snip & Sketch app, enhancing efficiency when taking screenshots.
- Enabling this shortcut eliminates the need to memorize multiple key combinations, simplifying the screenshot process.
- Following the outlined steps ensures that users can quickly access screen capture tools at their convenience.
- Remember to restart your computer after enabling the setting for changes to take effect.
- Utilizing the Print Screen key is especially beneficial for laptop users who may find navigation cumbersome on smaller keyboards.


Leave a Reply to How to Share Website link with Nearby Devices in Windows 11 – Geek Rewind Cancel reply