How to Change HungAppTimeout in Windows 11
Is Windows 11 taking too long to close unresponsive apps? You can tweak a setting called HungAppTimeout to change how long the operating system waits before closing a frozen application.
HungAppTimeout is a registry setting (a configuration value stored in Windows’s system files). It dictates the timeout period, in milliseconds, before Windows forcibly terminates an application that appears to be frozen.
By default, this value is set to 5000 milliseconds (5 seconds). This means Windows waits 5 seconds for a hung application to respond before assuming it’s frozen and offering to close it.
Modifying this setting can speed up shutdown or restart processes when applications misbehave, preventing you from waiting unnecessarily long.
Modify the HungAppTimeout registry value. Open Registry Editor, navigate to 🗝️HKEY_USERS.DEFAULTControl PanelDesktop, create a new String Value named HungAppTimeout, and set its data to your desired milliseconds. Restart your PC for the change to take effect.
What is HungAppTimeout?
HungAppTimeout is the setting in Windows that decides how long your computer waits before asking if you want to close an app that’s frozen or not responding.
If you don’t respond within a minute, Windows gives up trying to shut down and returns you to the desktop. You can adjust this waiting time to make Windows wait longer or less before forcing an app to close.
How to Change HungAppTimeout for Everyone Using Your PC
You can change the HungAppTimeout setting in Windows 11 to control how long the computer waits before closing a stuck app, and this guide shows you how to do it using the Registry Editor.
- Press Windows key + R to open the Run box.
- ADMIN REQUIRED: Type
regeditand press Enter to open the Registry Editor. Click “Yes” if it asks for permission. - In the Registry Editor, go to this folder path:
HKEY_USERS\.DEFAULT\Control Panel\Desktop - If you don’t see a folder named Desktop under Control Panel, right-click Control Panel, choose New > Key, and name it Desktop.
- Now, right-click in the right side panel (inside Desktop) and choose New > String Value.
- Name this new string
HungAppTimeout. - Double-click
HungAppTimeoutand set the Value data to the number of milliseconds you want Windows to wait. For example:- 5000 = 5 seconds (default)
- 10000 = 10 seconds
- Don’t use less than 1000 (1 second) to avoid issues.
- Click OK and close the Registry Editor.
- Restart your computer to apply the changes.
Change HungAppTimeout for Only Your User Account
If you want to change this setting for your user account only (and not all users), use this folder path instead:
HKEY_CURRENT_USER\Control Panel\DesktopThen follow the same steps as above.

What Does the End Task Prompt Look Like?
When an app is slow to close, Windows shows a message like this:
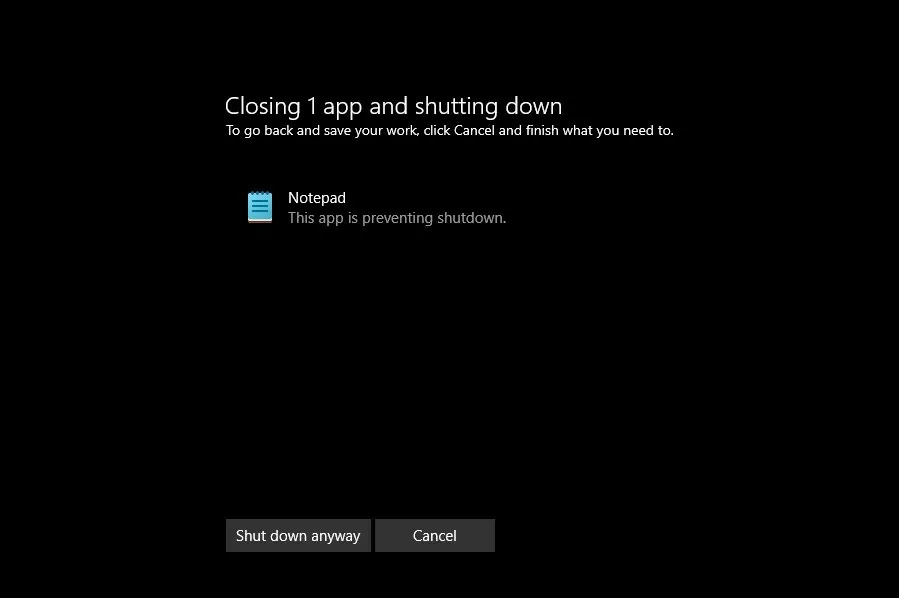
You can choose to wait, close the app, or shut down anyway.
Summary
- HungAppTimeout controls how long Windows waits before forcing an app to close.
- You can increase or decrease this time by editing the Windows Registry.
- Always back up the Registry before making changes.
- Changing this setting can help if apps take longer to close or if you want faster shutdowns.
- Follow the steps carefully to avoid any problems.
In short, HungAppTimeout is the time Windows gives an app before it asks if you want to force it closed, and you can change this setting in the Windows Registry.
What is HungAppTimeout?
HungAppTimeout is a setting that determines how long a system waits for a frozen application to respond before letting you forcefully close the program. This countdown also applies during special cases. Tasks that don't automatically close when you shut down/restart/sign out trigger the HungAppTimeout countdown.
How to fix Screen timeout on 🪟 Windows 11?
So that the screen turns off after 15 minutes and it goes to sleep after 30 minutes. And it's as easy as that updating your screen timeout. And sleep settings is a simple task to perform.
Should I turn off all background apps in 🪟 Windows 11?
If you are in a similar situation and want to maximize your Windows 11 laptop's performance, consider disabling background activity for apps you don't use or uninstall them altogether. Even if you choose the latter, there's always the option to reinstall these from the Microsoft Store.
Was this guide helpful?

About the Author
Richard
Tech Writer, IT Professional
Richard, a writer for Geek Rewind, is a tech enthusiast who loves breaking down complex IT topics into simple, easy-to-understand ideas. With years of hands-on experience in system administration and enterprise IT operations, he’s developed a knack for offering practical tips and solutions. Richard aims to make technology more accessible and actionable. He's deeply committed to the Geek Rewind community, always ready to answer questions and engage in discussions.

No comments yet — be the first to share your thoughts!