Deny Write Access to Unprotected Drives in Windows 11
You can deny write access to unprotected drives in Windows 11 to prevent accidental data saving on drives without encryption.
This security measure ensures that sensitive information is only written to drives protected by BitLocker, which is a crucial feature for safeguarding your data. By default, Windows allows writing to any connected drive, but this tutorial shows you how to change that behavior.
Implementing this in Windows 11, specifically on Pro and Enterprise editions, adds a significant layer of protection against data leaks or accidental exposure on unencrypted storage devices.
Open the Local Group Policy Editor and navigate to Computer Configuration > Administrative Templates > Windows Components > BitLocker Drive Encryption > Fixed Data Drives. Double-click “Deny write access to fixed drives not protected by BitLocker” and set it to Enabled. Restart your computer.
Why Block Writing to Unprotected Drives?
BitLocker is a built-in Windows tool that protects your files by encrypting your drives. When you use BitLocker, only people with permission can open and change files on the drive. By blocking write access to unencrypted drives, you keep your data safe from accidental changes or security risks.
What Drives Can BitLocker Protect?
- External drives (like USB sticks)
- Internal fixed drives
- Your main Windows system drive
When BitLocker is turned on for your Windows system drive, it can unlock automatically when you start your PC if you have the right security chip (called TPM).
What Happens When You Block Unprotected Drives?
Windows lets you set a rule to block writing (saving or changing files) on any fixed drives that don’t have BitLocker protection. This means your computer will only allow changes on drives that are encrypted and secure. Unencrypted drives become read-only.
Method 1Using Group Policy Editor
Follow these simple steps to set this up:
- Click the Start button and type
Edit group policy. Click to open the Local Group Policy Editor. - In the left panel, follow this path:
Computer Configuration > Administrative Templates > Windows Components > BitLocker Drive Encryption > Fixed Data Drives - In the right panel, find and double-click
Deny write access to fixed drives not protected by BitLocker. - Choose one of these options:
- Not Configured (default) – Same as Disabled below.
- Enabled – Blocks writing to drives without BitLocker. Those drives will be read-only.
- Disabled – Allows writing to all fixed drives, with or without BitLocker.
- Click OK to save your choice.
- Restart your computer to apply the changes.
Here’s a screenshot of the setting:
Method 2Using Registry Editor
If you prefer, you can also make this change by editing the Windows Registry. Be careful when editing the Registry – it’s a good idea to make a backup first.
- [ADMIN REQUIRED] Open Registry Editor as an administrator:
- Click Start, type
regedit, right-click it and selectRun as administrator.
- Click Start, type
- Go to this location:
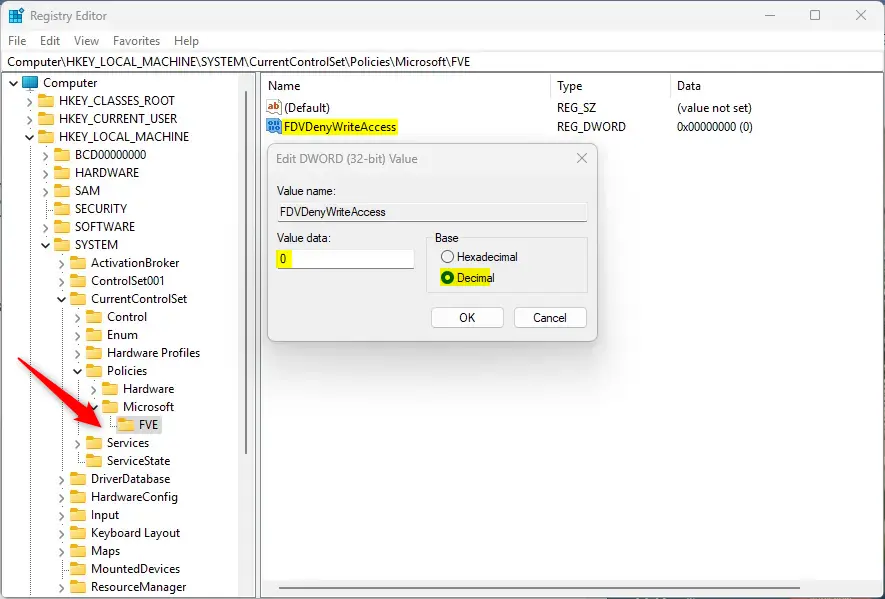
HKEY_LOCAL_MACHINE\SYSTEM\CurrentControlSet\Policies\Microsoft\FVE - Look for a value named
FDVDenyWriteAccessin the right pane. - If it doesn’t exist, right-click on the empty space, select
New > DWORD (32-bit) Value, and name itFDVDenyWriteAccess. - Double-click
FDVDenyWriteAccessand set its value to1to block writing on unprotected drives. - Click OK and close the Registry Editor.
- Restart your computer to make the change take effect.
If you want to allow writing again on unprotected drives, delete the FDVDenyWriteAccess entry or set its value to 0.
Summary
Using this setting helps keep your data safe by only allowing changes on drives protected by BitLocker. You can set this up easily with either the Group Policy Editor or Registry Editor. After setting it up, your PC will prevent writing to any unencrypted fixed drives, protecting your files from accidental changes or risks. If you want to learn more about turning on BitLocker, check out this helpful guide: How to Turn On BitLocker in Windows 11.
Can I abort BitLocker encryption?
Turn off Standard BitLocker encryption Type and search [Manage BitLocker] in the Windows search bar①, then click [Open]②. Click [Turn off BitLocker]③ on the drive that you want to decrypt. If the drive is under locked status, you need to click [Unlock drive] and type the password to turn off BitLocker.
Was this guide helpful?

About the Author
Richard
Tech Writer, IT Professional
Richard, a writer for Geek Rewind, is a tech enthusiast who loves breaking down complex IT topics into simple, easy-to-understand ideas. With years of hands-on experience in system administration and enterprise IT operations, he’s developed a knack for offering practical tips and solutions. Richard aims to make technology more accessible and actionable. He's deeply committed to the Geek Rewind community, always ready to answer questions and engage in discussions.
📚 Related Tutorials


No comments yet — be the first to share your thoughts!