How to Secure Your Windows 11 Device Portal
You can secure your Windows 11 Device Portal by restricting access to only your local machine, preventing unauthorized remote connections.
The Windows 11 Device Portal is a web-based tool that allows developers and advanced users to manage and test their device remotely. It’s incredibly useful for debugging and monitoring.
To enhance security, you can configure the Device Portal to accept connections only from your own computer. This prevents anyone else on your network, or even the internet, from accessing its features.
This article shows you how to enable this local-only access on your Windows 11 system.
To secure your Windows 11 Device Portal, open Settings, navigate to System > For developers, and enable Device Portal. Then, toggle on “Restrict to loopback connections only” to allow access only from your local machine.
What is Device Portal?
Windows Device Portal is a handy tool built right into Windows 11 that lets you manage and check your device’s settings and performance from a web browser.
Normally, other devices on your network can access it. But if you want to keep it private and secure, you can restrict it. Only your own computer will be able to use it.
Why Restrict Device Portal to Loopback Connections?
Restricting Device Portal to loopback connections means only your own computer can access it, which is a great way to keep it safe from strangers or hackers trying to get in.
By doing this, only someone sitting at your computer can open the Device Portal. This makes it much safer.
How to Restrict Device Portal to Loopback Connections Only
You can easily restrict Device Portal to loopback connections by opening Windows Settings, going to ‘System’, then ‘For developers’, and turning on the specific setting.
- Open the Windows Settings app: Click the Start menu button. Then click Settings. Or press
Windows key + Ion your keyboard. Learn more about opening Settings.System in the Settings app - Go to the System section: When Settings opens, click System on the left side.
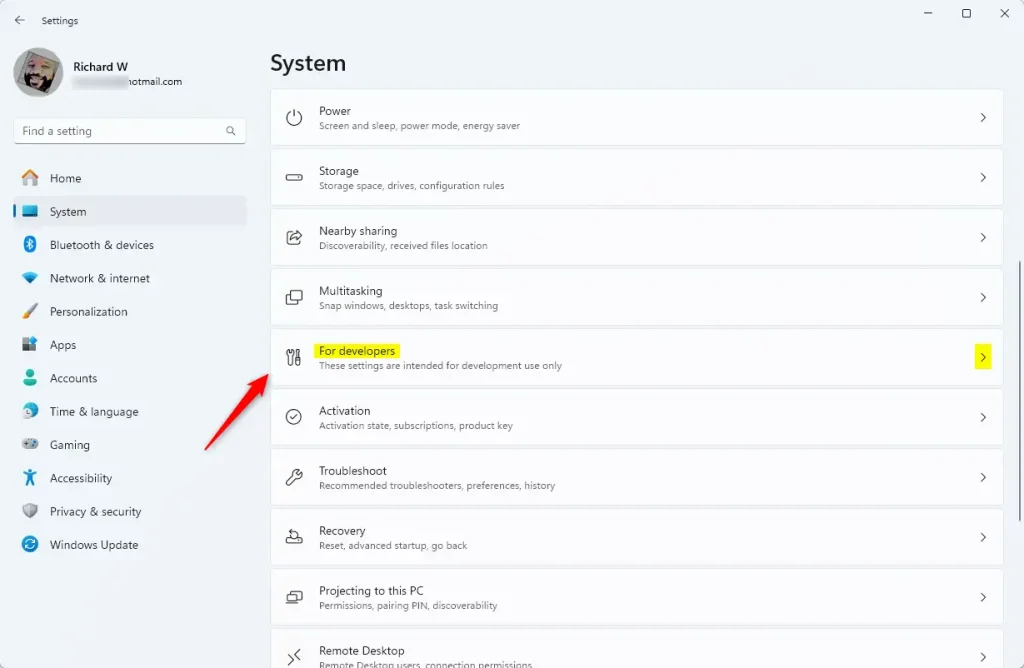
For developers in the Settings app - Open the For developers settings: On the right, click the For developers tile.
- Turn on Developer Mode: Make sure the “Developer Mode” switch is turned on. ⚙️ Requires admin privileges
- Enable Device Portal: Find “Device Portal” and toggle the switch to On. ⚙️ Requires admin privileges
- Restrict access to loopback connections only: Below the Device Portal switch, turn on the option that says Restrict to loopback connections only. ⚙️ Requires admin privileges
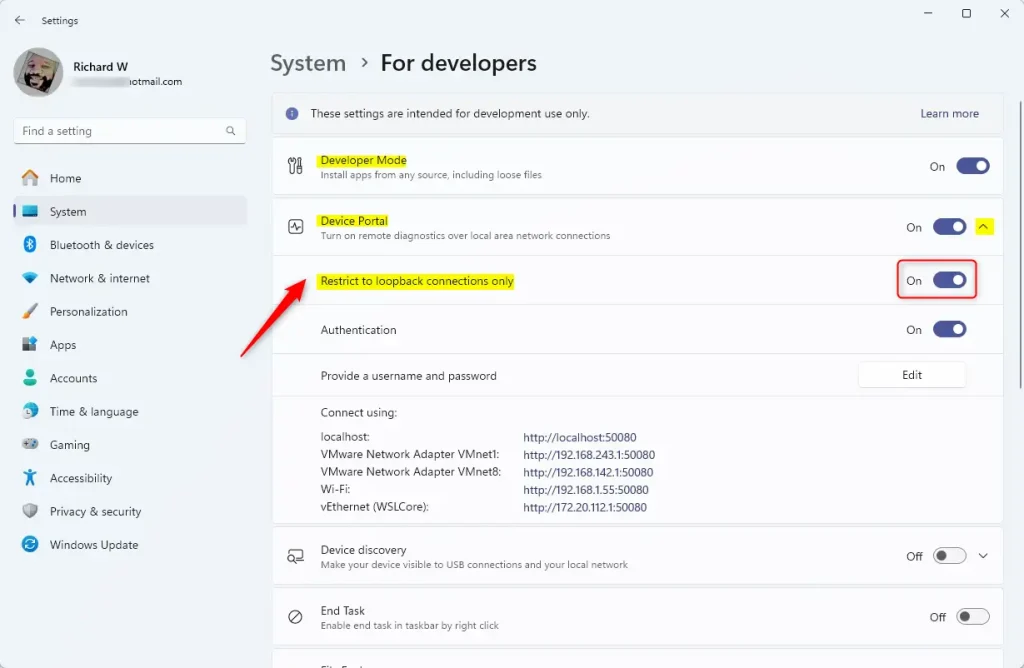
Windows Device Portal loopback address only
Once you’ve done these steps, only your own computer can access the Device Portal. You can now close the Settings app.
Summary
Keeping your Windows 11 device safe is easier when you restrict Device Portal to loopback connections, meaning only your local computer can connect.
This setting makes sure only your local computer can connect to Device Portal.
Following the simple steps above helps protect your device easily and quickly.
If you want to learn more about Device Portal or developer features in Windows 11, visit the full guide here.
What is a loopback network connection?
Loopback refers to a communication method where the sender and receiver are the same device, allowing it to send data to itself. This concept is commonly used in networking and software development for testing and troubleshooting purposes.
What is the loopback address 127.0 0.1 255.0 0.0 255.255 0.0 255.255 255.255 0?
0.1 is the standard IPv4 loopback address that always points to your own computer. It's the IP address behind “localhost” and enables local network communication without ever leaving your machine. Loopback Address Range: The IPv4 loopback range spans from 127.0. 0.0/8 (covering 127.0.
How do I enable loopback connections?
Click on the Access Control tab. Under Loopback Connections, ensure that Allow loopback connections is checked. If you're using UltraVNC, right click the icon in system tray and select Admin properties. Under Incoming connections, check Allow Loopback Connections.
Can loopback connection?
To set up a loopback connection, you’ll need to connect the CAN_L and CAN_H ports from one CAN controller to the matching ports on another CAN controller, and add a 120 Ohm resistor across these pins on each side.
Was this guide helpful?

About the Author
Richard
Tech Writer, IT Professional
Richard, a writer for Geek Rewind, is a tech enthusiast who loves breaking down complex IT topics into simple, easy-to-understand ideas. With years of hands-on experience in system administration and enterprise IT operations, he’s developed a knack for offering practical tips and solutions. Richard aims to make technology more accessible and actionable. He's deeply committed to the Geek Rewind community, always ready to answer questions and engage in discussions.
No comments yet — be the first to share your thoughts!