
This article explains how to rename the physical disks in the Storage pool of Storage spaces on Windows 11.
Storage Spaces is a feature in Windows that allows you to combine multiple hard drives into a single virtual drive, also known as a storage pool. This feature enables you to create a more flexible and scalable storage solution for your computer.
With Storage spaces, you can create a Storage pool, rename it, add physical disk drives to it, add a Storage space to an existing Storage pool, optimize it, and more.
You can also use the Windows Storage Spaces feature to rename the physical disks within a Storage pool, providing each disk with a unique name.
Renaming the physical disks within a Storage pool on Windows can be helpful for several reasons. Firstly, it can make identifying specific disks within the pool more accessible, especially if you have many disks.
This can be particularly useful if you need to replace a faulty disk or perform maintenance on a specific disk. Renaming the disks can also help avoid confusion if you use similar disks from different manufacturers or with other specifications.
Rename the physical disk within a Storage pool on Windows
As mentioned, users can rename the physical disks within a Windows storage pool.
Here’s how to do it.
First, open the Control Panel app on Windows.
Then, navigate to Storage Spaces in the Control Panel app.
Control Panel > System and Security > Storage Spaces
Click the “Change settings” button on the Storage Spaces settings page.
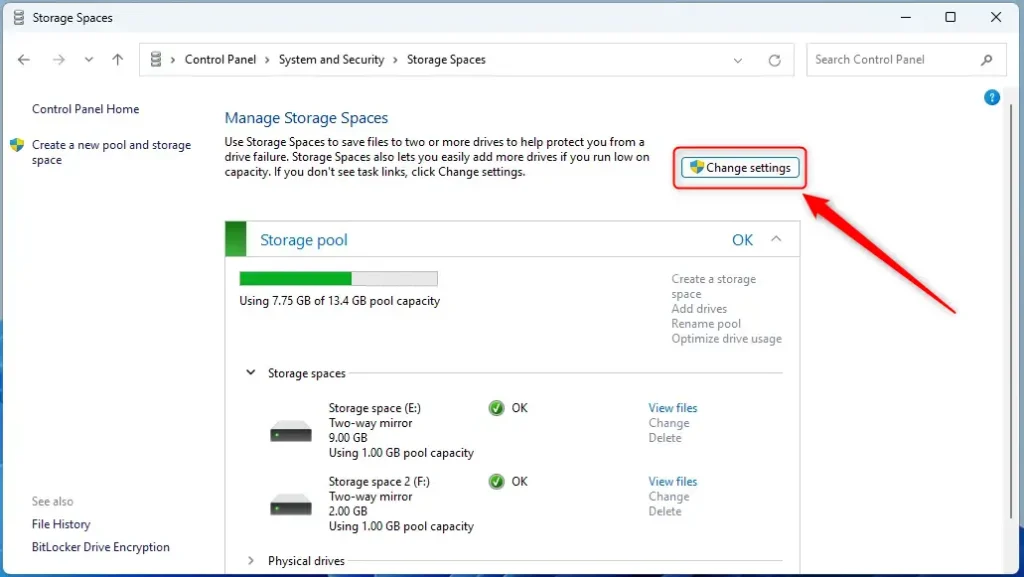
Next, expand the “Storage pool” tile. Then, click the “Rename” link for the disk drive you want to rename under the expanded “Physical drives” tile.
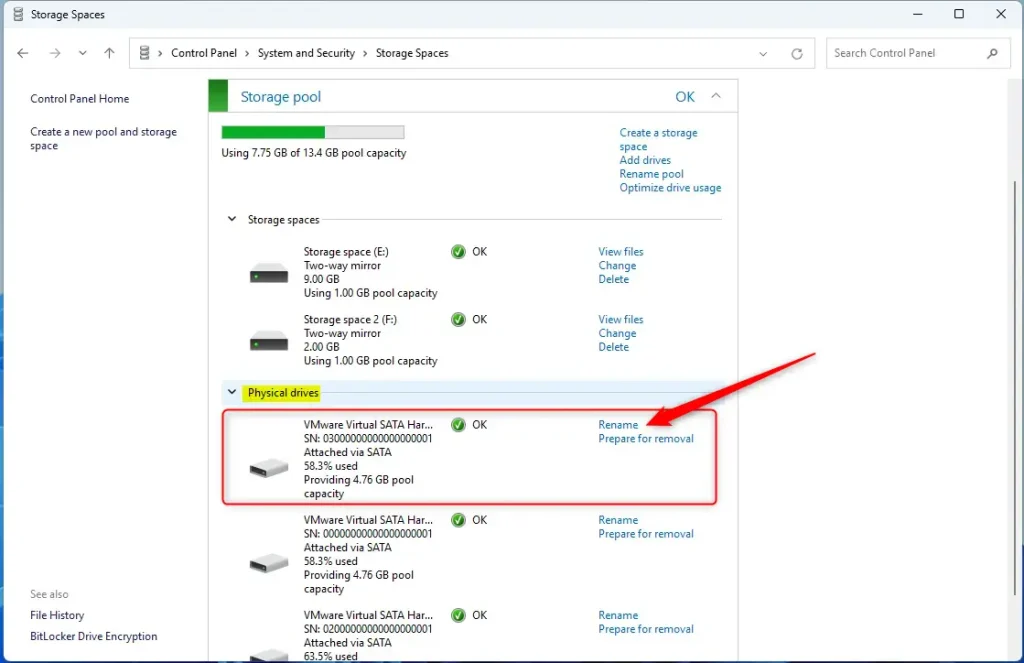
On the pop-up window, type a new unique name for the drive and click the “Rename drive” button to apply.

When finished, you can close the Control Panel app.
Rename the physical disks within the Storage pool using PowerShell
Another to rename the physical disks within a Windows Storage pool is to use PowerShell.
First, open PowerShell in Windows Terminal as administrator.
Use the command below to list all the physical disks within a Windows Storage pool on your machine.
Get-PhysicalDisk | Select-Object FriendlyName,SerialNumber,UniqueID
You can rename the disk drive using the command format below using the FriendlyName or its unique ID.
Set-PhysicalDisk -FriendlyName "Name" -NewFriendlyName "NewDiskName"
OR
Set-PhysicalDisk -UniqueId "ID" -NewFriendlyName "NewDiskName"
For example, to rename a Samsung disk drive with the name “SAMSUNG HD5555” or unique ID ” 1234567890,” you would run the command below.
Set-PhysicalDisk -FriendlyName "SAMSUNG HD5555" -NewFriendlyName "SAMSUNG HD1"
OR
Set-PhysicalDisk -UniqueId "1234567890" -NewFriendlyName "SAMSUNG HD1"
That should do it!
Conclusion:
- Renaming the physical disks within a Storage pool on Windows 11 can significantly simplify disk identification and maintenance.
- Windows provides two methods to rename physical disks within a Storage pool: using the Control Panel or PowerShell.
- Whether through the Control Panel or PowerShell, the process involves providing a new unique name for the disk and applying the changes.
- These simple yet effective methods for renaming physical disks contribute to a more organized and manageable storage infrastructure on Windows 11.


Leave a Reply Cancel reply