How to Create Virtual Desktops in Windows 11
You create virtual desktops in Windows 11 to give yourself separate digital workspaces for different tasks.
A virtual desktop is essentially a distinct workspace that lets you keep your open applications organized and easily accessible. This is particularly helpful if you’re juggling work projects, personal browsing, and entertainment.
Windows 11’s virtual desktop feature allows you to create multiple desktops, for example, one for your spreadsheets and email, and another for streaming services or gaming. This built-in functionality helps you declutter your screen and switch between tasks more efficiently.
This feature is accessible directly from the Task View button on your Windows 11 taskbar.
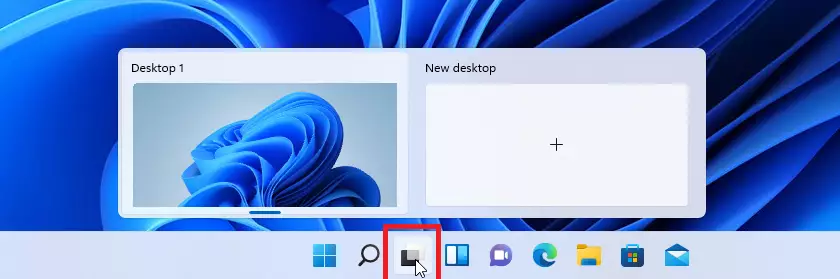
Press ⊞ Win+Ctrl+D to create a new virtual desktop. You can also click the Task View icon on the taskbar and then click the “+ New desktop” button.
How to Create Virtual Desktops in 🪟 Windows 11
You can create virtual desktops using the Taskbar or your keyboard. Task View is the main tool for this.
Using Keyboard Shortcuts
The fastest way to create a new workspace is by using your keyboard. Press ⊞ Win+Ctrl+D to instantly add a new desktop.
Using the Taskbar
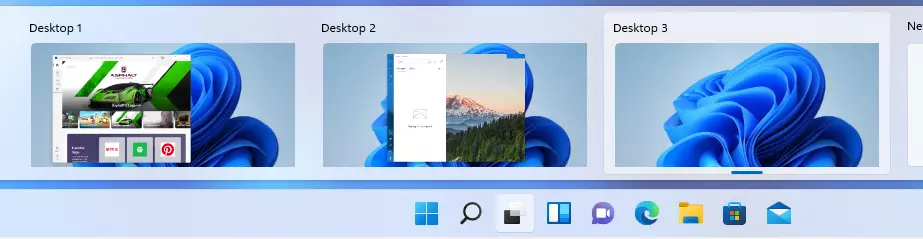
Click the Task View icon on your Taskbar. It looks like two overlapping squares. Click the + New desktop button to add more.
Managing Your Virtual Desktops
You can make your virtual desktops even easier to spot by customizing them.
Renaming and Backgrounds
Right-click on a desktop in the Task View to rename it. You can also right-click to choose a different background for each desktop. This helps you visually distinguish between your work and home workspaces.
Moving Windows Between Desktops
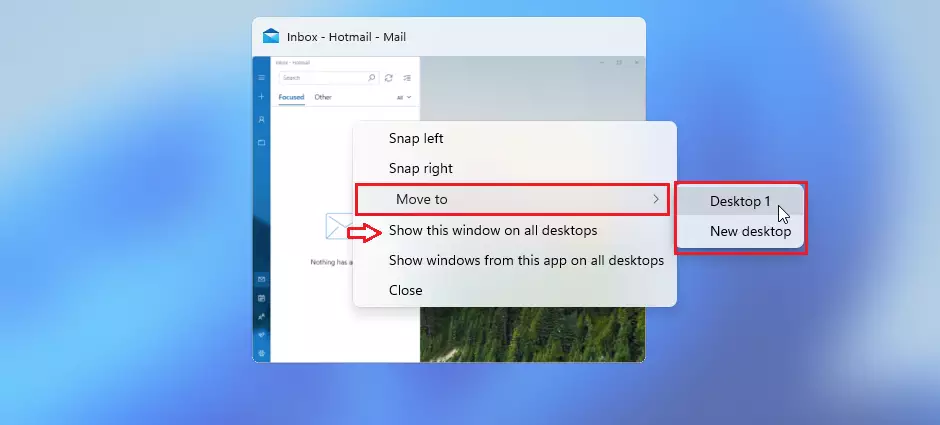
Need to move an app? Open Task View, right-click the window you want to move, and select Move to. Choose the desktop where you want the app to go.
Essential Keyboard Shortcuts
| Action | Shortcut |
|---|---|
| Open Task View | ⊞ Win+Tab |
| Create New Desktop | ⊞ Win+Ctrl+D |
| Switch to Next Desktop | ⊞ Win+Ctrl+→ Arrow |
| Switch to Previous Desktop | ⊞ Win+Ctrl+← Arrow |
| Close Current Desktop | ⊞ Win+Ctrl+F4 |
Summary
Virtual desktops help you organize your digital life by letting you create separate spaces for different tasks.
How do I delete a virtual desktop in 🪟 Windows 11?
Deleting a virtual desktop in Windows 11 is simple: open Task View, hover over the desktop you want to remove, and click the X.
Can I have different wallpapers for each virtual desktop?
Yes, you can. Open Task View, then right-click on the thumbnail of the desktop you want to change and select ‘Choose background.’ This lets you set a unique image for each workspace, which makes telling your different desktops apart at a glance much easier when you’re juggling tasks.
Do virtual desktops persist after a restart?
No, virtual desktops do not stay after you restart your computer in Windows 11.
How many virtual desktops can I create?
You can create as many virtual desktops as your computer can handle in Windows 11, with no strict limit.
Was this guide helpful?

About the Author
Richard
Tech Writer, IT Professional
Richard, a writer for Geek Rewind, is a tech enthusiast who loves breaking down complex IT topics into simple, easy-to-understand ideas. With years of hands-on experience in system administration and enterprise IT operations, he’s developed a knack for offering practical tips and solutions. Richard aims to make technology more accessible and actionable. He's deeply committed to the Geek Rewind community, always ready to answer questions and engage in discussions.

[…] We recently published a post explaining Task View and how to utilize it in Windows 11. You can read that post here. […]
[…] Task View feature in Windows is a manager that lets you switch between apps on multiple desktops. Why use […]