This article explains how to upgrade to Windows 11 with a workaround or bypass Windows 11’s strict requirements.
If you have a valid Windows 10 licensed computer, you can upgrade to Windows 11 for free.
However, your Windows 10 machine must meet Windows 11 minimum requirements to upgrade normally or use the standard methods.
What if your system is old and does not meet Windows 11 requirements? You can still upgrade using non-standard methods that Microsoft does not recommend. We have written a post showing you how to download Windows 11 ISO and create a bootable disk to install Windows 11 on unsupported PCs.
In the steps below, we will show you how to upgrade an old PC that does not meet Windows 11 requirements using another workaround method. With this, you will not need to reformat your drive, erase your files, or even burn the ISO to an external USB drive.
How to download Windows 11 ISO
As mentioned above, if you have a valid Windows 10 licensed computer, you can upgrade to Windows 11 for free. If your computer doesn’t meet Windows 11 requirements, upgrade using the workaround method below.
First, you’ll need to download the Windows 11 ISO file online. Go to Windows 11 ISO download site, and scroll down to Download Windows 11 Disk Image (ISO).
Click on the Select Download dropdown, pick Windows 11, then hit the Download button, select your product language from the Choose one dropdown that appears, hit Confirm, then click 64-bit Download to download the ISO file on your computer.
You can also read the post below to learn how to download Windows 11 ISO files to your computer.
How to download Windows 11 ISO file
How to edit Windows registry to bypass Windows 11 CPU checks
Now that you’ve downloaded Windows 11 ISO on your Windows 10 machine, edit your Windows 10 registry to bypass the Windows 11 CPU checks before you upgrade using the downloaded ISO file.
How to open and edit the Windows registry
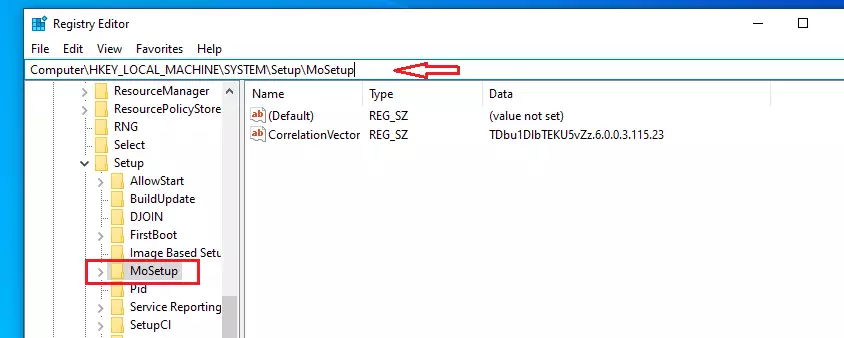
With the Windows registry editor open, navigate to the below, either by copying and pasting the path below:
Computer\HKEY_LOCAL_MACHINE\SYSTEM\Setup\MoSetup
Or drilling down through the HKEY_LOCAL_MACHINE and System and Setup and MoSetup subkeys or folders one at a time.
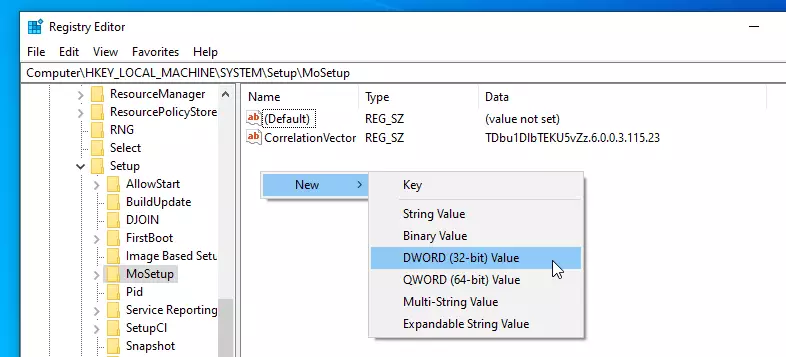
Right-click on the blank area in the right pane and select New > DWORD (32-bit) Value. Name the value AllowUpgradesWithUnsupportedTPMOrCPU.
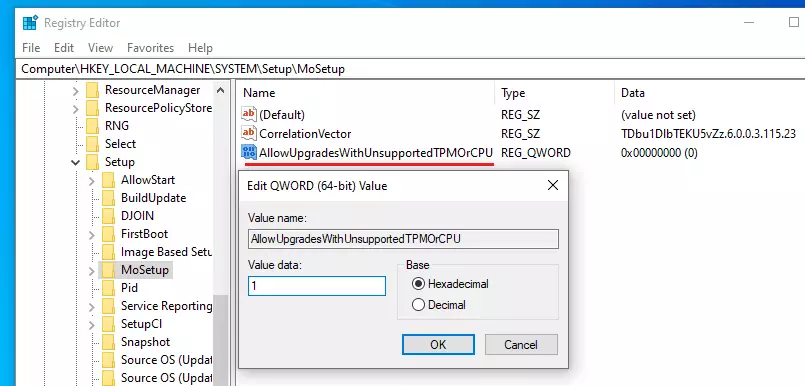
Next, double-click on your new value and enter 1 into the Value data field. Hit OK and close the registry editor.
How to upgrade to Windows 11 with the setup
Now that you’ve created a workaround, go to your Downloads folder where you downloaded the Windows 11 ISO file earlier. Then, right-click the file and select mount to mount the ISO file.
You can also double-click the ISO file and open it with File Explorer. In File Explorer, double-click the setup file to begin the installation.
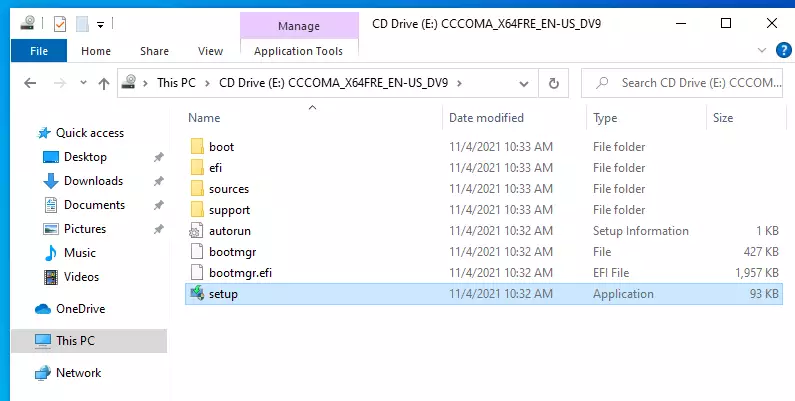
When the installer opens, click Next.
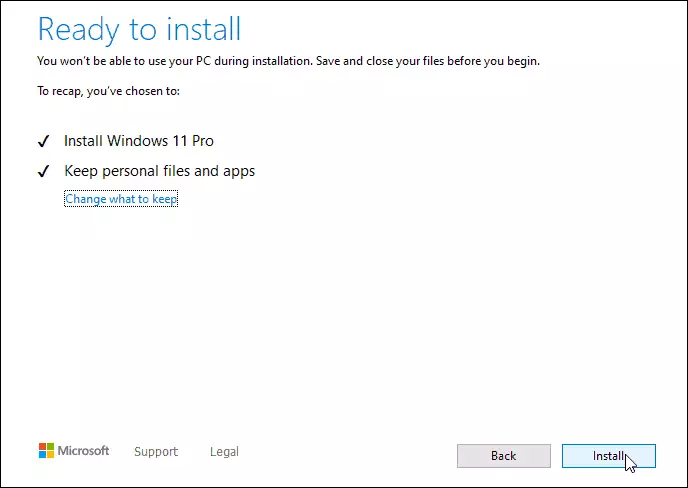
That should do it! If the workaround method above worked, you should see a warning message instead of a rejection message, allowing you to install Windows 11 without losing your data.
Conclusion:
- Upgrading to Windows 11 can be achieved even on unsupported devices by following the above steps.
- Ensure that you have a valid Windows 10 license before proceeding.
- Download the Windows 11 ISO file from the official Microsoft website.
- Modify the Windows registry to bypass CPU and TPM checks.
- Use the mounted ISO file to start the installation process.
- Always back up your important files before upgrading to avoid potential data loss.
- Enjoy the new features and interface of Windows 11 while keeping your files and applications intact.


Leave a Reply Cancel reply