How to Turn On “Activate on Hover” Mouse Feature in Windows 11

Activate on Hover brings a window to the front the moment you rest your mouse pointer over it, so you don’t have to click first. It works in Windows 11 Home and Pro, and the setting applies only to your user account.
The feature helps most when two or more programs are open at once. You can move between apps and taskbar icons just by moving the mouse. It does take some getting used to. Brushing the pointer across another window on the way to a button can switch focus by accident, so try it for a day before you decide to keep it.
Open Settings, go to Accessibility Mouse, and toggle “Activate on hover” on. Alternatively, use Control Panel, navigate to Ease of Access Ease of Access Center Make the mouse easier to use, and check the “Activate a window by hovering” box.
Turn On “Activate on Hover” Using Settings App
The first way is through the Settings app. You open the Accessibility section, go to the mouse options, and turn on the setting that makes windows come to the front when you point at them. Follow the steps below in order, and compare each one with the screenshots that follow.
Microsoft moves some options between Windows 11 builds. If you can’t find the hover option in Settings on your PC, don’t worry. The Control Panel method further down reaches the same setting and works on every Windows 11 version.
- Open Settings : Click the Start menu (the Windows icon at the bottom-left corner) and select Settings. Or press Win+I on your keyboard to open Settings right away.
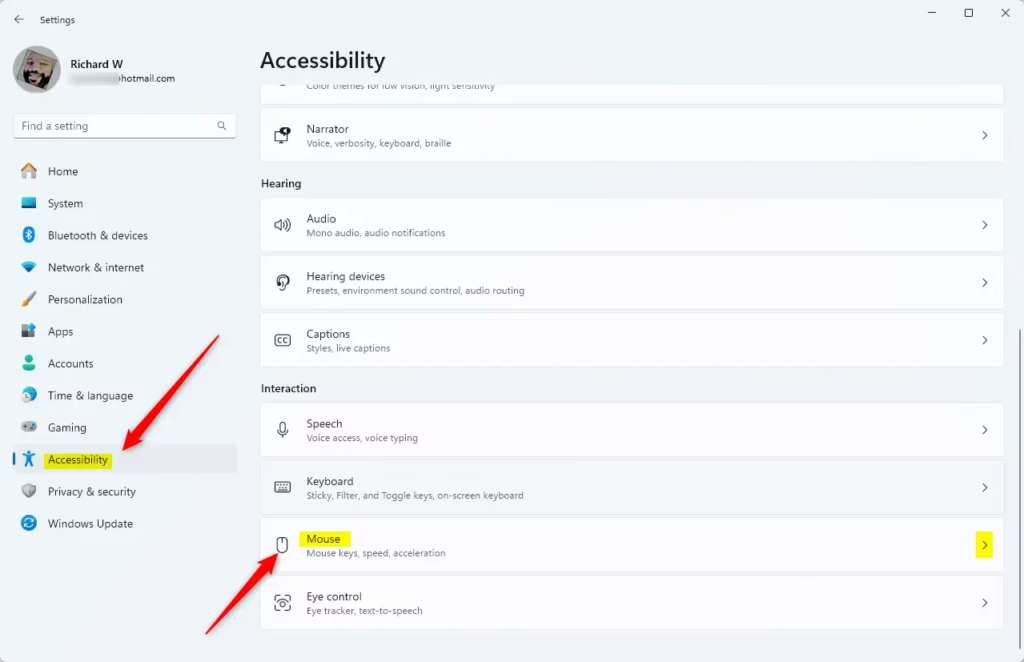
- In the Settings window, click on Accessibility in the left panel.
- Scroll down and click on the Mouse option on the right side.
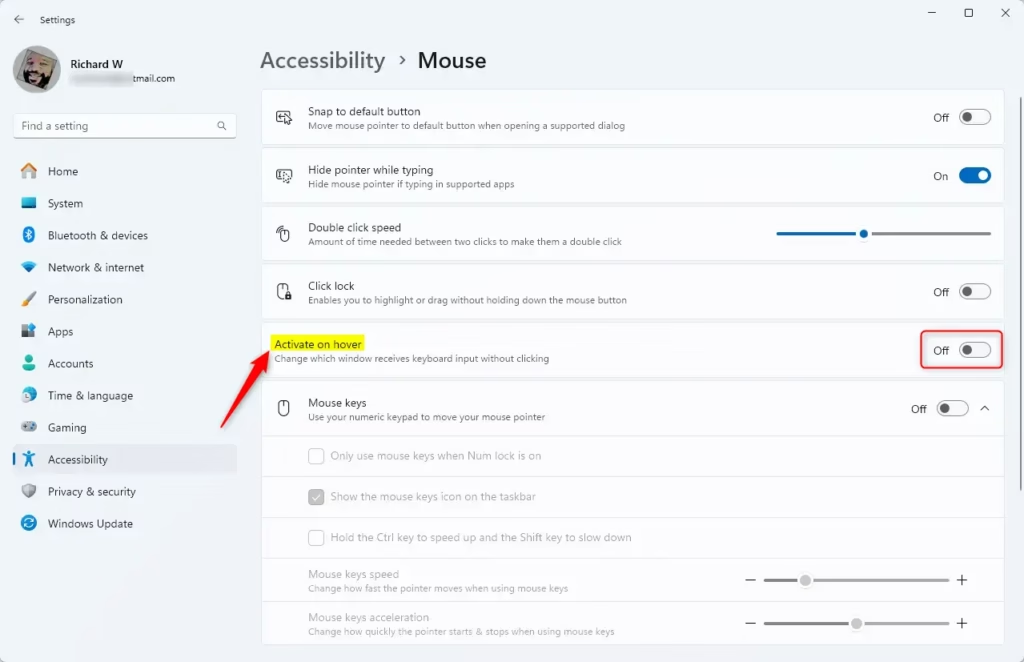
- Find the Activate on hover toggle switch and click it to turn it On.
- Once done, you can close the Settings app.
Reference these images to locate the correct menu items:
Turn On “Activate on Hover” Using Control Panel
The second way is through the classic Control Panel. You go into the Ease of Access Center and change how the mouse pointer interacts with open windows. This is the route I use most, because the option is always in the same place. You don’t need to restart afterwards. The change normally takes effect as soon as you click OK or Apply.
- Open Control Panel : Click the Start menu , type Control Panel, and press Enter. Or learn more about opening Control Panel here: Open Control Panel in Windows 11.
- In Control Panel , go to Ease of Access Ease of Access Center.
- Under the Explore all settings section, click on Make the mouse easier to use.
- Check the box next to Activate a window by hovering over it with the mouse to turn it on.
- Click OK or Apply to save your changes.
Reference these images to locate the correct menu items:
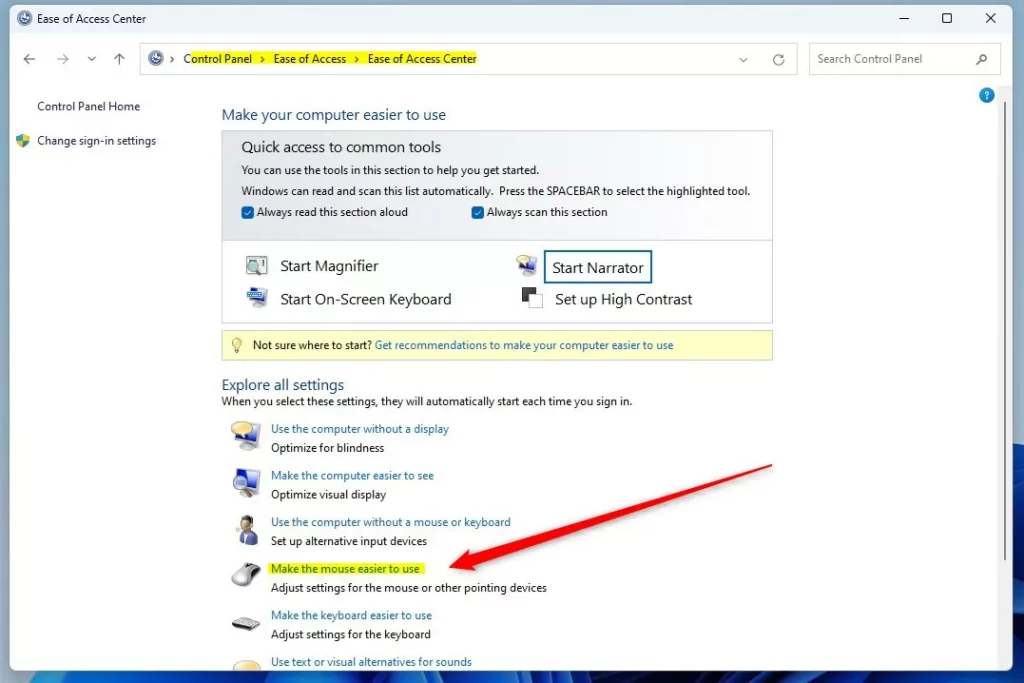
In the Explore all settings section, click Make the mouse easier to use. A page of mouse options opens. The hover checkbox is in the lower part of that page, so scroll down if you don’t see it right away.
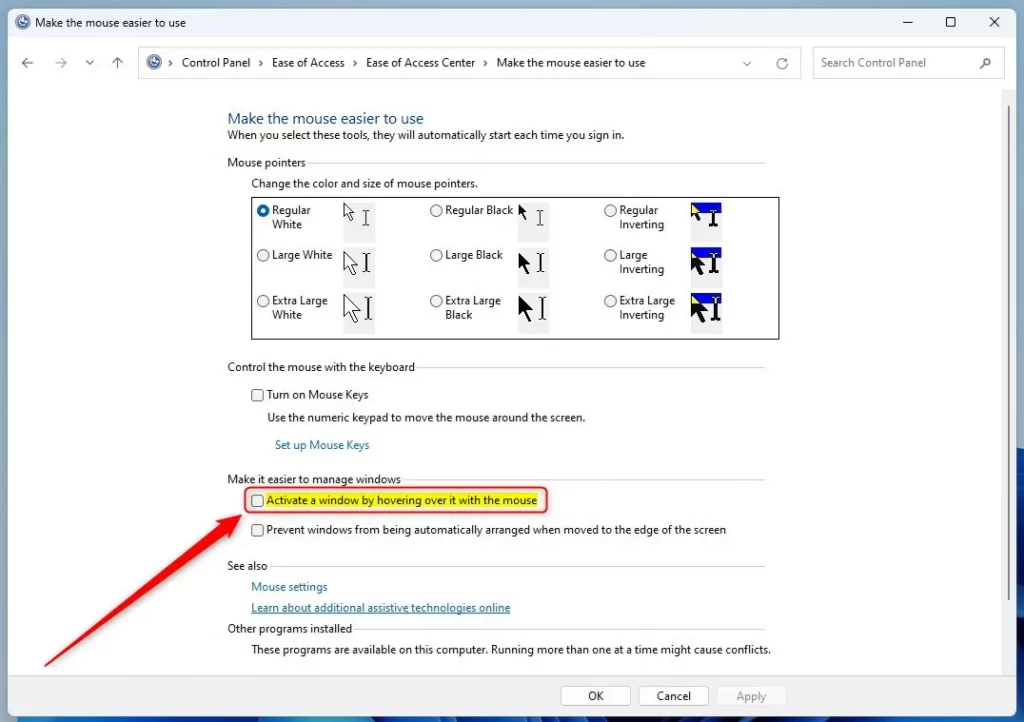
The Activate a window by hovering over it with the mouse checkbox controls this feature. When it is ticked, you can open or switch to a program or window just by moving the pointer over it. It speeds up everyday tasks by giving you faster access to your applications, an idea that dates back to Windows 95.
To undo the change, return to the same page, clear the checkbox, and click OK. Windows goes back to the normal click-to-focus behavior. If the checkbox looks greyed out, check that you are signed in to your own account and that your PC isn't managed by a work or school policy. Managed PCs can lock this setting.
Summary
Turning on activate on hover in Windows 11 cuts down on repetitive clicking. Program windows come to the front the moment your mouse pointer rests on them.
Switching between open programs gets faster because you no longer need a click to change focus. The gain is biggest when you jump between several applications all day.
Windows 11 offers this setting in both the Settings app and the Control Panel, though the Control Panel is the more dependable of the two. Fewer clicks make navigating the PC feel more responsive.
Test the setting for a day or two to see how it fits your routine. If it gets in the way, you can turn it off again at any time.
Have a question about this guide?
Answered by AI from this guide. Good questions may be added to this page — please don't include personal details.
Did this guide fix your problem?

About the Author
Richard
Tech Writer, IT Professional
Richard is a writer at Geek Rewind who turns complex IT tasks into clear, step-by-step guides. He draws on years of hands-on experience in system administration and enterprise IT operations, focusing on Windows, Linux and WordPress: the problems people actually run into, and the fixes that work. His server and WordPress guides come from systems he runs himself. Richard builds and maintains the platform behind Geek Rewind, from its Ubuntu servers and Nginx configuration to its custom WordPress plugins. Many new tutorials start with readers' questions, and he's always glad to answer them in the comments.
No comments yet — be the first to share your thoughts!