How to Stop Connecting Automatically to Wi-Fi in Windows 11
You stop connecting automatically to Wi-Fi in Windows 11 by disabling the “Connect automatically when in range” setting for individual networks.
This setting allows your Windows 11 PC to automatically join saved Wi-Fi networks the moment they become available. Turning this off gives you full control over which networks your computer connects to, preventing unwanted connections and potentially saving battery life.
For example, automatically connecting to public Wi-Fi at a coffee shop can sometimes pose security risks. By default, Windows 11 aims to connect to any network you’ve previously accessed.
Disable the “Connect automatically when in range” option for specific Wi-Fi networks. Access this setting via Quick Settings or Windows Settings > Network & internet > Wi-Fi > Manage known networks. Unchecking this box prevents your PC from joining previously connected networks without your manual approval.
What happens when done?
When you disable Wi-Fi auto connect, your computer won’t join networks by itself anymore, even if it knows the password.
Method 1Stop Automatic Connection via Quick Settings
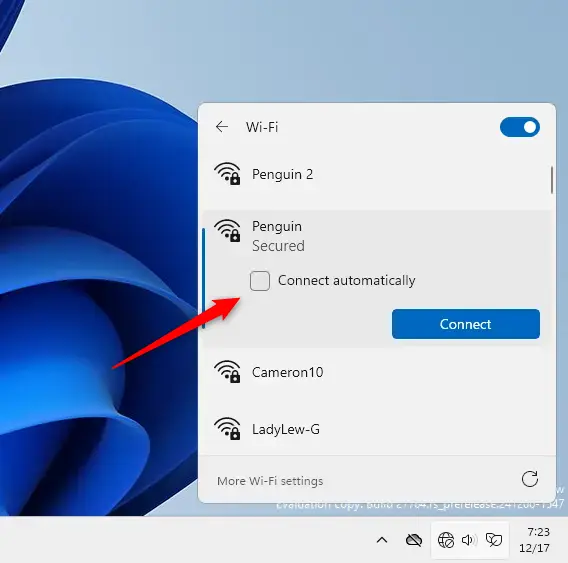
You can stop Windows 11 from automatically connecting to a Wi-Fi network using the Quick Settings menu if you’re already connected to it.
- Open your Quick Settings menu in the bottom right corner of your taskbar.
- Click the arrow next to your Wi-Fi icon.
- Select the network you are using and click Disconnect.
- Uncheck the box that says Connect automatically.
Method 2Stop Automatic Connection via Settings
If you’re not currently connected to Wi-Fi, you can stop Windows 11 from automatically connecting to a network by changing its settings in the main Settings app.
- Press the Windows key + I on your keyboard to open Windows Settings.

- Click on Network & internet in the left menu.
- Select Wi-Fi on the right side.

- Click on Manage known networks.
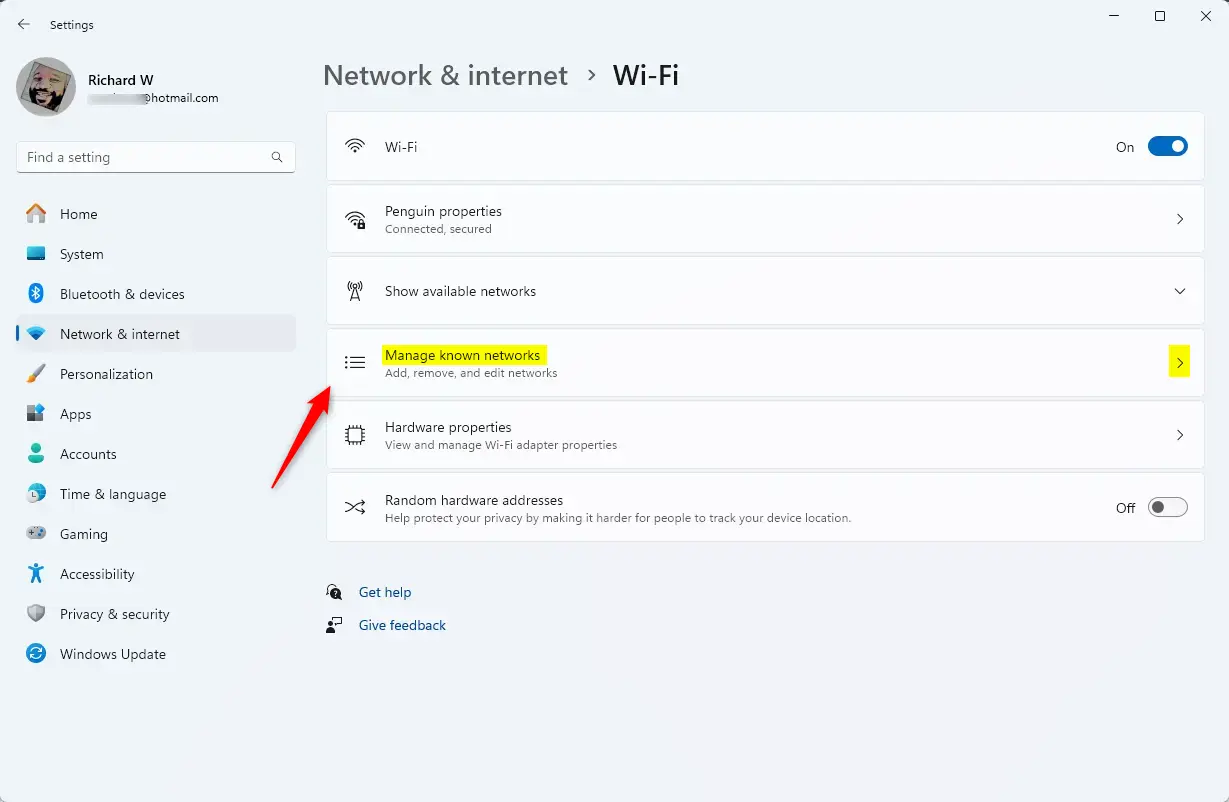
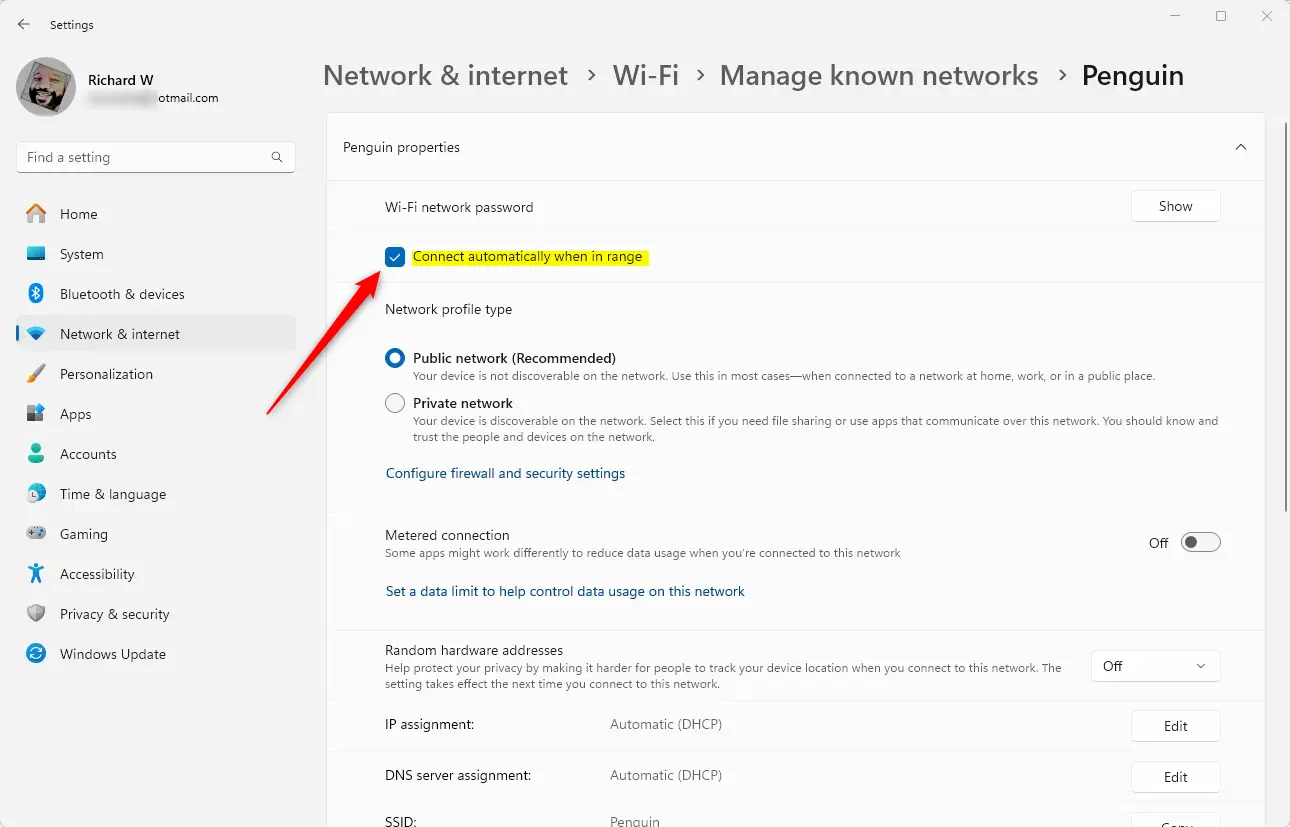
- Find the network you want to change in the list and click on it.
- Uncheck the box labeled Connect automatically when in range.
Advanced: Command Line Method (Netsh)
For advanced users, you can stop Windows 11 from automatically connecting to specific Wi-Fi networks using a simple command in the Terminal.
- Right-click the Start button and select Terminal (Admin).
- Type the following command to see your profiles:
netsh wlan show profiles - To disable auto-connect for a specific network, type:
netsh wlan set profileparameter name="NetworkName" connectionmode=manual
Advanced: Registry Editor Method
You can modify the registry to force manual connections. You’ll need administrator privileges for this.
- Press ⊞ Win+R, type
regedit, and hit Enter. - Navigate to:
HKEY_LOCAL_MACHINE\SOFTWARE\Microsoft\Windows NT\CurrentVersion\NetworkList\Profiles - Locate the subkey for your network and change the EnableAutoConnect value to 0.
Cross-Platform: Mobile Devices
Android: Go to Settings > Network & internet > Internet. Tap the gear icon next to your network and toggle off Auto-connect.
iOS: Go to Settings > Wi-Fi. Tap the ‘i’ icon next to the network and toggle off Auto-Join.
Troubleshooting Persistent Issues
If your computer still connects automatically, your network profile might be corrupted. Use PowerShell to reset the profile. You’ll need administrator privileges for this.
- Open PowerShell (Admin).
- Run:
Set-NetConnectionProfile -Name "NetworkName" -NetworkCategory Public
Summary
Disabling Wi-Fi auto connect helps keep your computer more secure, especially on public networks, and can also save battery life by preventing constant scanning.
Why does my computer keep connecting to public Wi-Fi automatically?
Windows saves network profiles once you connect to them successfully. If the “Connect automatically” setting is enabled, Windows will prioritize these known networks whenever they are in range, even if they are public or insecure, to ensure you stay connected to the internet without manual intervention.
How do I stop Windows from connecting to known networks without forgetting the password?
You can uncheck the “Connect automatically” box in the Manage Known Networks settings menu. This keeps the password saved in your system’s memory, but prevents Windows from initiating the connection until you manually select the network from your Wi-Fi list and click the Connect button.
Was this guide helpful?
0% of readers found this helpful (1 votes)

About the Author
Richard
Tech Writer, IT Professional
Richard, a writer for Geek Rewind, is a tech enthusiast who loves breaking down complex IT topics into simple, easy-to-understand ideas. With years of hands-on experience in system administration and enterprise IT operations, he’s developed a knack for offering practical tips and solutions. Richard aims to make technology more accessible and actionable. He's deeply committed to the Geek Rewind community, always ready to answer questions and engage in discussions.


dude, everybody knows this already. i bet every bit of traffic for this particular page is from people who are connecting automatically even though auto connect is off. it’s a windows 11 bug.