

Sometimes your Windows 11 computer may have problems like freezing or crashing. One way to fix this is by starting Windows in Safe Mode. Safe Mode loads only the basic parts of Windows, which can help you find and fix problems.
What is Safe Mode?
Safe Mode starts Windows with only the important files and drivers. It doesn’t load extra software or drivers that might be causing problems. If your computer works fine in Safe Mode, it means the problem is likely from something that doesn’t start in Safe Mode.
Types of Safe Mode:
- Safe Mode: Starts Windows with only basic drivers and no internet.
- Safe Mode with Networking: Starts Windows with basic drivers plus internet and network access.
- Safe Mode with Command Prompt: Starts Windows with basic drivers and opens a command window instead of the normal desktop. This is for advanced users.
Note: You cannot use multiple screens while in Safe Mode.
How to Start Safe Mode in Windows 11
Option 1: Use Advanced Startup Settings
This is an easy way to get into Safe Mode. Follow these steps:
- Click the Start button, then click the Power icon.
- Hold the Shift key and click Restart.
- Your computer will restart and show a blue screen with options. Click Troubleshoot.
- Click Advanced options.
- Click Startup Settings.
- Click Restart.
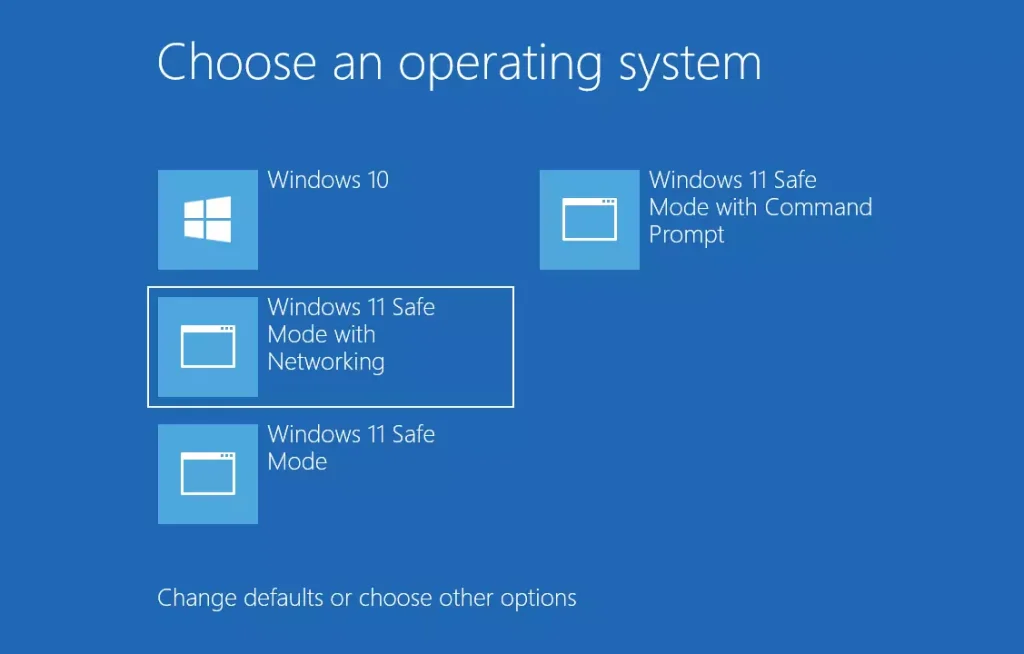
- When your PC restarts, you will see a list of options. Press the number key or function key for the Safe Mode you want:
| Key to Press | Mode |
|---|---|
| 4 or F4 | Safe Mode |
| 5 or F5 | Safe Mode with Networking |
| 6 or F6 | Safe Mode with Command Prompt |
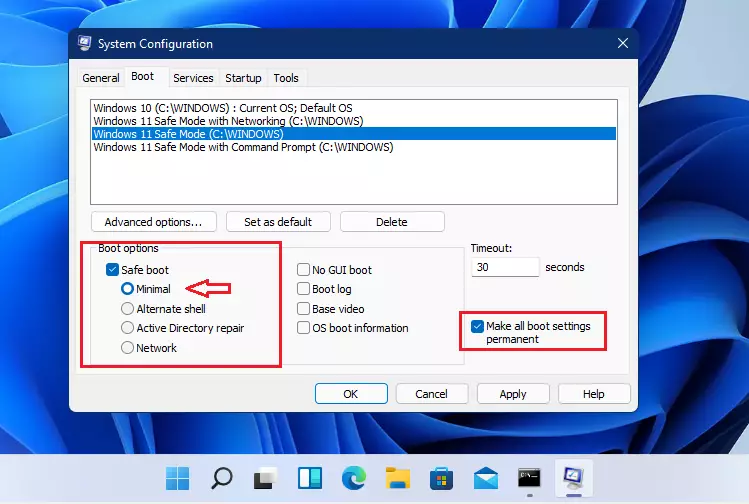
Option 2: Use System Configuration (msconfig)
This method lets you set Safe Mode and restart your PC automatically.
- Press Windows + R, type
msconfig, and press Enter. - In the window that opens, click the Boot tab.
- Under Boot options, check Safe boot.
- Choose the type of Safe Mode you want:
- Minimal: Standard Safe Mode
- Network: Safe Mode with Networking
- Alternate shell: Safe Mode with Command Prompt
- Click OK.
- You will be asked to restart your computer. Click Restart to enter Safe Mode.
Option 3: Use Command Prompt
For users comfortable with commands:
- Open Windows Terminal or Command Prompt as an administrator. To do this, right-click the Start button and select Windows Terminal (Admin).
- Type one of the following commands and press Enter:
| Command | What it Does |
|---|---|
bcdedit /set {current} safeboot minimal | Start in Safe Mode |
bcdedit /set {current} safeboot network | Start in Safe Mode with Networking |
bcdedit /set {current} safeboot minimalbcdedit /set {current} safebootalternateshell yes
| Start in Safe Mode with Command Prompt |
bcdedit /deletevalue {current} safebootbcdedit /deletevalue {current} safebootalternateshell
| Return to Normal Mode |
After typing your command, restart your computer to enter Safe Mode.
Option 4: Use Command Prompt at Boot
If you can open Command Prompt before Windows starts:
- Type
bcdeditand press Enter. - Look for the identifier under the Windows Boot Loader section (usually
{default}). - Use the same commands as Option 3 but replace
{current}with your identifier (for example,{default}). - Restart your computer to apply changes.
Important Tips
- Use Safe Mode to find and fix problems by running only essential parts of Windows.
- Choose the Safe Mode version that fits your needs (with or without internet or command prompt).
- After fixing your problem, make sure to restart your computer normally.
For more detailed help, you can visit the official Microsoft guide here: Windows Startup Settings – Microsoft Support
![]() support.microsoft.com
support.microsoft.com


Leave a Reply Cancel reply