How to Show or Hide Empty Drives in Windows 11
You can show or hide empty drives in Windows 11 File Explorer by adjusting a specific setting in Folder Options.
Empty drives are storage devices, such as USB flash drives or secondary hard drives, that currently contain no files or folders. Windows 11, by default, hides these from view in File Explorer to streamline your file management experience.
You might want to display them if you frequently swap USB drives or manage multiple partitions and want visual confirmation of all your connected storage, regardless of content.
You can show or hide empty drives in Windows 11 by opening File Explorer, clicking the three dots, selecting Options, going to the View tab, and checking or unchecking “Hide empty drives.” Alternatively, use the Settings app under System > For developers > File Explorer.
What Are Empty Drives?
Empty drives are storage devices plugged into your computer that have no files or folders saved on them. Think of a brand new USB stick or an empty SD card. Windows hides these drives automatically so your File Explorer doesn’t look cluttered with devices you’re not using right now.
Why Show or Hide Empty Drives?
Hiding empty drives in Windows 11 helps keep File Explorer tidy if you have lots of connected storage, making it easier to find what you need. Showing empty drives can be useful if you want to quickly spot which storage devices have no files on them.
Show empty drives: If you often add or remove files and want to quickly spot which drives are empty, showing them helps you find those drives faster.
How to Show or Hide Empty Drives in 🪟 Windows 11
You can easily show or hide empty drives in Windows 11 using the Settings app. First, open Settings by clicking the Start button or pressing Windows key + I, then go to System, and find the ‘For developers’ option.
- Open Windows Settings:
- Click the Start button and then select Settings.
- Or press
Windows key + Ion your keyboard.
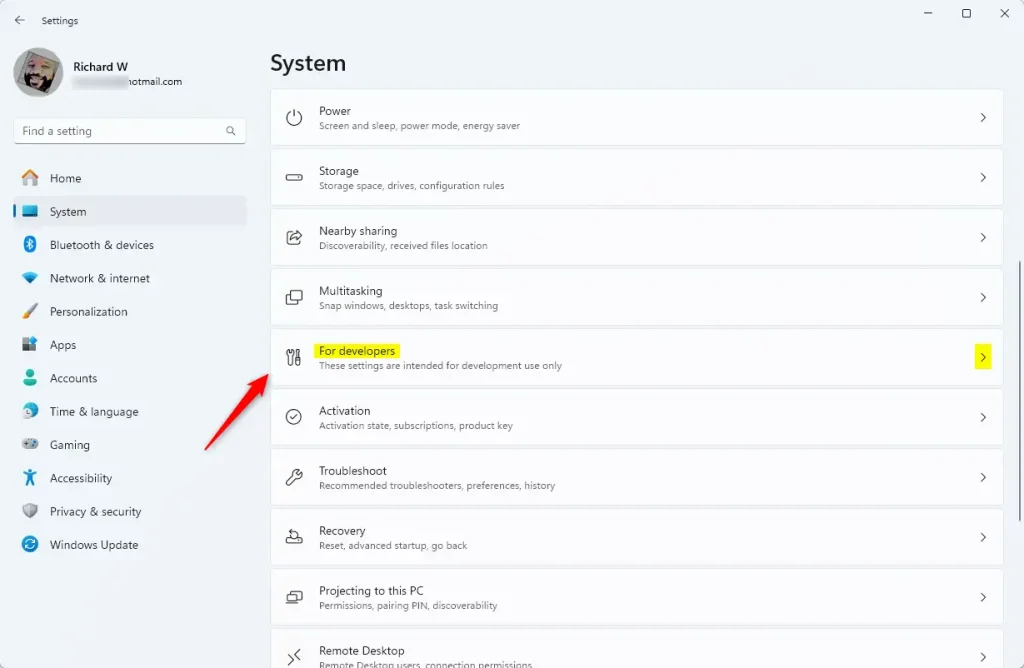
- Go to System: In the Settings window, click System on the left side.
Windows 11 System button in Settings - Open “For developers”: On the right side, find and click the For developers option.
Windows 11 For developers tile - Find File Explorer Settings: Scroll down until you see the File Explorer section and click it to open.
- Turn On or Off “Show empty drives”: Toggle the switch next to Show empty drives:
- Switch it On to see empty drives in File Explorer.
- Switch it Off to hide empty drives.
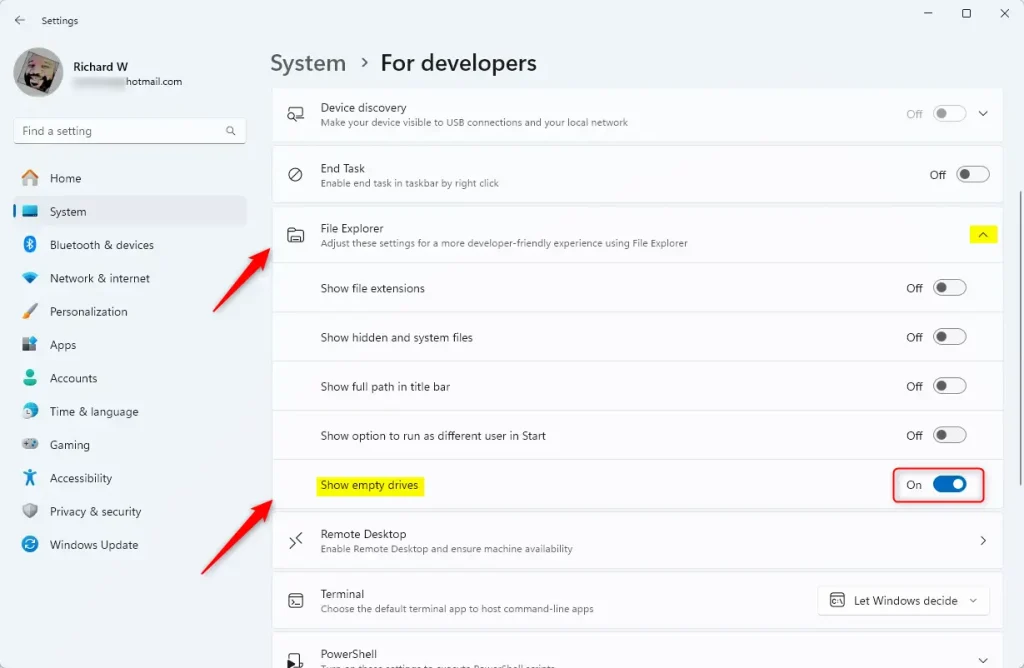
Show empty drives toggle - Close Settings when you’re done.
Alternative Method: Using File Explorer Options
An alternative way to manage empty drives in Windows 11 is through File Explorer Options. Open File Explorer, click the three dots, select Options, go to the View tab, and then find the setting to hide or show empty drives.
- Open File Explorer (press
Windows key + E). - Click the three dots
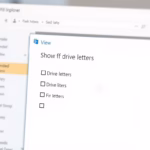
...at the top and select Options. - In the Folder Options window, click the View tab.
- Find Hide empty drives in the list:
- Check the box to hide empty drives.
- Uncheck it to show empty drives.

File Explorer - Hide empty drives option - Click OK to save your changes.
Summary
Empty drives are storage devices with no files, and Windows 11 hides them by default to keep File Explorer clean. You can choose to show or hide these drives using either the Settings app or File Explorer Options to better manage your storage view.
How do I show empty drives in 🪟 Windows 11?
Press ⊞ Win+I to open the Settings app. Go to System > For developers. Under File Explorer, find the Show empty drives toggle. Toggle it 'On' to display empty drives on your PC, and toggle it 'Off' to hide them.
How do you clear drives in 🪟 Windows 11?
In the search box on the taskbar, type disk cleanup, then select it from the results. Select the drive you want to clean up files for, then select OK. Select the check box next to the type of files you want to delete.
Was this guide helpful?

About the Author
Richard
Tech Writer, IT Professional
Richard, a writer for Geek Rewind, is a tech enthusiast who loves breaking down complex IT topics into simple, easy-to-understand ideas. With years of hands-on experience in system administration and enterprise IT operations, he’s developed a knack for offering practical tips and solutions. Richard aims to make technology more accessible and actionable. He's deeply committed to the Geek Rewind community, always ready to answer questions and engage in discussions.


No comments yet — be the first to share your thoughts!