How to Set Your Default Microphone in Windows 11
You set your default microphone in Windows 11 by selecting your preferred audio input device from the Sound settings, ensuring all your applications automatically use it for voice calls, recordings, and more.
This process simplifies your audio setup, especially if you have multiple microphones connected, such as a built-in laptop mic, a webcam microphone, or a dedicated USB microphone.
You will navigate to Settings > System > Sound and select your desired microphone under the “Input” section to establish it as the primary device.
Go to Settings, then System, and select Sound. Under the Input section, choose your desired microphone from the “Choose your input device” dropdown menu. This ensures all applications automatically use your selected microphone.
Why Set a Default Microphone?
When multiple microphones are connected, Windows doesn’t automatically know which one you want to use. Designating a default microphone saves you time; you won’t have to select the correct one every time you launch an app.
How to Choose Your Default Microphone
Setting your default microphone in Windows 11 is simple and makes sure all your apps use the right mic for calls and recordings without you having to switch it manually each time.
- Open Settings: Press the Windows key + I on your keyboard. Or click the Start button and then click Settings.
Here’s a peek at what Settings looks like once you open it from the Start menu.
- Click on System: In the Settings window, click on System from the left menu.
- Click on Sound: Now, click on Sound from the right side.
- Find your input device: Under the Input section, click the dropdown menu labeled Choose your input device.
- Pick your microphone: Select the microphone you want to use as your default.
This is what the Sound settings page typically shows.
For instance, you might see options like “Headset Microphone” or “Built-in Microphone.”
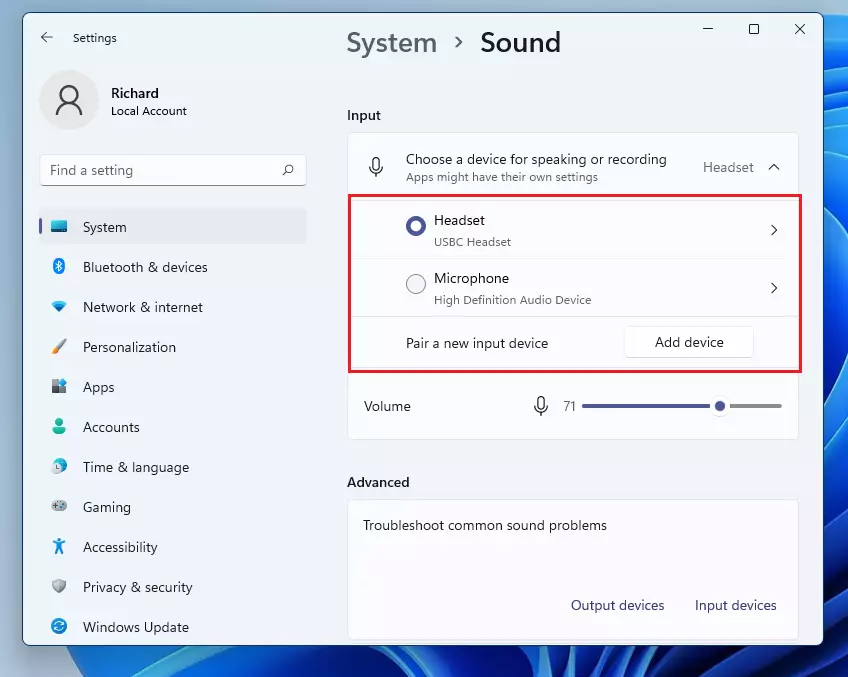
Once you pick your mic here, all apps will use it by default. Some applications might still give you the option to select a different microphone within their own settings.
Quick Way to Switch Microphones Using the Taskbar
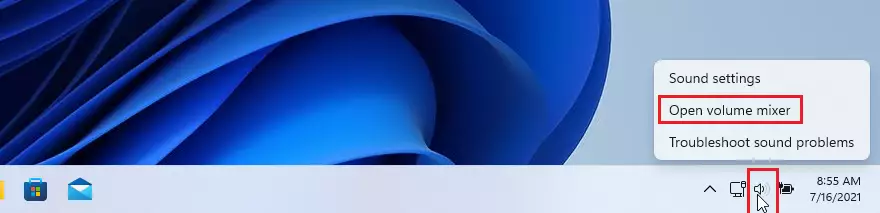
Switching your default microphone in Windows 11 is quick and easy using just the taskbar, letting you change your audio input without opening the main Settings app.
- Right-click the speaker icon: Right-click the little speaker icon in the bottom-right corner of your screen (taskbar).
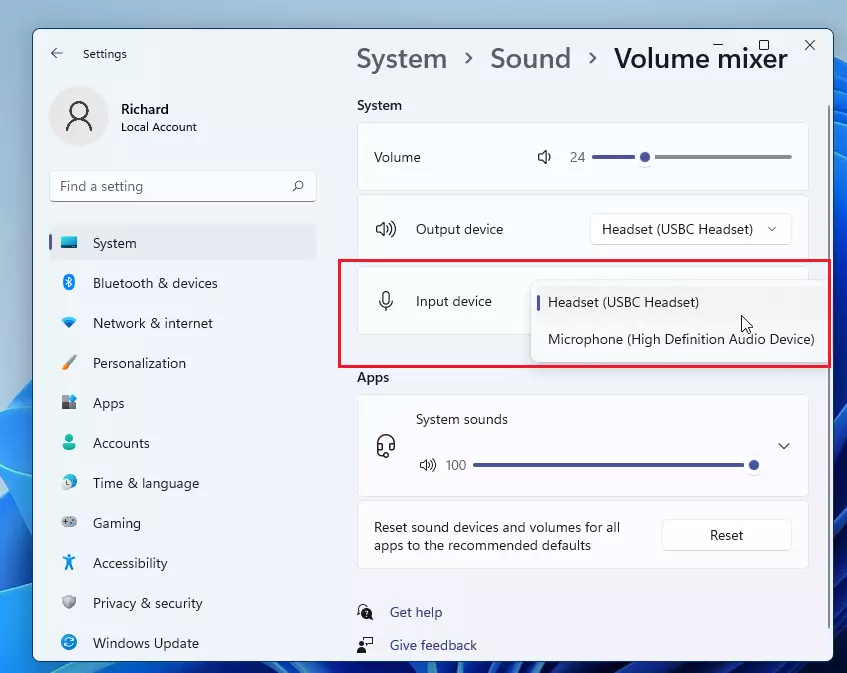
- Open the volume mixer: Click Open volume mixer from the menu.
- Pick your microphone: In the volume mixer window, find the input device dropdown and pick the microphone you want to use.
- Close the window: Close the window when you’re done.
Note: If your microphone doesn’t appear here, it might not be connected correctly or recognized by Windows. Try unplugging and plugging it back in, or restarting your computer.
Make Sure Your Apps Can Use the Microphone
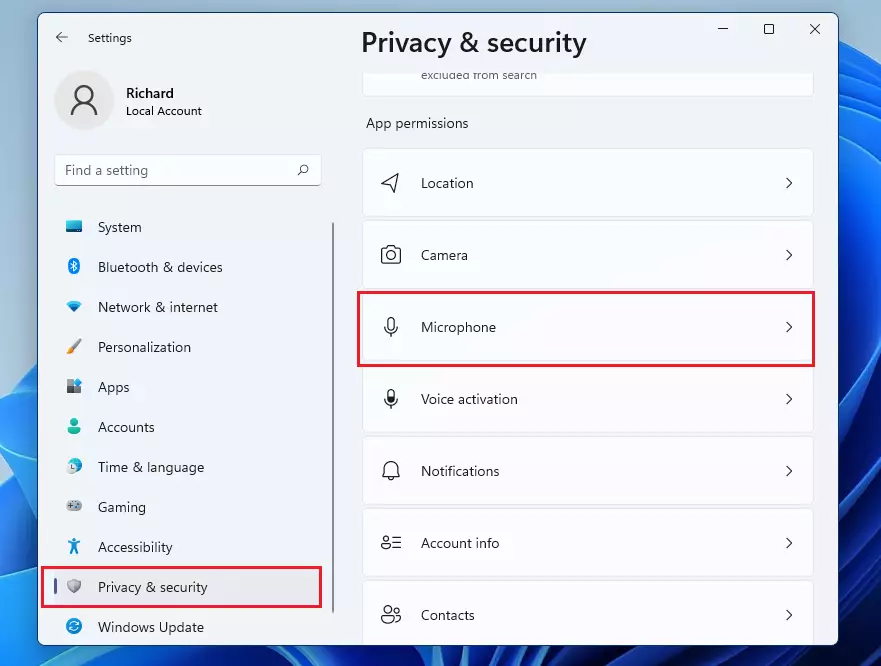
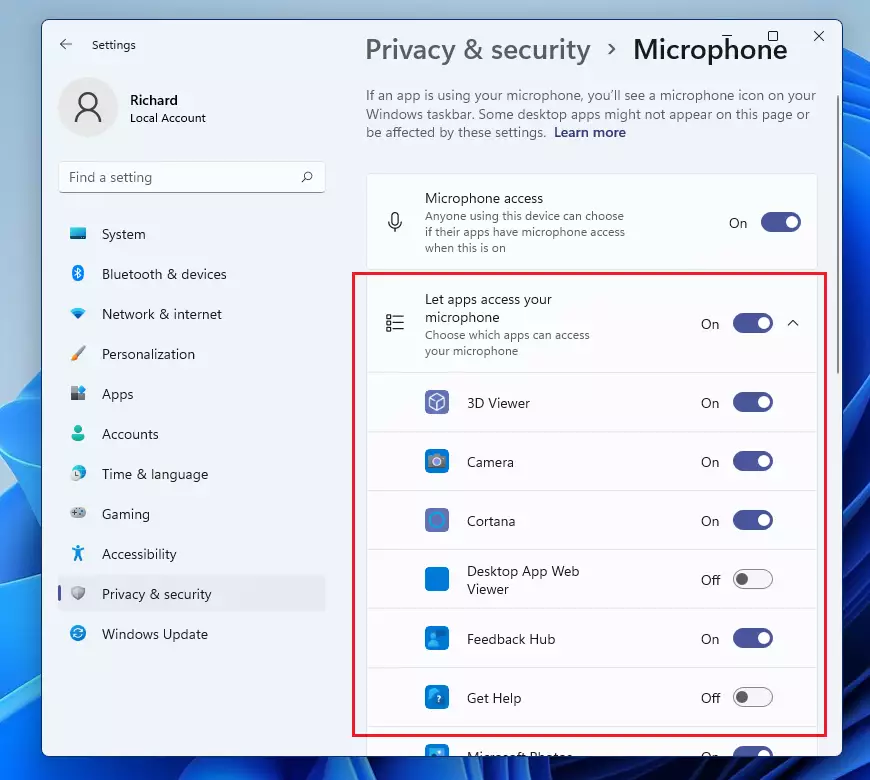
If your microphone isn’t working in certain apps on Windows 11, you need to check the privacy settings to allow apps access to your mic, ensuring it works for all your programs.
- Open Settings again: Press Windows key + I.
- Go to privacy settings: Go to System > Privacy & Security > Microphone.
- Turn on microphone access: Make sure the switch under Microphone access is turned on.
- Allow apps to use your mic: Below that, turn on access for the apps you want to use the microphone.
After making these adjustments, test your microphone again. It should be working correctly now!
Summary
- Setting a default microphone makes it easier to use sound apps since all use the same mic.
- You can change your mic settings in Windows Settings or quickly from the taskbar volume mixer.
- Make sure your apps are allowed to use the microphone in privacy settings.
- Regularly check your mic settings to avoid issues with calls or recordings.
- If your mic doesn’t show up, try reconnecting it or troubleshooting your device.
Setting your default microphone in Windows 11 makes using apps easier because they all use the same mic automatically, and you can change this setting easily through the Settings app or taskbar.
What is my default microphone?
Open the Control Panel, then navigate to “Hardware and Sound,” and finally click on “Sound.” Under the “Recording” tab, you’ll see a list of devices that can record audio. See if your microphone is marked as the default device.
Was this guide helpful?

About the Author
Richard
Tech Writer, IT Professional
Richard, a writer for Geek Rewind, is a tech enthusiast who loves breaking down complex IT topics into simple, easy-to-understand ideas. With years of hands-on experience in system administration and enterprise IT operations, he’s developed a knack for offering practical tips and solutions. Richard aims to make technology more accessible and actionable. He's deeply committed to the Geek Rewind community, always ready to answer questions and engage in discussions.


No comments yet — be the first to share your thoughts!