How to Troubleshoot RAM Issues with Windows Memory Diagnostic in Windows 11
You use the Windows Memory Diagnostic tool in Windows 11 to test your computer’s RAM for errors.
This free, built-in utility scans your PC’s memory modules for hardware faults that can cause system instability, freezes, and Blue Screen of Death (BSOD) errors. Identifying faulty RAM is crucial because it’s a common culprit behind random performance issues and unexpected crashes.
Running the Windows 11 Memory Diagnostic helps you determine if your RAM is healthy or if you need to replace it to resolve these problems.
Search for “Windows Memory Diagnostic” and select the app, or press ⊞ Win+R and type mdsched.exe. Choose to restart now and check for problems to begin the test.
How to run the Windows Memory Diagnostic (mdsched.exe)
You can easily run the Windows Memory Diagnostic tool in Windows 11 to check your computer’s RAM for any issues.
- Open the Start menu or use the search bar on the Taskbar.
- Type “Windows Memory Diagnostic” and select the app. You can also press ⊞ Win+R and type
mdsched.exeto launch it directly.
Once the tool opens, you’ll see two options:
- Restart now and check for problems (recommended): This restarts your PC immediately to start the test.
- Check for problems the next time I start my computer: This schedules the test for your next reboot.
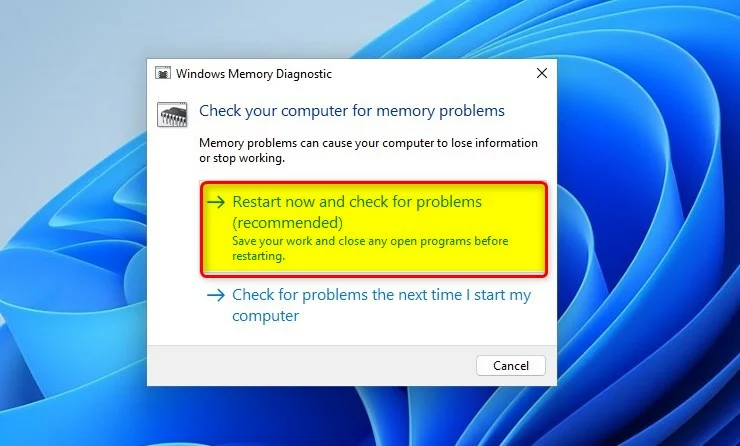
Select the first option to begin. Your computer will restart into a blue screen environment. This is where the actual testing happens.

Advanced Scan Options
For a more thorough check of your RAM, the Windows Memory Diagnostic tool offers advanced scan options beyond the basic test.
How to find and interpret Event Viewer logs
If the Windows Memory Diagnostic test results aren’t immediately visible after your PC restarts, you can find them in the Event Viewer.
- Right-click the Start button and select Event Viewer.
- In the left pane, expand Windows Logs and click on System.
- On the right side, click Filter Current Log.
- Check the box for MemoryDiagnostics-Results and click OK.
- Double-click the entry to see if any hardware errors were detected.
Summary
The Windows Memory Diagnostic tool helps you understand if your computer’s RAM has hardware problems, guiding you on the next steps.
How long does the Windows Memory Diagnostic take to complete?
The test duration depends on your RAM size and the scan type selected. A standard test usually takes 15 to 30 minutes. However, if you choose the Extended scan option, it can take several hours to finish. Ensure your computer is plugged into power during this time.
Why are my Windows Memory Diagnostic results not showing up?
If the desktop notification is missing, the results are still saved in the system logs. You can manually view them by opening the Event Viewer, navigating to Windows Logs, selecting System, and filtering for the MemoryDiagnostics-Results source. This will show you the specific outcome of the memory test.
Is Windows Memory Diagnostic as effective as MemTest86?
The built-in Windows tool is excellent for quick, basic checks and identifying major hardware failures. However, MemTest86 is considered more advanced and thorough for professional troubleshooting. If the Windows tool reports no errors but you still suspect RAM issues, MemTest86 is the recommended next step.
What should I do if the tool finds hardware errors?
If the tool reports hardware problems, it means your RAM is physically failing. You should identify which stick is faulty by testing them one at a time. Once identified, you must replace the defective RAM module to restore system stability and prevent further data corruption or crashes.
Was this guide helpful?

About the Author
Richard
Tech Writer, IT Professional
Richard, a writer for Geek Rewind, is a tech enthusiast who loves breaking down complex IT topics into simple, easy-to-understand ideas. With years of hands-on experience in system administration and enterprise IT operations, he’s developed a knack for offering practical tips and solutions. Richard aims to make technology more accessible and actionable. He's deeply committed to the Geek Rewind community, always ready to answer questions and engage in discussions.

No comments yet — be the first to share your thoughts!