
This post shows students and new users steps to reset the AutoPlay settings in Windows 11 to the defaults.
The AutoPlay settings in Windows allow users to choose different actions when devices are inserted or attached to a Windows computer.
By default, Windows 11 will display a pop-up and ask you to select what actions to take when you insert media or attach a new device. This works if you haven’t changed anything.
However, suppose you have chosen certain actions for particular media and wish to change them or choose a different action. In that case, you can configure that particular setting or reset the entire AutoPlay. The steps below will show you how to do that.
To configure individual AutoPlay settings in Windows 11, read the post below:
How to configure AutoPlay settings in Windows 11
AutoPlay, depending on its current settings, does one of the following:
- Plays the content automatically.
- Displays a dialog box prompting the user to choose a default handler for a single content type.
- Presents a list of available handler applications to launch for mixed content. The chosen handler then automatically plays its associated content type.
- Displays a standard folder view of the files.
- Does nothing if, earlier, the user had chosen to Take no action for that content type as well as specified Always do the selected action?
How to reset AutoPlay settings in Windows 11
As mentioned above, Windows AutoPlay settings allow users to choose certain actions when a media or device is inserted into a Windows computer.
Individuals can also choose different actions for different media and what to do when Windows detects such media or device after inserting. Whatever settings you choose, Windows will default to that and automatically play its associated content type.
If you have made many changes to your AutoPlay settings and wish to reset everything back to default, use the steps below.
First, open the Control Panel app. In the Control Panel app, select Hardware and Sound group and go to AutoPlay.
On the AutoPlay settings pane, click the Reset all defaults button at the bottom of the page.
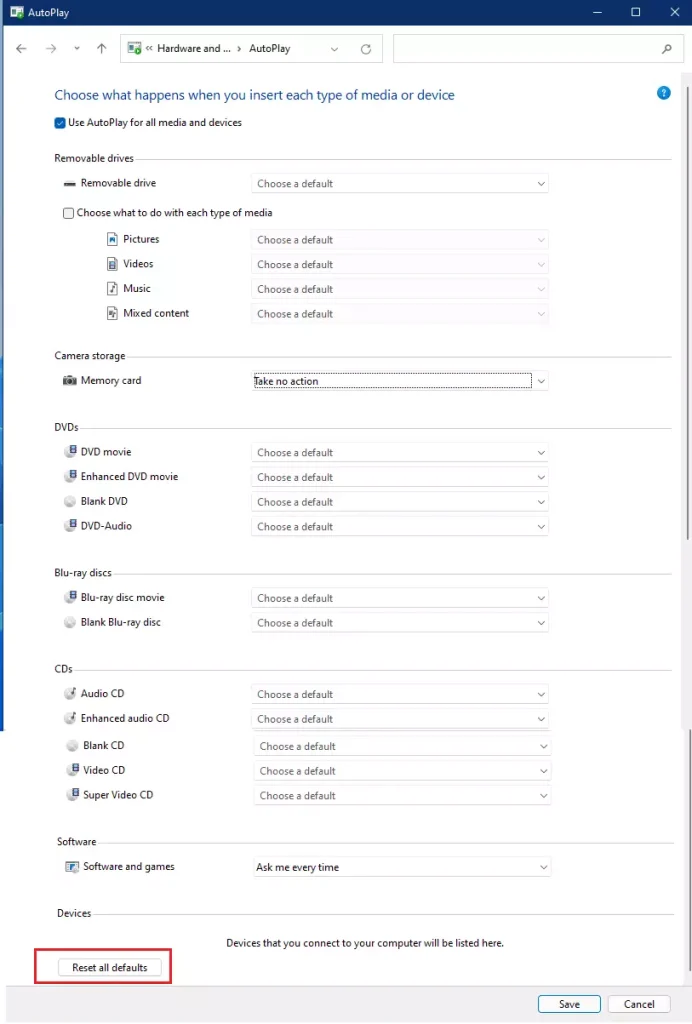
Click the Save button, and close out.
That should do it!
Conclusion:
Resetting the AutoPlay settings in Windows 11 can help restore optimal functionality for media and device interactions. Here’s a quick recap of the steps and benefits:
- Access Control Panel: Navigate to the Control Panel to find AutoPlay settings easily.
- Reset to Defaults: Click the “Reset all defaults” button to clear existing customizations.
- Save Changes: Ensure to save your changes to effectively apply the new settings.
- Immediate Effect: Experienced users will notice the immediate reversion to default settings when connecting devices or media.
- Enhanced User Experience: Restoring defaults can lead to a smoother and more predictable workflow when using various devices with your Windows 11 system.


Leave a Reply