
This article describes the steps to install or uninstall the Trusted Platform Module (TPM) Diagnostics tool in Windows 11.
TPM technology is designed to provide hardware-based, security-related functions. A TPM chip is a secure cryptoprocessor that helps you generate, store, and limit the use of cryptographic keys.
The TPM Diagnostics tool is an optional feature in Windows that allows you to gather and collect your device’s TPM chip capabilities.
The tool doesn’t do much but provides diagnostic information about the TPM chip installed on your computer.
You must be an administrator to install or uninstall the tool in Windows 11.
How to install or uninstall the TPM Diagnostics tool using the Settings app
As described above, the TPM Diagnostics tool is an optional feature in Windows that allows you to gather and collect your device’s TPM capabilities.
Here’s how to install it in Windows 11
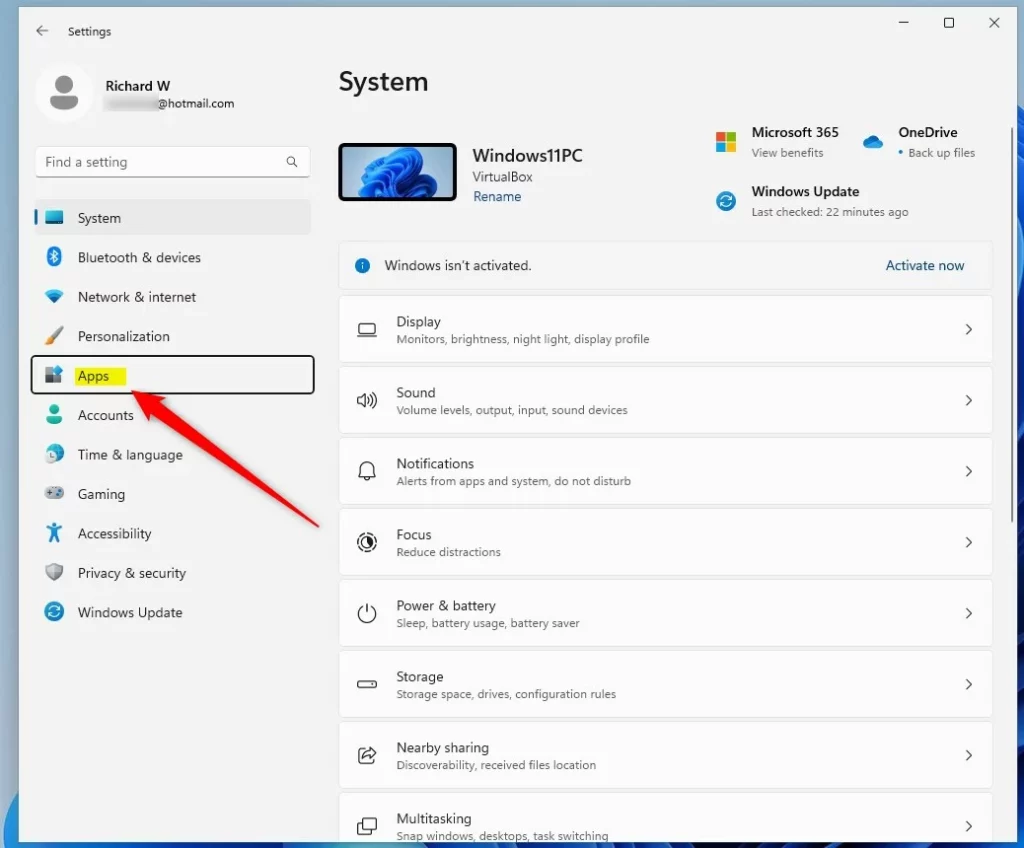
Click on the Start menu button and click Settings to open the Windows Settings app. You can also use a keyboard shortcut (Windows key + I) to launch the Settings app.

When the Settings app opens, click the Apps button on the left.
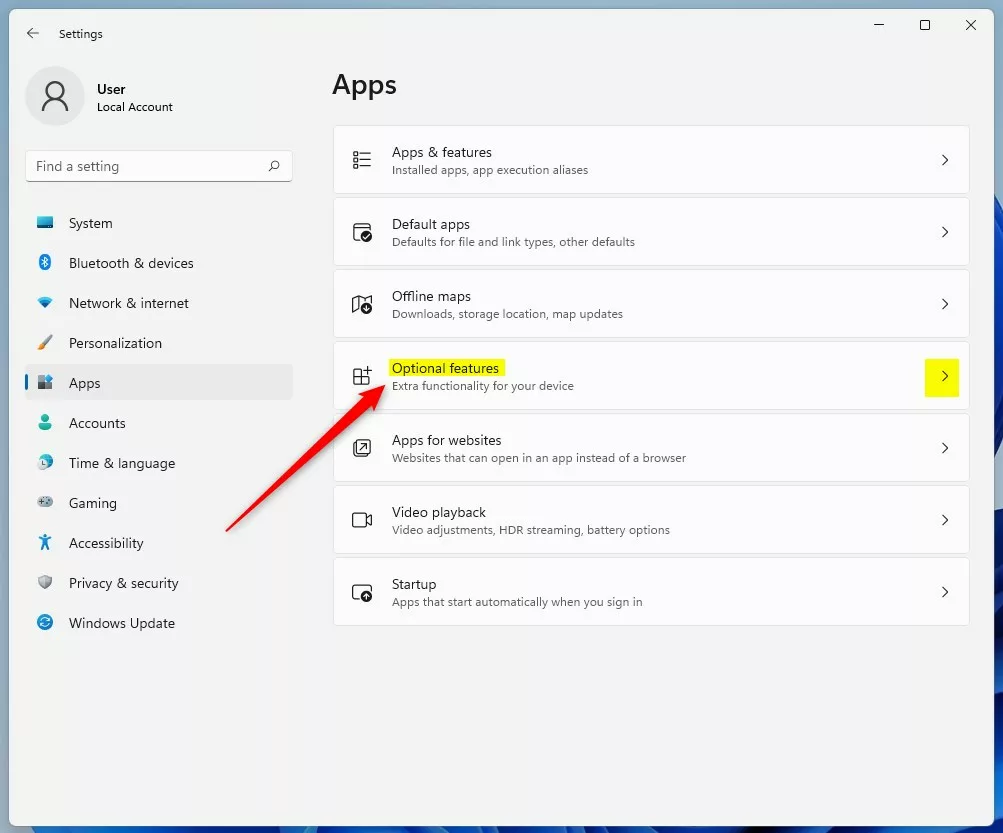
On the right, click on the Optional features tile to expand.
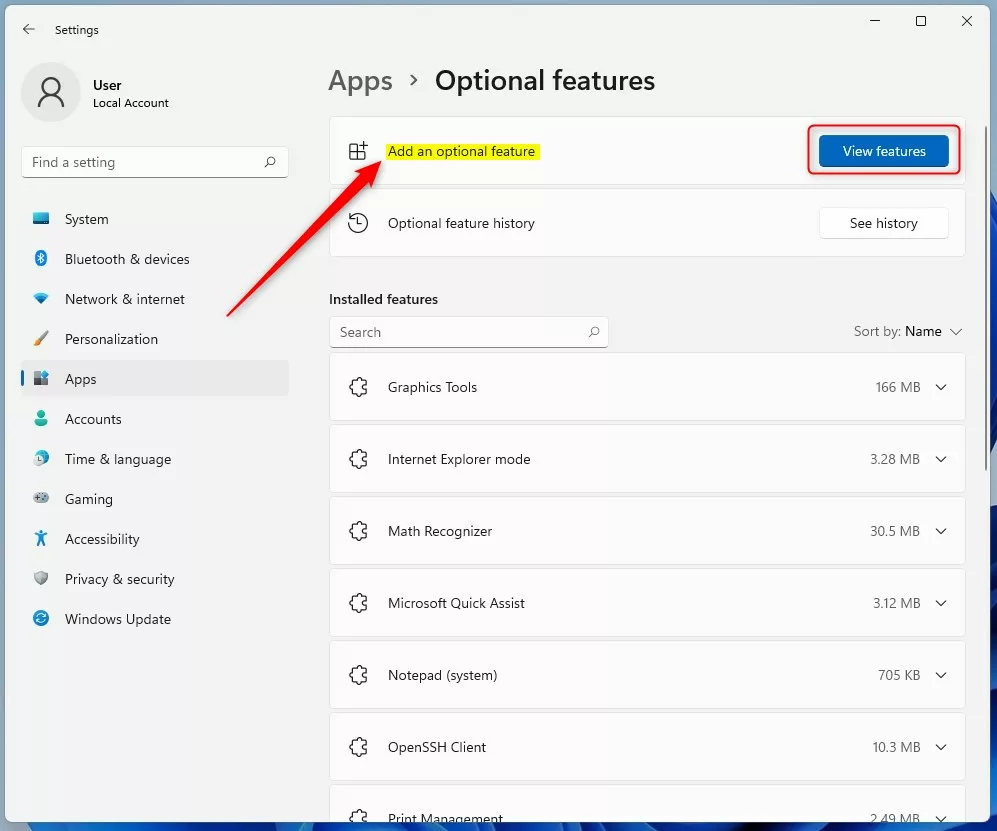
On the Apps -> Optional features settings pane, click on the “Add an optional feature” (View features) button.
On the Apps -> Optional features -> View feature window, under Add an optional feature, use the search box to search for TPM.
Under Sort by Name, check the box next to TPM Diagnostics, then click Next to install.
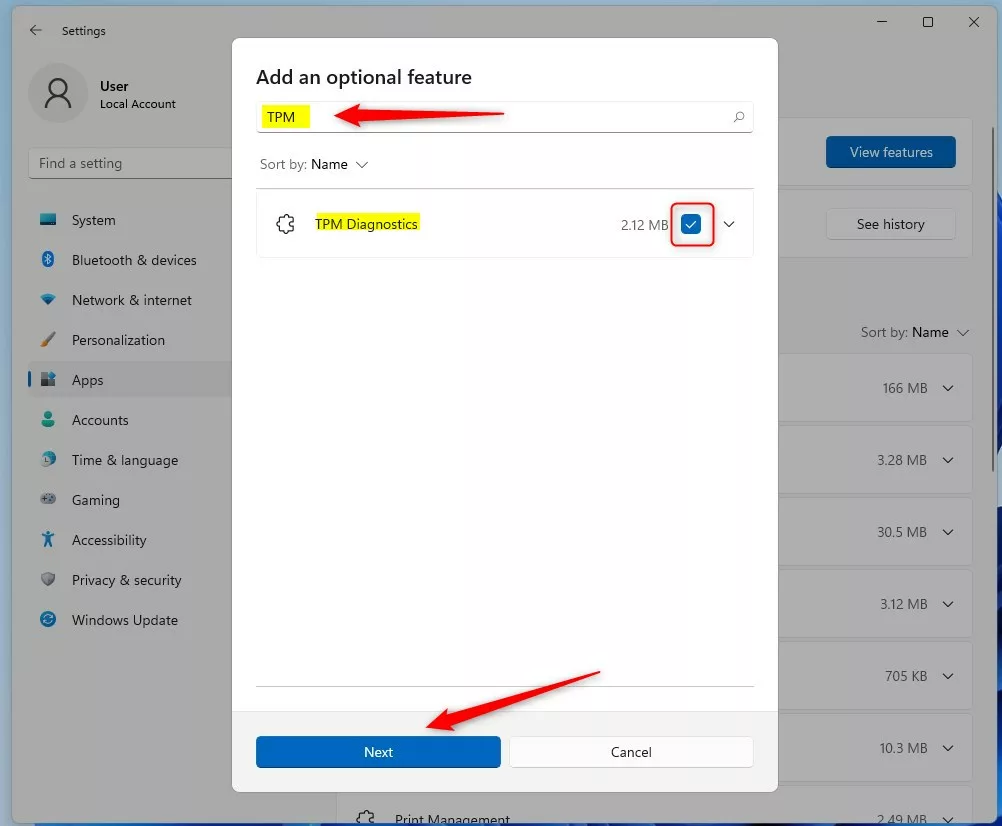
In the next window, click the Install button to install the app.

To uninstall, reverse the steps above, and uncheck the box for the TPM Diagnostics app.
Install the TPM Diagnostics app via the Command Prompt
Alternatively, users can install the TPM Diagnostics app using the Command Prompt.
To do that, launch the Command Prompts as an administrator. When the Command Prompt app opens, run the commands below to install the TPM Diagnostics app.
DISM /Online /Add-Capability /CapabilityName:Tpm.TpmDiagnostics~~~~0.0.1.0
If you want to uninstall, run the commands below.
DISM /Online /Remove-Capability /CapabilityName:Tpm.TpmDiagnostics~~~~0.0.1.0
With the app installed, you can run the TPM Diagnostics tool commands below to view details of the TPM chip on your machine.
TpmDiagnostics.exe GetCapabilities
Simply typing the TpmDiagnostics.exe command will provide help on how to use it.
TpmDiagnostics.exe : A tool for Windows 10 build 22000
Copyright (c) Microsoft Corporation. All rights reserved.

Flags:
        PrintHelp ( /h -h )
        PromptOnExit ( -x /x )
        UseECC ( -ecc /ecc )
        UseAes256 ( -aes256 /aes256 )
        QuietPrint ( -q /q )
        PrintVerbosely ( -v /v )

Use the 'help' command to get more information about a command.
Commands:

TpmInfo:
        GetLockoutInfo
        IsOwned
        PlatformType
        CheckFIPS
        ReadClock
        GetDeviceInformation
        IfxRsaKeygenVulnerability
        GatherLogs <full directory path>
        PssPadding
        IsReadyInformation

TpmTask:
        MaintenanceTaskStatus
        ShowTaskStatus
        IsEULAAccepted
        ProvisionTpm [force clear] [allow PPI prompt]

TpmProvisioning:
        PrepareTPM
        CanUseLockoutPolicyClear
        CanClearByPolicy

AutoProvisioning:
        IsAutoProvisioningEnabled
        EnableAutoProvisioning
        DisableAutoProvisioning [-o]

EK:
        EkInfo
        ekchain
        EkCertStoreRegistry
        GetEkCertFromWeb [-ecc] <cert file>
        GetEkCertFromNVR [-ecc] <cert file>
        GetEkCertFromReg [-ecc] [ output file ]
        GetEk [-ecc] [key file]
        CheckEkCertState
        InstallEkCertFromWeb
        InstallEkCertFromNVR
        InstallEkCertThroughCoreProv
        EKCertificateURL

WindowsAIK:
        InstallWindowsAIK [-skipCert]
        WinAikPersistedInTpm
        UninstallWindowsAIKCert
        GetWindowsAIKCert [cert file]
        IsWindowsAIKInstalledInNCrypt
        EnrollWindowsAIKCert
        GetWindowsAIKPlatformClaim ["fresh"] [output file]

OtherKeys:
        PrintPublicInfo < srk / aik / ek / handle > [-asBcryptBlob / -RsaKeyBitsOnly / -RsaSymKeyBitsOnly] [-ecc]
        TestParms < SYMCIPHER | RSA > < algorithm specific arguments >
        EnumerateKeys

NVStorage:
        EnumNVIndexes
        DefineIndex <index> <size> [attribute flags]
        UndefineIndex <index>
        ReadNVIndexPublic <index>
        WriteNVIndex <index> <data in hex format | -file filename>
        ReadNVIndex <index>
        NVSummary

NVBootCounter:
        CheckBootCounter
        ReadBootCounter [/f]

PCRs:
        PrintPcrs

PhysicalPresence:
        GetPPTransition
        GetPPVersionInfo
        GetPPResponse
        GetPPRequest

TPMCommandsAndResponses:
        CommandCode <hex command code>
        ResponseCode <hex response code>

Tracing:
        EnableDriverTracing
        DisableDriverTracing
        FormatTrace <etl file> [output json file]

DRTM:
        DescribeMle <MLE Binary File>

Misc:
        Help [command name]
        DecodeBase64File <file to decode from base 64>
        EncodeToBase64File <file to encode>
        ReadFileAsHex <file to read>
        ConvertBinToHex <file to read> <file to write to>
        ConvertHexToBin <file to read> <file to write to>
        Hash <hex bytes or raw value to hash>
        GetCapabilities
That should do it!
Reference:
Conclusion:
- The installation and uninstallation of the TPM Diagnostics tool on Windows 11 can be easily accomplished using the Settings app or Command Prompt.
- The TPM Diagnostics tool provides valuable diagnostic information about the TPM chip installed on your computer, aiding in managing cryptographic keys and security-related functions.
- Following the steps outlined in this article, users can effectively manage the TPM Diagnostics tool and utilize its commands to gather detailed information about their device’s TPM capabilities.
- For further information and troubleshooting, the provided reference link offers additional insights into the Trusted Platform Module and its functionalities.

Leave a Reply Cancel reply