This article explains how to install Ralph CMDB on Ubuntu Linux.
Ralph provides a free, open-source, lightweight Assets Management System for Data Centers and Back Offices. Built on Django and Python 3, this database system is simple, customizable, and has an excellent user web interface.
If you need a database management system that is open, flexible, and easy to use, then you may want to look at Ralph.
Ralph DBMS uses REST API to query documents using Python right out of the box. Building your apps using this database system should do your job using its intuitive web UI.
For more about Ralph, please visit its homepage.
Install Required Packages
To get the latest version of Ralph DBMS, you’ll need to add its official repository to Ubuntu. However, some required packages may be needed for the installation to work.
First, run the commands below to install apt-transport-https.
sudo apt update
sudo apt install apt-transport-https
Install MariaDB Database Server
Ralph DBMS also requires a database server to store its content… If you’re looking for a genuinely open-source database server, then MariaDB is a great place to start… To install MariaDB, run the commands below:
sudo apt-get install mariadb-server mariadb-client
After installing MariaDB, the commands below can be used to stop, start, and enable the MariaDB service to always start up when the server boots.
Run these on Ubuntu 16.04 LTS
sudo systemctl stop mysql.service
sudo systemctl start mysql.service
sudo systemctl enable mysql.service
Run these on Ubuntu 18.10 and 18.04 LTS
sudo systemctl stop mariadb.service
sudo systemctl start mariadb.service
sudo systemctl enable mariadb.service
Next, run the commands below to secure the database server with a root password if you were not prompted to do so during the installation…
sudo mysql_secure_installation
When prompted, answer the questions below by following the guide.
- Enter current password for root (enter for none): Just press the Enter
- Set root password? [Y/n]: Y
- New password: Enter password
- Re-enter new password: Repeat password
- Remove anonymous users? [Y/n]: Y
- Disallow root login remotely? [Y/n]: Y
- Remove test database and access to it? [Y/n]: Y
- Reload privilege tables now? [Y/n]: Y
Now that MariaDB is installed, to test whether the database server was successfully installed, run the commands below…
sudo mysql -u root -p
Type the root password when prompted.
If you see a similar screen as shown above, then the server was successfully installed…
Next, run the commands below to open the MariaDB default config file…
sudo nano /etc/mysql/mariadb.conf.d/50-server.cnf
Then add the lines below and save.
innodb_file_format = Barracuda
innodb_large_prefix = 1
innodb_default_row_format = dynamic
Restart MariaDB after that.
sudo systemctl restart mariadb.service
sudo systemctl restart mysql.service
After installing the package above, continue below to install Ralph.
Install Ralph
Now that some required packages have been installed follow the steps below to get Ralph DBMS installed and configured.
To add Ralph’s repository and key, run the commands below. The first line imports the repository’s GPG key. The second adds Ralph’s repository into a new file called ralph.list.
sudo apt-key adv --keyserver  hkp://keyserver.ubuntu.com:80 --recv-keys E2D0F3764B54797F
sudo sh -c "echo 'deb https://dl.bintray.com/allegro/debng bionic main' >  /etc/apt/sources.list.d/ralph.list"
After the steps above, run the commands below to install them.
sudo apt update
sudo apt install ralph-core
When prompted where to use Ralph’s default settings, choose Yes
                                 ┌────────┤ Configuring ralph-core ├─────────┐
                                 │                                           │
                                 │ Use default database settings for Ralph.  │
                                 │                                           │
                                 │ Use default database settings:            │
                                 │                                           │
                                 │        <Yes>           <No>               │
                                 │                                           │
                                 └───────────────────────────────────────────┘
After installation, the commands below can stop, start, and enable Ralph’s service.
sudo systemctl stop ralph.service
sudo systemctl start ralph.service
sudo systemctl enable ralph.service
To verify that Ralph is installed and running, run the commands below to check its status.
sudo systemctl status ralph.service
You should see similar lines as shown below:
● ● ralph.service - Ralph service
   Loaded: loaded (/lib/systemd/system/ralph.service; enabled; vendor preset: enabled)
   Active: active (running) since Fri 2019-06-21 10:47:57 CDT; 16s ago
 Main PID: 14904 (gunicorn)
    Tasks: 3 (limit: 4680)
   CGroup: /system.slice/ralph.service
           ├─14904 /opt/ralph/ralph-core/bin/python /opt/ralph/ralph-core/bin/gunicorn -c /var/local/ralph/guni
           ├─14907 /opt/ralph/ralph-core/bin/python /opt/ralph/ralph-core/bin/gunicorn -c /var/local/ralph/guni
           └─14909 /opt/ralph/ralph-core/bin/python /opt/ralph/ralph-core/bin/gunicorn -c /var/local/ralph/guni

Jun 21 10:47:57 ubuntu1804 systemd[1]: Started Ralph service.
That should do it!
Setup Ralph Database and User
Set up Ralph MariaDB database and user by running the commands below.
sudo mysql -u root -p
When prompted, type in the MariaDB root password created above.
Next, run the commands below to create a new database called ralph_ng
CREATE DATABASE ralph_ng;
Then run the commands below to create a new database user called ralph_ng
CREATE USER 'ralph_ng'@'localhost' IDENTIFIED BY 'ralph_ng';
Grant the account access to the ralph_ng database above.
GRANT ALL PRIVILEGES ON ralph_ng.* TO 'ralph_ng'@'localhost';
Next, save and exit.
FLUSH PRIVILEGES;
QUIT;
The default username and password are configured in /etc/ralph/conf.d/database.conf file. If you didn’t use the default above, update the file with the correct account before continuing below.
After that, run the commands below to create a database schema.
sudo ralphctl migrate
After that, run the commands below to create Ralph’s admin account for its web portal.
sudo ralphctl createsuperuser
Output:
Username: admin
Email address: admin@example.com
Password:
Password (again):
Superuser created successfully.
Optionally, you can run the commands below to import demo data.
sudo ralphctl demodata
Next, enable Ralph’s sync apps and restart Ralph’s service.
sudo ralphctl sitetree_resync_apps
sudo systemctl start ralph.service
Access Ralph Web Interface
Ralph also comes with a web interface for easy management in your web browser. You must install a web server to get a good web experience.
For this post, we’re going to use the Nginx HTTP server.
Run the commands below to install Nginx
sudo apt install nginx
Then, create a virtual host for Ralph.
sudo nano /etc/nginx/conf.d/ralph.conf
Copy and paste the content below into the file and save
server {

    listen 80;
    client_max_body_size 512M;
    server_name example.com;
    proxy_set_header Connection "";
    proxy_http_version 1.1;
    proxy_connect_timeout  300;
    proxy_read_timeout 300;

    access_log /var/log/nginx/ralph-access.log;
    error_log /var/log/nginx/ralph-error.log;

    location /static {
        alias /usr/share/ralph/static;
        access_log        off;
        log_not_found     off;
        expires 1M;
    }

    #location /media {
    #    alias /var/local/ralph/media;
    #    add_header Content-disposition "attachment";
    #}

    location / {
        proxy_pass http://127.0.0.1:8000;
        include /etc/nginx/uwsgi_params;
        proxy_set_header Host $http_host;
        proxy_set_header X-Forwarded-For $proxy_add_x_forwarded_for;
    }
}
When you’re done, restart Nginx and browse to the server name you specified above.
sudo systemctl reload nginx
http://example.com
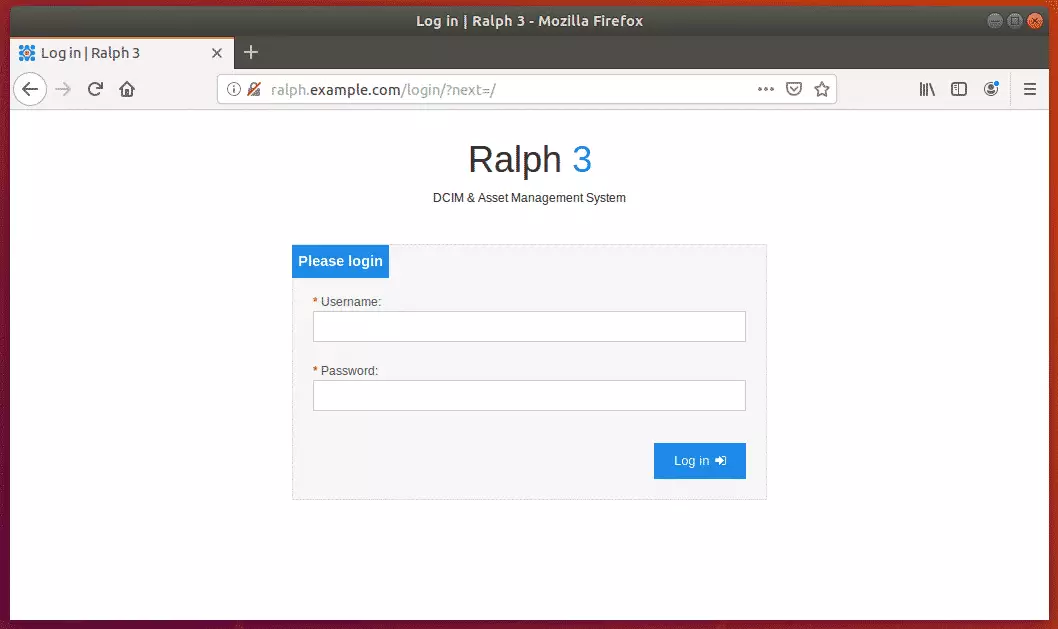
Login with the admin account you created previously.
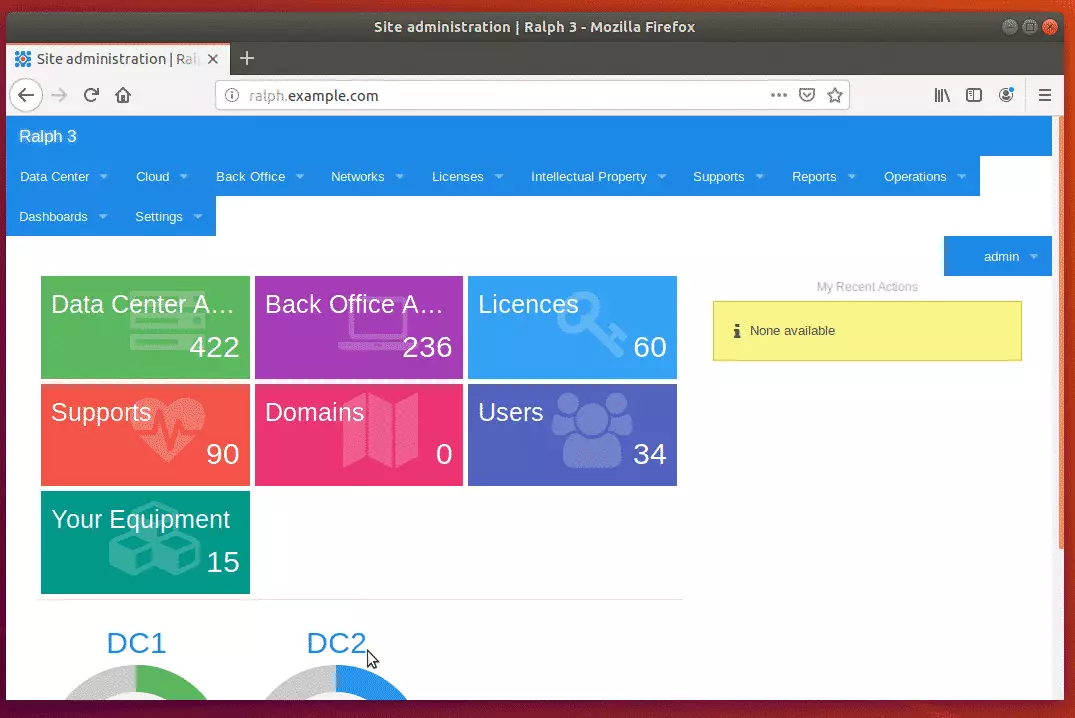
Congratulations! You have successfully installed Ralph DBMS on Ubuntu 16.04 and 18.04
You may also like the post below:


Leave a Reply