This article describes the steps to install and use the Monica Personal CRM application on Ubuntu Linux.
Monica is an excellent open-source CRM, which is your relationship management system. It is an open-source web application to organize and record your interactions with family, friends, and almost any group.
Monica will help you keep track of personal events, birthdays, contacts, basic journals, notes, and more. Stay in touch with a contact by sending reminders at a given interval.
For more on Monica, check its project’s GitHub page.
Below is how to install Monica on Ubuntu Linux with Nginx support.
Install Monica’s relation manager on Ubuntu Linux with Nginx
As mentioned above, Monica is an excellent open-source CRM. Call it your relationship management system. It is an open-source web application to organize and record your interactions with family, friends, and almost all organizations.
Below is how to install it on Ubuntu Linux with Nginx support.
Install Nginx
Monica is a web application written in PHP. Therefore, it requires a web server, and a great web server to use is Nginx.
Below is how to install Nginx on Ubuntu Linux.
sudo apt update
sudo apt install nginx
Additional help on installing Nginx can be found at the link below.
How to install Nginx on Ubuntu Linux
Install MariaDB
Monica also needs a database server to store its content. A tremendous open-source database server to use with Monica is MariaDB.
Below is how to install MariaDB on Ubuntu Linux.
sudo apt update
sudo apt install mariadb-server
Additional help on installing MariaDB can be found at the link below.
How to install MariaDB on Ubuntu Linux
Install PHP-FPM
As described above, Monica is an application written in PHP. Therefore, the current version of Monica CRM requires at least PHP v8.1 or newer.
Below is how to install PHP on Ubuntu Linux.
sudo apt update
sudo apt install php8.1-fpm php8.1-cli php8.1-common php8.1-mbstring php8.1-xml php8.1-mysql php8.1-curl php8.1-zip php8.1-intl php8.1-bcmath php8.1-gd php8.1-gmp php8.1-redis
Additional help on installing PHP can be found at the link below.
How to install PHP or PHP-FPM on Ubuntu Linux
Install Composer
A composer is a PHP tool that can install PHP dependencies. For example, you may need Composer to install Monica dependencies.
You can install Composer via the one-line command below.
curl -sS https://getcomposer.org/installer | sudo php -- --install-dir=/usr/bin --filename=composer
Install Node.js and Yarn
Node.js and Yarn are PHP package managers that will download and compile static files for Monica CRM.
Run the following command to add the Node.js Nodesource repository.
curl -fsSL https://deb.nodesource.com/setup_16.x | sudo bash -
After that, run the following command to add the Yarn package repository to your system.
curl -sL https://dl.yarnpkg.com/debian/pubkey.gpg | gpg --dearmor | sudo tee /usr/share/keyrings/yarnkey.gpg >/dev/null

echo "deb [signed-by=/usr/share/keyrings/yarnkey.gpg] https://dl.yarnpkg.com/debian stable main" | sudo tee /etc/apt/sources.list.d/yarn.list
Finally, install Node.js and Yarn using the commands below.
sudo apt update
sudo apt install nodejs yarn
Now that all required packages to install Monica are installed, we can begin configuring Monica’s database and creating a web application portal.
Create Monica database
Let’s create a database for Monica. Run the commands below to log in to the MariaDB shell via the MySQL command below.
sudo mysql -u root -p
Then, create a database named monicadb.
CREATE DATABASE monicadb;
Create a database user named monicadbuser.
CREATE USER monicadbuser@localhost;
Finally, grant all access to the monicadb database to monicadbuser and create a new password.
GRANT ALL ON monicadb.* TO 'monicadbuser'@'localhost' IDENTIFIED BY 'type_password_here';
Save your changes and exit.
FLUSH PRIVILEGES;
exit
Install Monica
We are ready to install the Monica web app. But before we do that, let’s clone Monica’s project from GitHub.
sudo apt install git
cd /var/www/
sudo git clone https://github.com/monicahq/monica.git
Check out the stable branch version 3.7.0.
cd /var/www/monica
sudo git checkout tags/v3.7.0
Next, copy the default configuration .env.example to .env inside the Monica directory. Then, change the file ownership to ‘www-data.’
sudo cp /var/www/monica/.env.example /var/www/monica/.env
sudo chown www-data:www-data /var/www/monica/.env
Run the commands below to edit the .env file.
sudo nano /var/www/monica/.env
Then, update the highlighted lines to match your environment.
# The URL of your application.
APP_ENV=production
APP_URL=http://monica.example.com
# Force using APP_URL as base url of your application.
# You should not need this, unless you are using subdirectory config.
APP_FORCE_URL=false
# Database information
# To keep this information secure, we urge you to change the default password
# Currently only "mysql" compatible servers are working
DB_CONNECTION=mysql
DB_HOST=127.0.0.1
DB_PORT=3306
# You can use mysql unix socket if available, it overrides DB_HOST and DB_PORT values.
#DB_UNIX_SOCKET=/var/run/mysqld/mysqld.sock
DB_DATABASE=monicadb
DB_USERNAME=monicadbuser
DB_PASSWORD=type_password_here
DB_PREFIX=
DB_TEST_HOST=127.0.0.1
DB_TEST_DATABASE=monica_test
DB_TEST_USERNAME=homestead
DB_TEST_PASSWORD=secret
# Use utf8mb4 database charset format to support emoji characters
Save the file and exit.
Next, run the commands below to update the directory permissions and create a new folder.
sudo chown -R www-data:www-data /var/www/monica
sudo mkdir -p /var/www/.cache
sudo chown -R www-data:www-data /var/www/.cache
After that, run the commands below to install PHP dependencies for Monica.
sudo -u www-data composer install --no-interaction --no-dev
Next, create a Yarn folder and update its permissions to work with Nginx.
sudo mkdir -p /var/www/.yarn
sudo chown -R www-data:www-data /var/www/.yarn
Once you are done, run the commands below to complete installing and compiling Monica’s dependencies and environment.
sudo -u www-data yarn install
sudo -u www-data yarn run production
sudo -u www-data php artisan key:generate
sudo -u www-data php artisan setup:production -v
When you use the last command, it should prompt you if you want to configure Monica. Type Yes to continue.
You should see an output similar to the one below:
Monica v3.7.0 is set up, enjoy.

✓ Filling database
Seeding: FakeUserTableSeeder
Seeded:  FakeUserTableSeeder (16,577.42ms)
Database seeding completed successfully.
-----------------------------
|
| Welcome to Monica v3.7.0
| You can now log in to your account
| URL:      http://monica.example.com
Setup is done. Have fun.
To ensure that Monica’s application functions well, update its directory permissions so the web server can manage the content.
sudo chown -R www-data:www-data /var/www/monica
sudo chmod -R 775 /var/www/monica/storage
Configure the Nginx server block.
To get the Monica portal working, we must configure the Nginx server block and define the Monica directory to manage.
Run the commands below to create a server block for Monica.
sudo nano /etc/nginx/sites-available/monicacrm
Copy and paste the lines below into the file and save.
server {
    listen 80;

    server_name monica.example.com;
    root /var/www/monica/public;

    index index.php;

    location / {
        try_files $uri $uri/ /index.php?$args;
    }

    location ~ \.php$ {
        include snippets/fastcgi-php.conf;
        fastcgi_pass unix:/var/run/php/php8.1-fpm.sock;
    }
}
After saving, run the commands below to enable the server block.
sudo ln -s /etc/nginx/sites-available/monicacrm /etc/nginx/sites-enabled/
Test and restart Nginx. If you don’t get any errors, you’re good to go.
sudo nginx -t
sudo systemctl restart nginx
Access Monitor portal
Now, all that is left to do is to connect to the server hostname or domain and access the Monitor portal.
http://monica.example.com
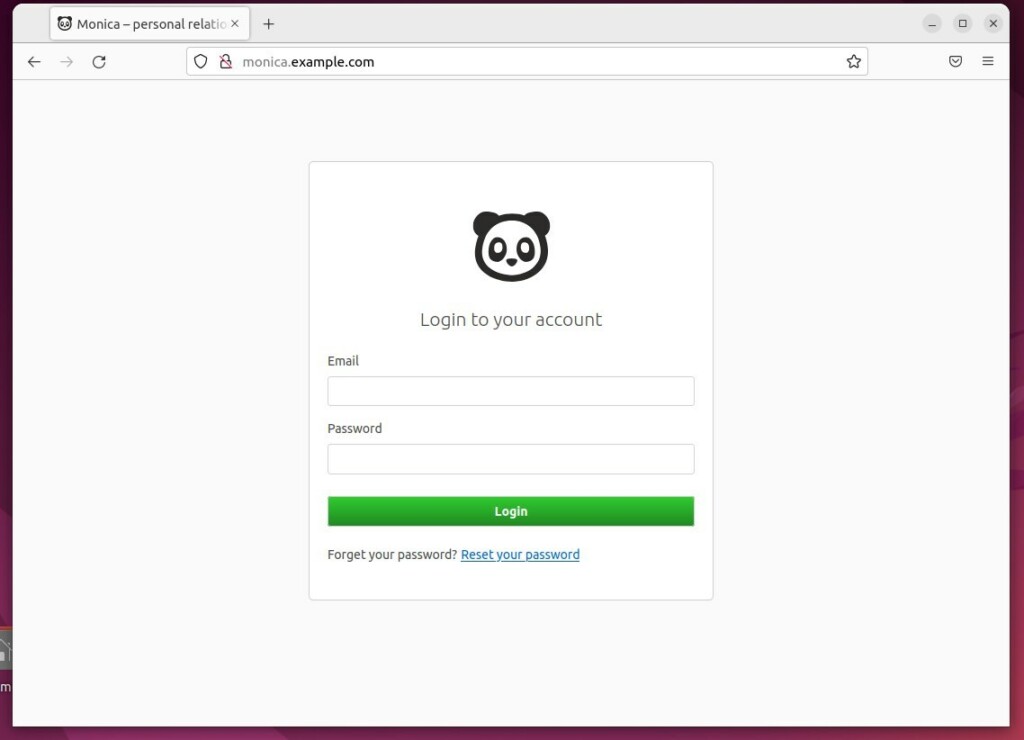
You can register and begin using Monica.
If you want to secure the Monica portal with SSL, you may want to install and use Let’s Encrypt free SSL.
Below is how to do that with Nginx on Ubuntu Linux.
How to install and use Let’s Encrypt SSL with Nginx on Ubuntu Linux
That should do it!
Conclusion:
- In conclusion, this guide has detailed steps for installing Monica CRM on Ubuntu Linux with Nginx support.
- Following the instructions outlined in this article, users can effectively set up Monica CRM to organize and record interactions with various contacts and groups.
- The comprehensive tutorial covers installing necessary components such as Nginx, MariaDB, PHP, Composer, Node.js, and Yarn and configuring Monica’s database and web application portal.
- Additionally, the guide includes instructions for securing the Monica portal with SSL using Let’s Encrypt, enhancing the overall usability and security of the CRM platform.
- Readers are encouraged to utilize the comment section to report any errors found in the guide or to contribute additional insights related to the installation process.

Leave a Reply