How to Install a Printer in Windows 11
You install a printer in Windows 11 by using the built-in settings to add a new device.
Adding a printer allows you to send documents to your physical printing device, whether it’s connected via USB or Wi-Fi. Windows 11 simplifies this process, typically recognizing most printers automatically when you plug them in.
For example, if you’re adding a standard USB printer, Windows 11 often installs the necessary drivers automatically. If it doesn’t, you can manually search for and add the printer using its network name or IP address.
This guide helps you get your printer connected and ready for printing in just a few simple steps.
Open Settings, go to Bluetooth & devices, then Printers & scanners, and click Add device. Windows will search for printers, or you can manually add one if it isn’t found.
How to Install a USB Printer (Wired Connection)
Why do this? A USB printer connects directly to your computer with a cable. This is the most straightforward way to set up printing.
What happens when done? Your computer recognizes the printer and you can start printing right away.
- Plug in the USB cable from your printer into your computer’s USB port.
- Turn on the printer.
- Wait for Windows 11 to find it. Usually, Windows automatically detects and installs the printer. You’ll see a notification when it’s ready.
If Windows Doesn’t Find Your Printer Automatically
Why might this happen? Sometimes Windows needs help finding newer or less common printers.
- Click the Start button (Windows icon) and select Settings. Or press Windows key + I to open Settings directly.
- On the left side, click Bluetooth & devices.
- Click Printers & scanners.
- Click the Add device button at the top.
Windows will search for printers. When you see your printer appear, click it and then click Add device.
If your printer still doesn’t appear:
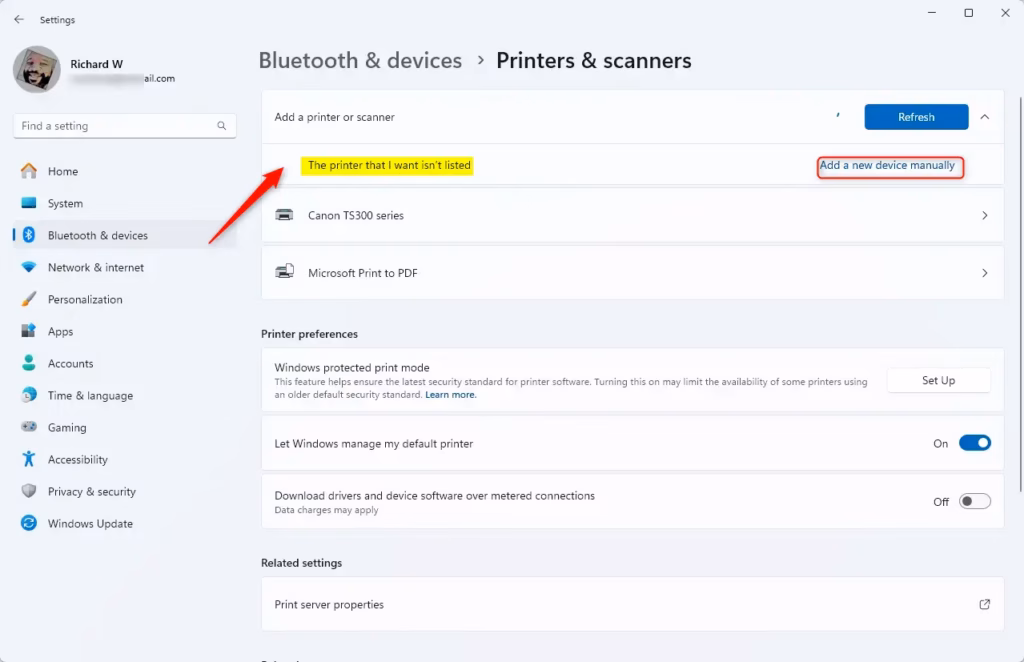
- Click The printer that I want isn’t listed.
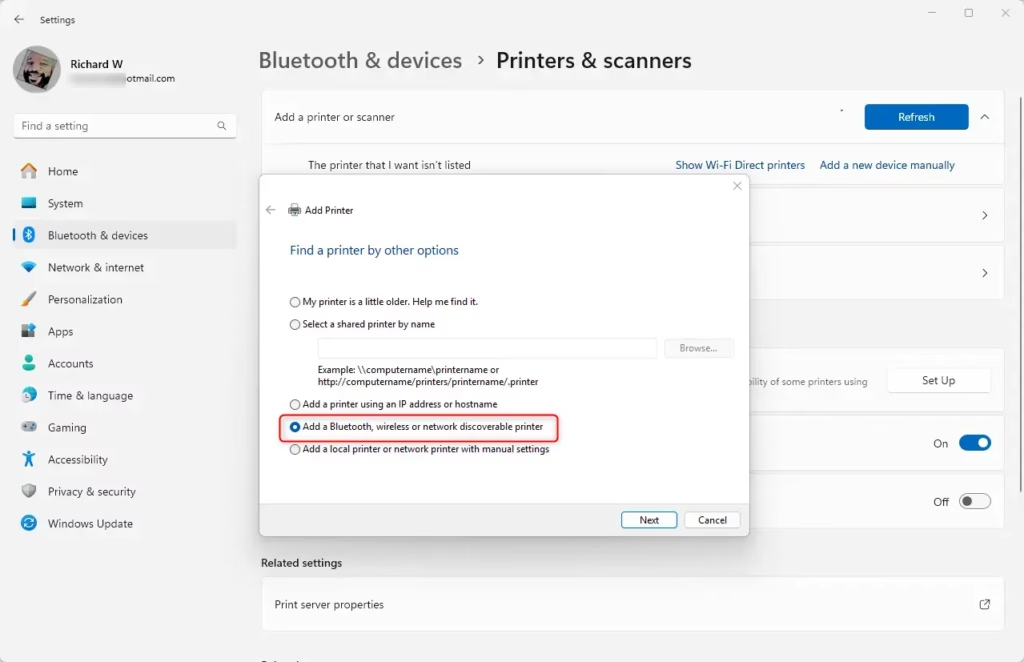
- Select Add a local printer or network printer with manual settings.
- Choose the port your printer uses. Most USB printers use a standard USB port.
- If you have a driver CD or downloaded a driver file, click Have Disk and browse to where the driver is saved.
- Follow the on-screen prompts to complete setup. %📂%ADMIN_FLAG%% Note: You may need administrator privileges to install printer drivers.
How to Add a Wireless Printer
Why do this? A wireless printer connects via Wi-Fi or Bluetooth. No cables needed, and you can print from anywhere in your home or office.
What happens when done? Your printer appears in your settings and you can print wirelessly.
- Open Settings by pressing Windows key + I.
- Click Bluetooth & devices on the left.
- Click Printers & scanners.
- Click Add device.
- Wait for Windows to search your network for wireless printers.
- When you see your printer in the list, click it and then click Add device.
If you don’t see your printer:
- Click The printer I want isn’t listed and follow the manual setup steps above.
- Make sure your printer is turned on and connected to the same Wi-Fi network as your computer.
- Check your printer’s manual or the manufacturer’s website for instructions on connecting to Wi-Fi.
Pro Tip: Your printer and computer must be on the same Wi-Fi network to work together. If you’re having trouble, check your printer’s manual or visit the manufacturer’s website. You can also download the latest drivers there.
Summary
Installing a printer in Windows 11 is simple:
- For USB printers: Plug it in, turn it on, and Windows usually handles the rest automatically.
- For wireless printers: Make sure both your computer and printer are on the same Wi-Fi network, then use Settings to add the device.
- If automatic setup fails: Use the manual setup option in Settings and browse to your printer driver if needed.
- Need help? Check your printer’s manual or the manufacturer’s website for driver downloads and troubleshooting tips.
Your printer is now ready to use. Happy printing!
Was this guide helpful?

About the Author
Richard
Tech Writer, IT Professional
Richard, a writer for Geek Rewind, is a tech enthusiast who loves breaking down complex IT topics into simple, easy-to-understand ideas. With years of hands-on experience in system administration and enterprise IT operations, he’s developed a knack for offering practical tips and solutions. Richard aims to make technology more accessible and actionable. He's deeply committed to the Geek Rewind community, always ready to answer questions and engage in discussions.


No comments yet — be the first to share your thoughts!