This article describes how to locate or view other computers on a network, Windows Workgroup, or domain.
Windows 11 allows you to easily locate devices and other computers on a network within a shared workgroup. A network is a collection of devices connected within the same domain or workgroup, whether at home or in an office, that can share resources such as internet connections, files, folders, or printers.
Windows should be installed on a private network at home or in the office. Use the public network profile in Windows 11 when outside your home or business.
In a Private network, devices on the same Network can see each other and share files and printers. A private network is trusted and should be used at home or work.
In a Public network, devices can not see or communicate with each other, and it should mostly be used on public networks like airports and coffee shops with public Wi-Fi hotspots.
To find devices or computers, they must be connected to the same network switch or router, and file sharing and network discovery should be enabled.
We will guide you on how to do this below.
How to enable a private Network in Windows 11
Windows 11 will evaluate your network profile to decide if you can access other computers on the network or if access should be restricted. If you are at home or in a business setting, you can change your Windows 11 network profile to “Private” for easier sharing and connection with other devices.
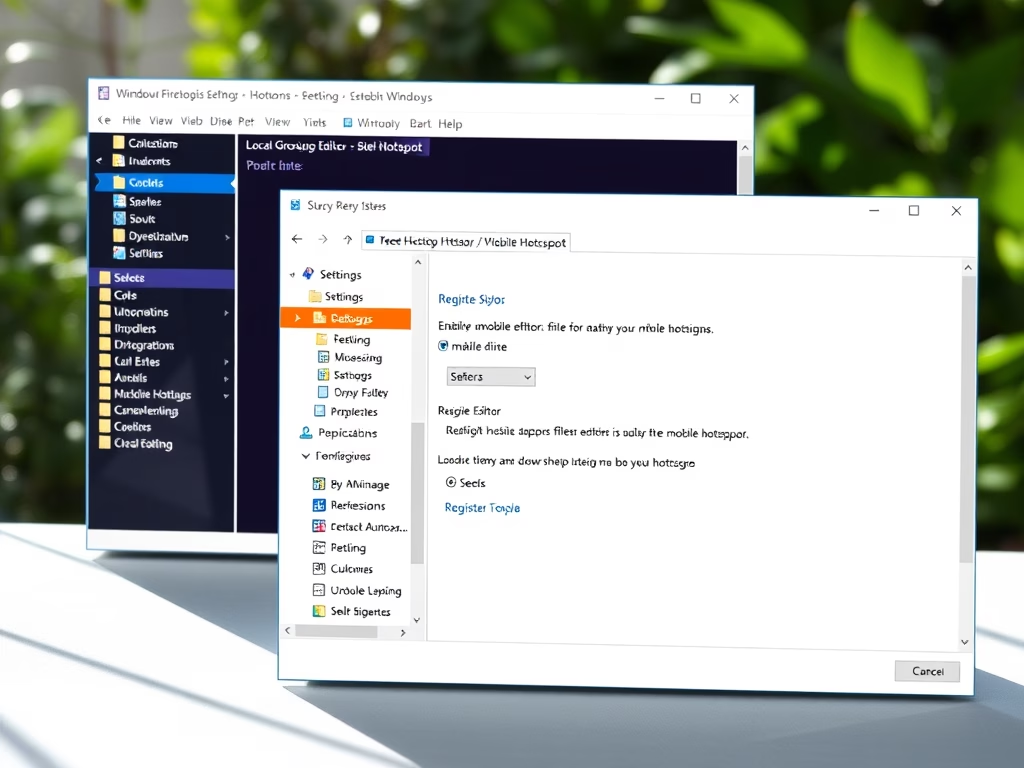
Windows 11 has a centralized location for the majority of its settings. From system configurations to creating new users and updating Windows, all can be done from the System Settings pane.
To get to System Settings, you can use the Windows key + I shortcut or click on Start ==> Settings, as shown in the image below:

Alternatively, you can use the search box on the taskbar and search for Settings. Then select to open it.
In Windows Settings, select Network & Internet, then choose Wi-Fi or Ethernet from the right pane of your screen.
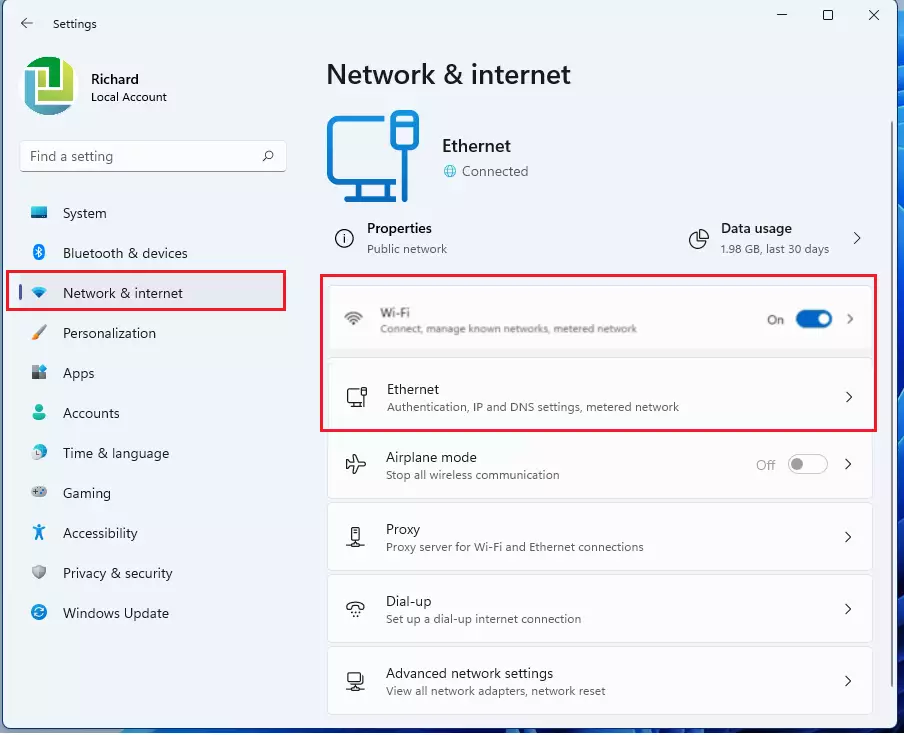
Each adapter can be set to either public or private. Click Wi-Fi or Ethernet (Wired), then select a profile that fits it.
The default is Public (Recommended). As mentioned above, a public profile is suitable for public spaces and not intended for home or work use.
Select a Private profile for your home and business network.
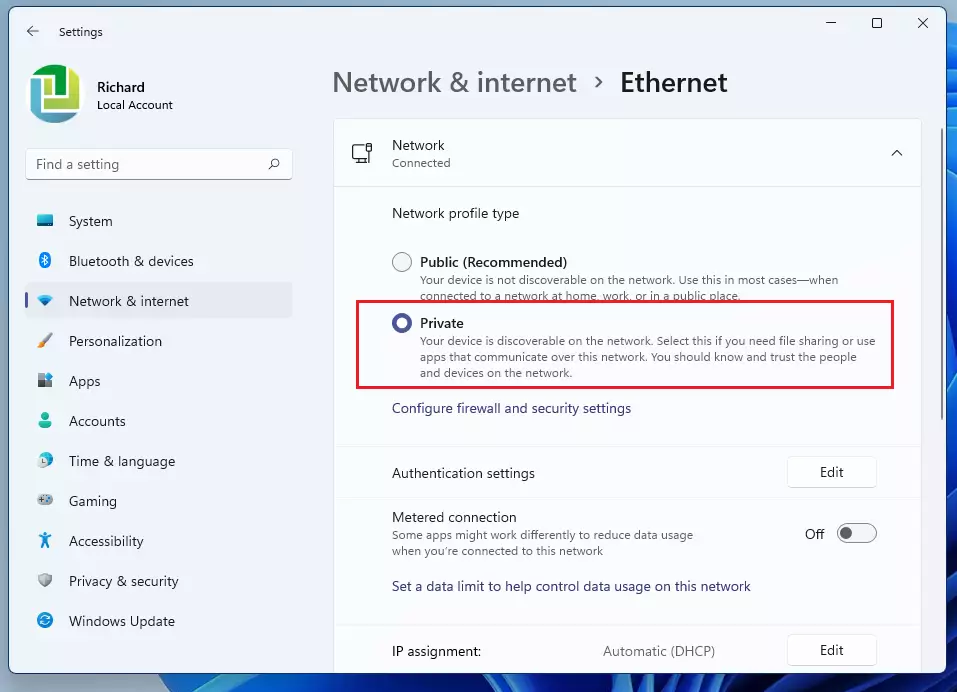
The profile you select for the adapter will automatically go into effect. You’ll sometimes have to reboot for the settings to apply fully.
Do the same for the Wi-Fi connection if you also want to configure that. When you’re done, exit the setting pane.
How to enable file sharing and network discovery in Windows 11
File sharing and network discovery must be enabled to view other computers. You can do that using the steps below.
Windows 11 has a centralized location for the majority of its settings. Everything can be done, from system configurations to creating new users and updating Windows from its System Settings pane.
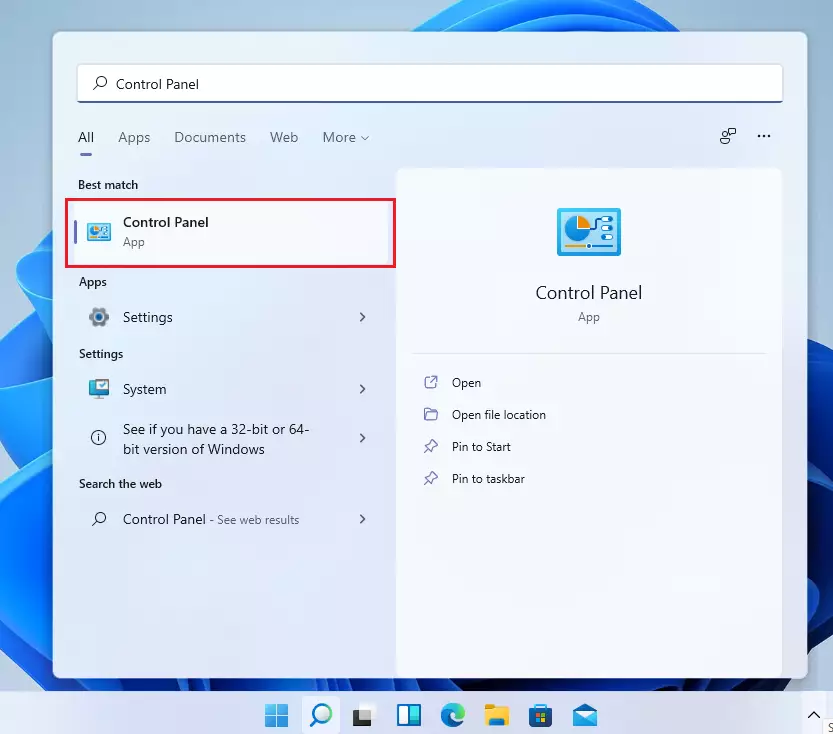
However, changing the account username is still done in the old Control Panel. To get to Control Panel, you can click on Start and start typing Control Panel as shown in the image below:
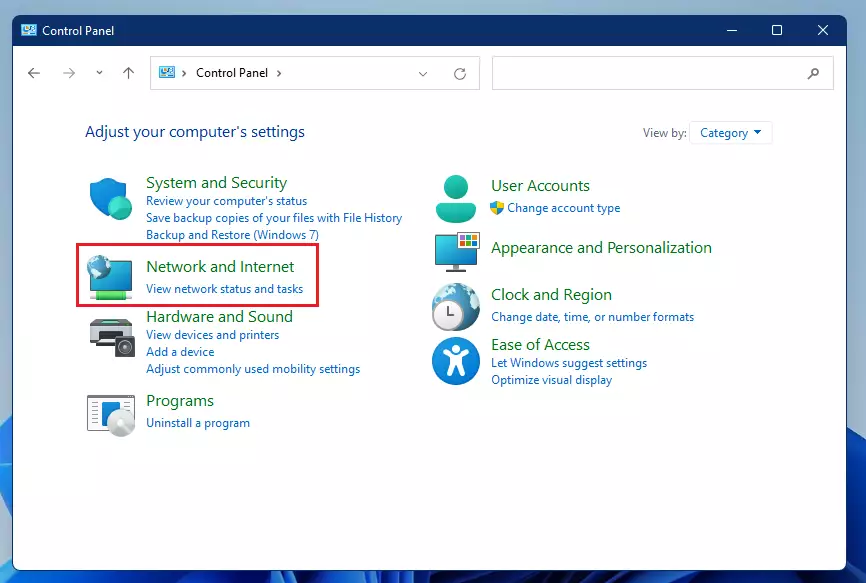
In the Control Panel, select Network and Internet, as highlighted in the image below.
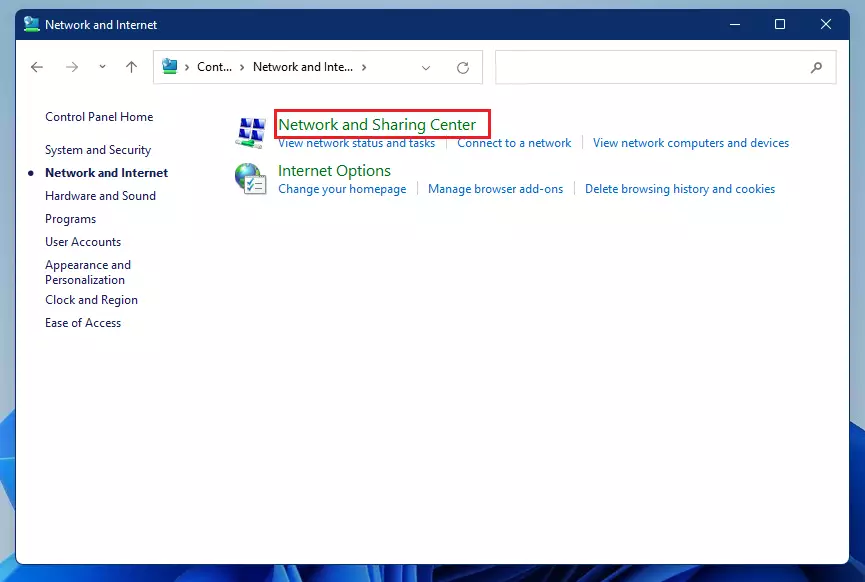
Select Network and Sharing Center on the next page, as highlighted below.
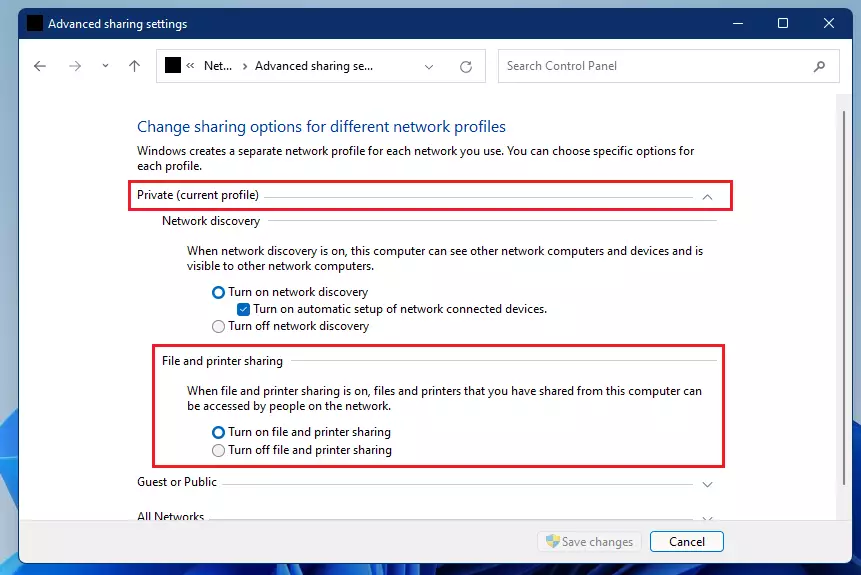
Next, select Change advanced sharing settings as highlighted below.

Select Private (current profile) and Turn on File and printer sharing in the Advanced sharing center.
Save your changes and exit.
On the same Advance sharing options page, scroll down All networks.
You should see settings for Public folder sharing, Media streaming, File sharing connections, and Password-protected sharing. Windows should automatically turn on File and printer sharing in private networks. However, in some instances, this will not be enabled.
If you can not automatically find printers and shared resources in your private Network, then the File sharing option may be disabled.
Only people with accounts on the local computer or in the domain environment can access shared files and printers if you enable password-protected sharing.

Make your changes and save, then exit.
Turn on file sharing and network discovery from the command line
The settings above can easily be done using the commands below as administrator.
netsh advfirewall firewall set rule group="File and Printer Sharing" new enable=Yes
netsh advfirewall firewall set rule group="Network Discovery" new enable=Yes
It would be best to open the command prompt as administrator to run the above commands.
How to view other computers in Windows 11
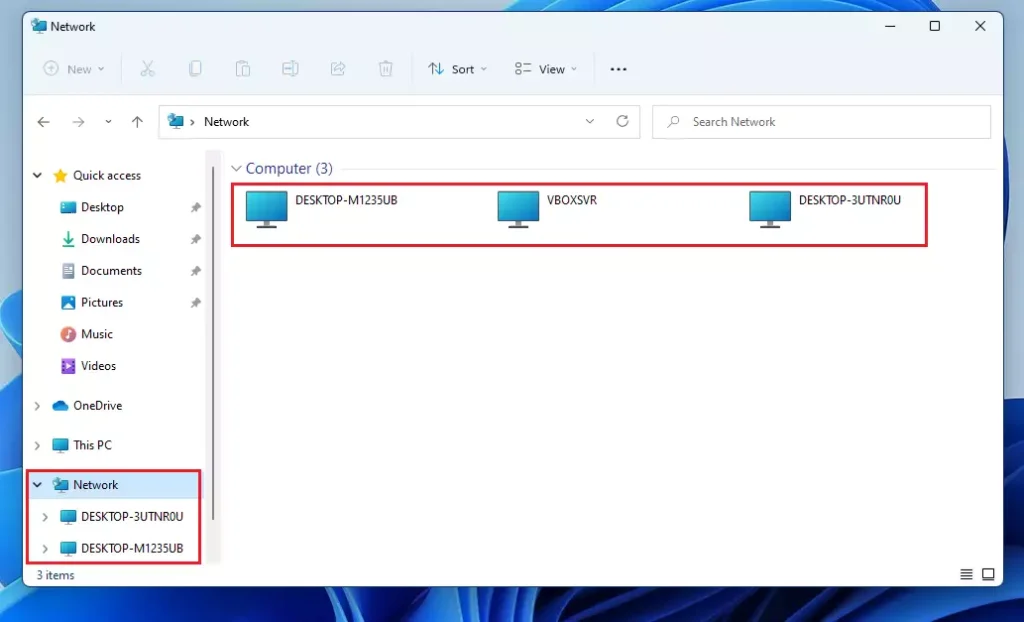
Now that your computer is set up with a Private network profile and File sharing and network discovery are enabled, go to File Explorer and click the Network link on the left menu, highlighted below.
You should then see other computers that are connected to your Network.
That should do it!
Update:
A commenter mentioned below to enable SMB 1.0 / CIFS File Sharing support in the Control Panel, under Programs and Features ==> Turn Windows features on or off.
Below is how to enable additional features in Windows 11.
Turn Windows features On or Off in Windows 11
An additional post with updated information is below.
How to locate other computers on a network in Windows 11
Conclusion:
- Configuring your network settings in Windows 11 allows for easy access to other devices.
- Ensure that your network is set to Private for optimal sharing capabilities.
- Enable File and Printer Sharing as well as Network Discovery to see other computers in your network.
- Utilize the Control Panel and Advanced Sharing Settings for finer control over shared resources.
- If issues persist, consider enabling additional features like SMB 1.0/CIFS File Sharing.
- Always ensure your settings are saved and updated to facilitate seamless device communication.
- For further assistance, refer to related articles on how to locate other computers on your network.

Leave a Reply to Tom Cancel reply